Single Target Leveling Rotation
Always keep your single-target Thunder on the target and only refresh it when it is about to fall off (less than three seconds), unless the target will die soon. This means that while you get a new Thunderhead buff each transition between Astral Fire and Umbral Ice, you will often end up ignoring/overwriting the buff until it is time to refresh the DoT.
Sub Level 35
Fire spam until low MP > Transpose > Blizzard until max MP > Transpose > repeat
Levels 35-59
Fire III and Blizzard III give you maximum stacks of their respective elements and replace the need to use Transpose to swap between Astral Fire and Umbral Ice.
Blizzard III > Blizzard > Fire III > Fire spam until low MP > repeat
Use your Firestarter procs as you get them, but don’t cancel or delay casts to do so. At 58+, replace Blizzard with Blizzard IV.
Umbral Soul should be used during downtime when you do not have a target to get back to full MP, Umbral Ice III, and at level 58+ attain three Umbral Hearts.
Levels 60-71
At level 60, Fire IV becomes the main MP spender in Astral Fire.
Blizzard III > Blizzard IV -> Fire III -> Fire IV x7 > repeat
At 70-79, use Foul whenever. It does not have a set place in the rotation, is not affected by Astral Fire/Umbral Ice, and should be used/not let overcap as it is a strong spell.
Levels 72-89
Blizzard III > Blizzard IV > Fire III > Fire IV x7 > Despair > repeat
Foul should be used similarly as before, replaced by Xenoglossy in single-target at level 80+. Xenoglossy provides additional utility since it is instant-cast and can also be used for movement/weaving as needed, as well as improved single-target damage over Foul.
Level 90-99
Blizzard III > Blizzard IV > Paradox > Fire III > Fire IV x3 > Paradox > Fire IV x3 > Despair > repeat
Paradox automatically replaces Fire and Blizzard on your hotbars when entering Astral Fire from Umbral Ice III with three Umbral hearts, as well as entering Umbral Ice from Astral Fire III which will happen naturally with the rotation. Note that if opening a fight with Blizzard III, the initial listed Paradox in Umbral Ice will not be available.
The exact placement of Paradox in Astral Fire is flexible and can be shifted as needed for movement/weaving considerations.
Your Firestarter proc should be used in Astral Fire, ideally saved through Umbral Ice to be used in Astral Fire I for a stronger reentry into your Astral Fire phase, i.e.:
Blizzard III > Blizzard IV > Paradox > Transpose > Firestarter proc
Level 100
Blizzard III > Blizzard IV > Paradox > Fire III > Fire IV x3 > Paradox > Fire IV x3 >Flare Star > Despair > repeat
Upon execution of all six Fire IV casts in a single Astral Fire phase, the Astral Gauge fills up and allows for the use of Flare Star. Note that if opening a fight with Blizzard III, the initial listed Paradox in Umbral Ice will not be available.
The exact placement of Paradox in Astral Fire is flexible and can be shifted as needed for movement/weaving considerations. Similarly, Flare Star and Despair can be swapped as needed for movement/weaving considerations as well.
Your Firestarter proc should be used in Astral Fire, ideally saved through Umbral Ice to be used in Astral Fire I for a stronger reentry into your Astral Fire phase, i.e.:
Blizzard III > Blizzard IV > Paradox > Transpose > Firestarter proc
See the main guide for further details and recommendations on playing the job at level 100.
AoE Leveling Rotation (3+ targets)
Always keep your AoE Thunder on the target and only refresh it when it is about to fall off (less than three seconds), unless the target will die soon. This means that while you get a new Thunderhead buff each transition between Astral Fire and Umbral Ice, you will often end up ignoring/overwriting the buff until it is time to refresh the DoT.
Levels 12-35
Blizzard II until full MP > Transpose > Fire II x3 > Transpose > repeat
Levels 35-40
Fire II and Blizzard II give you maximum stacks of their respective elements and replace the need to use Transpose to swap between Astral Fire and Umbral Ice. Use Umbral Soul during downtime when you have nothing to hit to get MP back.
Blizzard II x2 > Fire II x4 > repeat
Levels 40-49
(From Umbral Ice) Spam Freeze
If Thunder II needs to be refreshed, use the following to generate a fresh Thunderhead proc:
Transpose -> Fire II x3 > Transpose
Levels 50-57
(From Umbral Ice) Freeze x2 > Transpose > Fire II > Flare > Transpose > repeat
Levels 58-99
At level 58, the Umbral Hearts attained from Freeze allow for casting two Flares in a single Astral Fire phase instead of just one, which further lowers the value of Fire II/Blizzard II (and even High Fire II/High Blizzard II at 82+)
(From Umbral Ice) Freeze > Foul/Thunder II/Freeze > Transpose > Flare x2 > Transpose > repeat
Use one or more of Foul/Thunder II (or its upgraded versions at higher levels)/Freeze as needed in Umbral Ice to wait out the cooldown on Transpose. At 90, the Paradox in Umbral Ice can potentially be used as a filler spell if nothing else is available, but otherwise will generally be ignored for AoE.
Foul is a strong spell for AoE so even outside of just filler considerations it should be utilized for damage, and at 80+ allows for movement/weaving as needed, particularly to weave Transpose.
Level 100
(From Umbral Ice) Freeze > Foul/High Thunder II> Transpose > Flare x2 > Flare Star > Transpose > repeat
Use one or more of Foul/High Thunder II as needed in Umbral Ice to wait out the cooldown on Transpose. The Paradox in Umbral Ice can potentially be used as a filler spell if nothing else is available, but otherwise will generally be ignored for AoE.
Foul is a strong spell for AoE so even outside of just filler considerations it should be utilized for damage, and allows for movement/weaving as needed, particularly to weave Transpose.
See the AoE section of the main guide for further details and recommendations on playing the job at level 100.
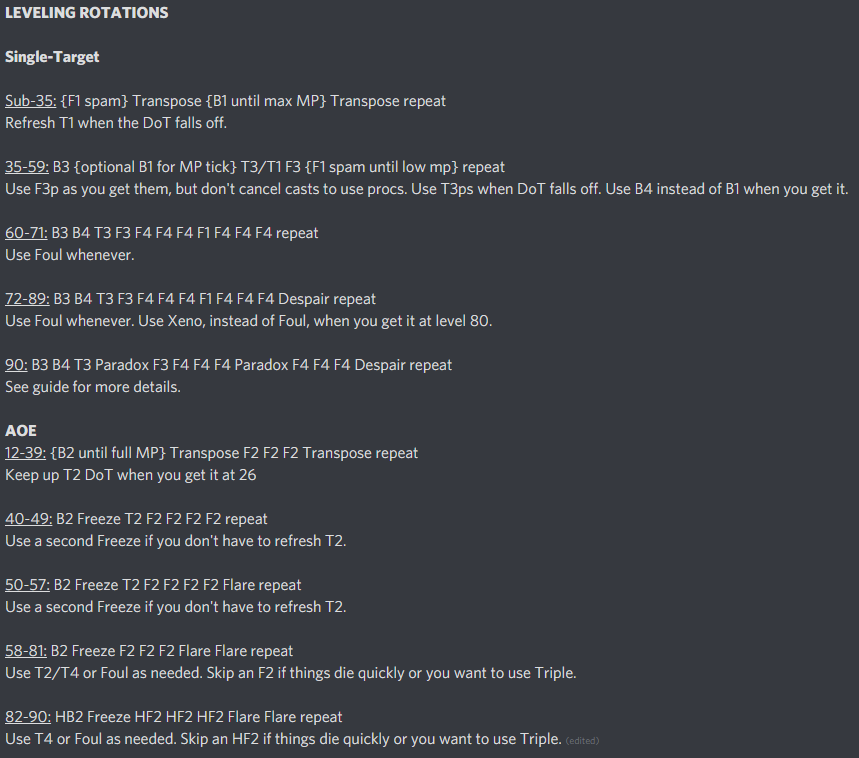
Here also as little cheatsheet if you want to save it:
- Have any questions?

 discord.gg/thebalanceffxivAuthors
 Fürst Blumier
 Fürst#4041
 Rika Vanih
rikavanih
Rika Vanih
rikavanih