Introduction
This guide will cover some Endwalker Red Mage optimization concepts and principles that aren’t fully covered in the basic job guide. The intended audience includes:
- Red Mage players who have the fundamentals mostly down and are familiar with all the concepts in the basic job guide, but are trying to improve.
- High performing Red Mage players who get good logs through good GCD uptime, intuitive sense and repetition but wish to augment their theoretical understanding.
- Players who have experience optimizing other jobs but are trying out Red Mage.
Some of the content here will cover concepts that are obvious to people who have experience playing other jobs at a high level. Other aspects will be unique to Red Mage.
Introduction
Endwalker changes have provided Red Mage more freedom with its rotation and movements. While revamped Manafication, nerfed Displacement and slower Enchanted Reprise have removed some unique and strict forms of optimization from Shadowbringers, we gained more freedom and decision-making complexity instead.
In Endwalker, most of our optimization follows more “standard” FFXIV concepts like managing our resources to burst under raid buffs with GCD-level precision, planning oGCDs, and adjusting our rotation for certain killtimes. However, the complexity of Endwalker Red Mage comes in how all of our abilities can interact and throw things off, e.g. doing something that is comfortable for movement may cause us to misalign our oGCDs, or perfectly aligning our oGCDs may cause us to have a slightly weaker burst window under buffs. The difficulty of “perfecting” Red Mage is lining everything up perfectly without affecting anything else. To do this, you may need to continuously track multiple cooldown timers to the second and be very strict in your gameplay.
Note that very advanced and niche optimizations have a chance of being discovered later through the expansion, so it’s likely that this guide will be updated as more information becomes available and more optimizations are tested and verified.
Casting Uptime
The most basic of all. With how Dualcast works, we will spend just under half of the fight standing still casting spells.
In a perfect uptime scenario with consistent play, you will eventually know if a mechanic comes up mid-cast or during your free movement timing. Situations like early pulling, slightly inconsistent boss mechanic timings (e.g. boss turning shenanigans) or spell speed differences (e.g. 2.48 vs 2.50 in E8S) can often change this.
For optimization, you will want a fight-specific rotation that works for you. Therefore, one of your first steps is to identify where you will need Acceleration, Swiftcast, or delayed melee combos for movement on your BiS spell speed, and to ensure you hold it for that mechanic in future. More notably, you will also have to weigh your Acceleration and Swiftcast usages with your ongoing Fleche and Contre Sixte alignment (as well as other oGCDs, potentially).
Melee combo movement planning
As we are no longer forced to melee combo almost immediately after accumulating enough Mana for fear of overcapping, we can now take much greater advantage of our melee combo for movement in a fight, such as in this example.
We generally aim to fit a double melee combo under each two minute buff window, and with the rate at which we build Black and White Mana, this means we are left with one flexible melee combo between which can be used freely for movement.
Mapping out your melee combo timings on a per-fight basis will allow you to get the most use out of your combo and lower the amount of Swiftcasts and Accelerations you will need to use to keep uptime. The melee part of our combo is 5.2s which is followed by ~7.5s of finishers, leaving us with ~12.7s of movement without cast times. If a movement-heavy mechanic requires you to move out of melee range, such as in the clip above, it is important to time your combo so that your finishers align with any movement required outside of melee range.
There is one situation where your extra combo between two-minute windows is not fully flexible, which is if an Astrologian card is applied to you in between buff windows, during which you should use your combo. This exception is not necessarily guaranteed every minute if an Astrologian is in the party. However, this still will leave Red Mage with far less mobility, placing a greater importance on Swiftcast and Acceleration planning.
Swiftcast and Acceleration
With Acceleration now acting as a second Swiftcast and having two charges, this hypothetically means we have three Swiftcasts to work with in our rotation. While this may seem to leave us with a lot of freedom, actual usage of these abilities is far more nuanced due to the uneven number of finishers in our melee combo and the nature of our passive, Dualcast. As mentioned in the basic guide, the most important use of these abilities aside from movement will be for keeping our oGCDs aligned. When fully optimizing a fight, things can still get deeper than this.
Understanding Swiftcast/Acceleration damage gains in a vacuum
In a vacuum and assuming an ideal situation, a Swiftcasted Verthunder III or Veraero III can be a 50 potency gain if used in place of a Verfire or Verstone, and a 70 potency gain if used in place of a Jolt II. Acceleration is an additional 20 potency gained if taking advantage of the guaranteed proc.
In addition to this, Swiftcast is a 1 Mana gain when replacing a proc and a 2 Mana gain when replacing a Jolt. Acceleration is an additional 1 Mana gain when including the guaranteed proc.
However, please note that whether an odd number of Swiftcast/Acceleration uses is a gain will depend on the GCD the phase or fight ends on. That’s because it takes two uses of these instant cast abilities to fully “replace” a Jolt II/Verfire/Verstone on our timeline. For simplicity’s sake let’s pretend the boss dies in four GCDs vs five GCDs:
4 GCDs
Jolt > Thunder > Jolt > Thunder (No Swift/Accel)
Jolt > Thunder > Thunder > Jolt (one Swift/Accel: no gain, only shifted downwards)
Jolt > Thunder > Thunder > Aero (two Swift/Accel: gain)
5 GCDs
Jolt > Thunder > Jolt > Thunder > Jolt (No Swift/Accel)
Jolt > Thunder > Jolt > Thunder > Thunder (one Swift/Accel, gain)
Jolt > Thunder > Thunder > Aero > Jolt (two Swift/Accel, no additional gain from one use)
As you can see, in a vacuum, maximizing your usage of these skills is a considerable DPS gain. In practice, however, using these abilities for a gain is not as simple.
As covered in the basic guide, using one of these abilities can cause you to drift your Fleche or Contre Sixte, which can result in a lost usage down the line. This will cause a net potency loss as maximizing your Fleche and Contre Sixte uptime is far more important than any direct gains from Swiftcast or Acceleration. Therefore, using Swiftcast and Acceleration on cooldown will not necessarily mean a net potency gain.
Swiftcast/Acceleration usage and flexibility with procs
Using Swiftcast and Acceleration for oGCD alignment is an important concept explained in the basic guide along with the rule of thumb, “one Swiftcast/Acceleration per melee combo.” However, many people misunderstand this rule by thinking that you must use a Swiftcast/Acceleration immediately after your melee combo while disregarding procs.
In reality, you can use Swiftcast and Acceleration for both oGCD alignment and procs. You only need to use an instant cast to shift your Dualcast windows sometime before your next oGCD comes off cooldown, which often does not happen immediately after a melee combo. If you finish a melee combo and your Fleche still has some time left on its cooldown, you do not have to rush your Swiftcast or Acceleration if you already have both procs available.
Some situations will arise where your proc luck leaves you with both procs by the time your next oGCD is available, in which case you should forgo the proc in favor of oGCD alignment. Outside of those situations, Swiftcast and Acceleration should ideally be used both for procs and movement/oGCD alignment. An example of this is shown below:
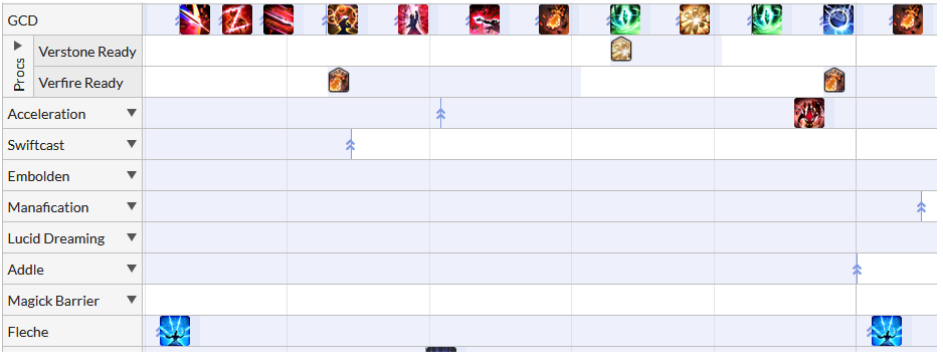
When optimizing a fight and knowing a general timeline, it is possible to benefit from these abilities when used for the sole purpose of getting an instant cast GCD, or fishing for a proc.
Back-to-back Swiftcast and/or Acceleration uses to avoid “overcapping”
Sometimes we may find ourselves with Swiftcast and two Acceleration charges available without needing them for either movement or oGCD alignment. While not a major DPS loss, we can minimize the time spent sitting on those abilities by using a Swiftcast and an Acceleration back-to-back, or weaving one Acceleration followed by a second in the following GCD.
Similar to fixing alignment after a melee combo, these abilities do not have to be used back-to-back as long as you realign your Dualcast windows before the next time your oGCD comes off cooldown. Rather than leaving free potency on the table by sitting on Swiftcast and two charges of Acceleration, using two instant-casted GCDs together can allow us to benefit from these abilities while still avoiding any oGCD drift. An example timeline of this being done can be seen here:
While it may be a potency gain in a vacuum, it is important to consider how this will affect our rotation down the line. Specifically, Swiftcast and Acceleration should not be used back-to-back for the sole purpose of avoiding overcapping if it jeopardizes our oGCD alignment after a future combo, or our ability to maintain uptime for an upcoming mechanic.
It is a bit tricky to determine whether or not it’s safe to use back-to-back instants due to variable combo timings and Mana values at different points in each encounter. But here are some numbers that may help with planning:
- Swiftcast and Acceleration cooldown timers are 60 and 55 seconds, respectively.
- A full melee combo is 12.64 seconds at 2.48 GCD.
- It takes around 47 to 50 seconds to generate 50|50 Mana from 0|0.
So at a minimum, using Swiftcast or Acceleration 37 seconds before our next single melee combo (accounting for a 12+ second combo itself and the fact that we are rarely ever actually at 0|0 Mana) should ensure that they are available for alignment purposes after the combo. If our next combo is part of a double combo, then that creates even more leeway to do this.
Additionally, in niche optimization scenarios with a consistent killtime, it is possible to still gain from using these abilities on their own while causing drift. If drifting your oGCDs by a GCD or two will not cause a lost usage, it is generally not harmful to your rotation to use a Swiftcast or Acceleration. However, intentionally causing drift with Swiftcast and Acceleration should only be done when you are confident in your killtime and total possible oGCD usages.
3. Embolden, Manafication and Potion Timings
With how hard it is to overcap our Mana now, it has become viable to build up Mana so we can put as much potency from our melee combo under buffs as possible.
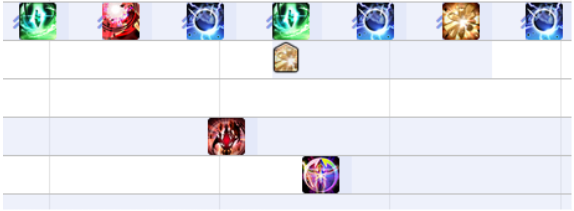
Double melee combos and 20 second buff windows
In theory, the ideal 20 second buff window will at least have this set of GCDs:

In practice, however, it is hard to achieve this for every window without delaying Manafication at least once if buffs are used strictly on cooldown (mainly for the first two-minute window). It is occasionally possible to also catch an additional Enchanted Redoublement at the start, but it is not something that is realistic to align consistently.
If delaying Manafication for the first two-minute Embolden, you start your melee combo five seconds before the first Embolden comes back up, and double weave Manafication and Embolden together. This means your Manafication will catch the three finishers under buff, and the subsequent melee hits.
If using Manafication strictly on cooldown, it is almost impossible to “guarantee” this for the first two-minute buff window at 2.48 GCD, as we do not generate enough Mana to do so without excellent proc luck. We may need to use one more GCD between combos (ideally a Swiftcast or Acceleration Veraero/Verthunder III), which limits us to one Resolution under Embolden there.
Triple melee combos under 30 second pot (and potentially Searing Light)
While triple melee combos are only a minor gain over doubles, it is theoretically still optimal if you can line one up like below for your potion window:

To accomplish this, you can start your first combo ~17-18 seconds before Embolden comes back off cooldown, and use your Tincture before the first Scorch. If you have a Summoner in your party (the only job with a 30 second raid buff), it is ideal to align our potion window with Searing Light if we can at no cost.
Manafication on CD vs aligned with 120s buffs
Part of putting together our optimal rotation for each raid is determining our Manafication timings. This chart shows how times will line up when both abilities are used strictly on cooldown in a full uptime scenario.

The general rule of thumb to start with is:
- If number of possible Manafications > number of possible Emboldens within that killtime, you will want to rush Manafication.
- If number of possible Manafications = number of possible Emboldens within that killtime, you can align them.
While many will think of this as a “rush Manafication vs 120s Manafication” dichotomy, the options are more nuanced when downtime or predictable killtimes are involved. For example, you can align the first two Manafications with buffs, then proceed to use them on cooldown after.
To illustrate this point in a simple way, let’s say we align the first two with Embolden, then use them on cooldown for an 8:00 killtime. The timeline would look like this:

So, you can see here that by partially delaying Manafication (align twice, then use on cooldown after), we can align it perfectly with Embolden twice while still not losing a use before 8:00, accounting also for the ~12.7 seconds a melee combo takes us.
Planning cooldowns on a spreadsheet like this is fairly simple. The basic formula for Excel beginners is to input the number of seconds, then do the previous cell +110 or +120 each time. For the encounter timestamp (e.g. 02:05), apply the seconds to time conversion formula (=cell/86400) and format that column as custom: mm:ss. Then compare it to a mechanics timeline. There are undoubtedly more sophisticated timelines or possible tools for cooldown mapping, but this is something anyone can do in less than five minutes.
*De-syncing Manafication, normal combos and buff alignment
A common misconception among newer players is that misaligning Manafication with Embolden means we do not use melee combo under buffs. This is not the case. We can simply build up Mana above 50|50 and spend it when buffs come, as long as we don’t overcap by going beyond 100|100. The 5% self-buff from Manafication is decent, but only amounts to ~150 potency when applied to all six melee combo hits.
In practice, outside of our buff windows, we accomplish this by using Manafication after Enchanted Redoublement, using our three finishers, then going back to Dualcast after. What this does is keep our Manafication cooldown running early, while “carrying over” our Mana prior to using Manafication.
This allows us to continuously build up enough Mana to do two normal melee combos under buffs later, as shown below. Note the Manafication timing and “Gauges” tab showing Mana values at the top, and how much Mana there is for a double combo later:

This also means Manafication will buff three normal spellcasting GCDs after the finishers. In terms of potency, three finishers + three normal casts is marginally higher than our melee hits (~1-8 potency difference for single target spells, depending which ones casted). However, three spells also take longer to use than our melee hits. Due to Manafication’s 15 second buff timer, you should either late weave Manafication here, or have your third spell be an instant cast to avoid the 5% damage buff from dropping off on our last cast.
Standard 0-6 potions vs two-minute potions
In most scenarios, our standard potion windows are the opener and the six-minute buff window. When using Manafication on cooldown, we can use Manafication after three melee hits at around 5:45, do the three finishers, then go back to Dualcasting to carry over the Mana to 6:00, where we then do two normal melee combos under pots and buffs (as covered above).
However, due to our more flexible Mana resource pool, it can be optimal to do a two-minute potion instead of using one in the opener, because we will be able to put at least two melee combos under buffs and pots each time. This is only preferred within certain killtime ranges:
- In longer fights where you can benefit from three potions (e.g. ~9:15 killtime or longer), triple potion will be better than only two.
- We also want to be sure that our second potion aligns with raid buffs.
- For a full uptime fight with no buff holds, you would want a killtime range between 8:30 and around 9:30, with a pot at around 2:00 and 8:00.
Note, however, that mechanics can make our second pot align with buffs earlier. For the first tier in Endwalker, this conveniently applies to three separate raids: Zodiark EX, P2S, and P3S. Each of these raids create a forced delay for our four-minute buffs due to “downtime” mechanics: Astral Eclipse, Kampeos Harma (colloquially “Limit Cut”), and the entire P3S adds phase respectively.
As such, we can use a potion at 2:00 and 6:30 and it will align with party burst and raid buffs.

In other scenarios with shorter killtimes, we would default to doing our first potion in the opener, and the second one during the first available buff window after pots come off cooldown (this is often – but not always – the six minute buff window).
Damage oGCD Optimization
Fleche and Contre Sixte uses per phase
Boss jumps and phasing add an additional layer of optimization to the job in many respects, but one that requires special attention is the number of Fleche and Contre Sixte uses we can get throughout an encounter. Melee combos, Acceleration and Swiftcast shift our Dualcast alignment around, so we at times have to be very strict in our planning to ensure we get the maximum number of uses. It is even possible that we have to change our opener.
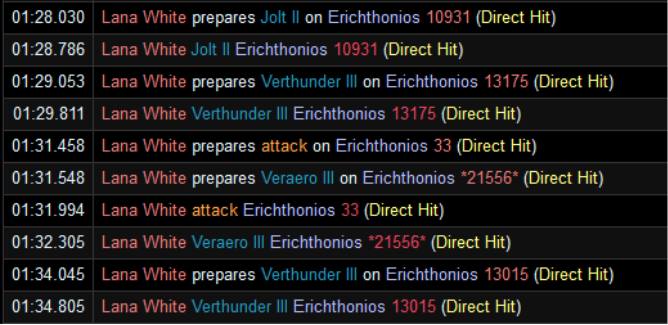
One prime example of this is The Minstrel’s Ballad: Hydaelyn’s Call. The first phase of this raid lasts for two minutes and ten seconds. In the Endwalker general purpose opener, Fleche is used just before ten seconds. When mapping out recast timers, however:

The sixth use at 02:15 is when the boss is no longer targetable, which means a lost use (given the length of the phase transition). This means that if we are optimizing, we need to use our Fleche earlier in the opener at no later than four seconds. With low ping, one way to do this is clip a potion with Fleche, like so:

As you can see on the timeline, the final Fleche is used just in time before the boss is untargetable, with the next use during adds phase at 2:35.

Note that this can also occur with Contre Sixte, as was the case in Shadowbringers, where we had a custom opener for Eden’s Promise: Anamorphosis (Savage) that allowed for an extra Contre Sixte use as the last oGCD weave in the phase. To count the number of Fleche or Contre Sixte uses you get per phase, you can start with the timestamp for the first use in the opener, and just spreadsheet which times it will come up later. The formula for how to do this on Excel is written in the Manafication section.
Contre Sixte and AOE: As a basic reminder, Contre Sixte doesn’t have any damage drop-off in AoE situations, so it’s worth it to hold it for multiple targets if it will not cost you a use (e.g. UWU opener). In a fight such as TEA, the decision of holding Contre Sixte for when Liquid Hand spawns will depend on whether your killtime costs you a use.
Corps-a-Corps and Engagement into buffs
Corps-a-corps (130 potency) and Engagement (180 potency) have two charges, and so can be a gain for the party if we delay some uses to occur under buffs. However, due to the 35 second timer, it isn’t always possible to put two uses under buffs every two minutes without substantially overcapping on charges. In a full uptime scenario, the recast timers align as follows:
- Two minutes: One use of each under buffs only, otherwise you have to overcap for about ten seconds and it affects subsequent timings.
- Four minutes: Two uses of each under buffs will line up naturally if held.
- Six minutes: One use of each under buffs lines up, but two is possible if you overcap for about 10 seconds. Depending on killtime and pot timing, this could be optimal.
- Eight minutes: Two uses of each will line up naturally under 20 second buffs, but the second use is likely to fall out of 15 second buffs.
- Ten minutes: You will likely overcap around the same time buffs come up (forcing a GCD or two of delay if you want to put two under buffs).
Downtime complicates this further. As a general rule of thumb, if you notice Corps-a-corps and Engagement go from 0 to 1 charge when there’s less than 30 seconds left on Embolden, that means you will be able to guarantee two uses under buffs.


Since Embolden doesn’t buff our own oGCDs, be aware that there is no gain to doing this in the rare situation that nobody else has raid buffs, i.e. you’re in a party where the healers are White Mage/Sage and the other DPS are Black Mage/Samurai/Machinist.
Niche and Highly Situational Optimizations
There are various niche micro-optimizations you can do depending on the situation, which may be updated as more experimentation has taken place. There are no general rules here.
Capitalizing on recast timers to gain an additional GCD or combo
While we lost the ability to abuse Enchanted Reprise’s 2.2 second recast timer to gain an extra GCD by the end of a phase, there is potential to apply similar logic to new aspects of Red Mage’s rotation, partially due to the way our new melee combo stacks work.
Spellspeed adjustments
When working with very predictable killtimes, it could theoretically be optimal to equip a small amount of additional spellspeed to ensure we end the encounter on a melee combo. This is more viable in Endwalker than it was in past expansions due to our larger Mana pool and reduced risk of overcapping. Small amounts of spell speed can also help us gain a GCD in fights with phasing, as was the case when choosing between 2.48, 2.49 and 2.50 GCDs in the Eden’s Promise raid tier of Shadowbringers.
Triple Enchanted Zwerchhau
If at above 45|45 Mana but below 50|50 in the final seconds of an encounter, it is theoretically possible to triple Zwerchhau to get our finishers ready earlier. This is only a gain if the final GCD from doing this is Resolution:

Enchanted Riposte into Double Enchanted Zwerchhau
Due to Enchanted Zwerchhau’s shorter cooldown timer versus Enchanted Redoublement (1.5 vs 2.2 seconds), it is also theoretically possible to capitalize on the recast time difference (0.7 seconds) to gain an extra GCD at the end of a phase. People who optimized Enchanted Reprise in Shadowbringers may be familiar with this concept. However, the gain is very minor.

If the GCD gained from doing so is a melee combo finisher, this would be more significant, but is difficult to plan for.
Enchanted Reprise
In Endwalker, Red Mage wants to avoid using Enchanted Reprise more than before due to its higher relative Mana cost – which can set a future normal melee combo back by around three casts – and 2.5 second recast timer. However, since it is considered a ranged weaponskill, it does not break any of our combos. As such, Enchanted Reprise can theoretically find use in niche situations where you want to use Manafication early, but also want to push a combo finisher under buffs. In the example below, observe how Enchanted Reprise after Scorch pushes Resolution into 22% more buffs than was previously available:
- The value from putting Resolution into those buffs is an additional 165 potency. Verthunder/aero III would have been ~83 potency.
- The gap between Enchanted Reprise and Verthunder/aero III is 50 potency.
- In this simplified comparison, 50 + 83 = 133, which is still lower than 165.

In practice, this is further complicated by variables like Mana cost, order of subsequent GCDs, and the number of 15 second vs 20 second raid buffs available. A better solution would usually exist via good Swiftcast/Acceleration planning. However, getting an additional Resolution under raid buffs is almost always better, so this technique can be something to keep in mind for niche or imperfect scenarios.
Checklist: Putting Your Fight-Specific Rotation Together
As a part of the review process for your fight-specific rotation, you can ask yourselves these questions:
“Big picture” timeline planning:
- Do I have a reasonable estimate of a raid’s killtime and buff timings for my group?
- Am I rushing Manafication, aligning it with buffs, or a mixture of both (i.e. align early uses and rush later uses)?
- What are the ideal potion timings for the killtime I am going for?
- For any encounter with phasing, am I losing a use of Fleche or Contre Sixte? Do I need to change anything to guarantee I don’t lose a use?
Execution planning/things to note:
- Where in the fight do I need to pool Mana for melee combos or hold Swiftcast and Acceleration to keep full uptime?
- Am I able to align any double or triple melee combos with buffs and potions without overcapping or drifting oGCDs?
- Am I able to keep my Dualcast aligned with my oGCDs (primarily Fleche and Contre Sixte) throughout most of the fight, if not all of it?
- How many Corps-a-corps and Engagements can I put under raid buffs without overcapping?
- Am I “overcapping” on Swiftcast or Acceleration uses for long periods of time? Can I afford to use them back to back for damage at any point without hurting alignment or movement?
Once you can address the above and reasonably replicate a clean rotation in raids, you can start considering niche optimizations or looking at minor things like adjusting for procs.
Red Mage Damage Delay Chart
Below is a chart showing the delay between when an action is used and when the damage is actually applied to a boss. This is helpful to note because some abilities, like Scorch, are more likely to ghost when a boss becomes untargetable. However, for the purposes of snapshotting an action under buffs, the delay doesn’t matter as the damage calculation is already done when you press the button (for instant casts) or near the end of your castbar (for hardcasted spells). Please note that due to the slight variance in damage application, these numbers have been rounded up to the second decimal.
| Action | Delay |
|---|---|
| Jolt II | 0.76 |
| Veraero III | 0.76 |
| Verthunder III | 0.76 |
| Verstone | 0.80 |
| Verfire | 0.80 |
| Enchanted Riposte | 0.63 |
| Enchanted Zwerchhau | 0.63 |
| Enchanted Redoublement | 0.63 |
| Verholy | 1.43 |
| Verflare | 1.43 |
| Scorch | 1.83 |
| Resolution | 1.56 |
| Enchanted Reprise | 0.63 |
| Veraero II | 0.80 |
| Verthunder II | 0.80 |
| Impact | 0.76 |
| Enchanted Moulinet | 0.80 |
| Fleche | 1.16 |
| Contre Sixte | 1.16 |
| Corps-a-corps | 0.63 |
| Engagement | 0.58 |
| Displacement | 0.76 |