Introduction
In this raid, only three phases in particular have what most would consider to be tight DPS checks (Nidhogg, Eyes, Dragon King Thordan), and one with a moderate one (Double Dragons). The Double Dragons phase DPS check is low in terms of boss HP relative to enrage timer, but in practice can feel high for people who struggle to keep uptime amid its mechanics.
Other phases, however, are much more lenient with minimal uptime considerations. So, with RDM being a gauge builder/spender job, we spend much of our time building mana on lenient phases to do more burst damage in the ones with DPS checks that matter.
The phases are commonly referred to by their number and will occasionally be referenced again as such later in the document for brevity (with the exception of eyes and rewind phases), so for clarification purposes, please refer to the below:
- Vault: P1/Door
- Thordan I: P2
- Nidhogg/Nidstinien: P3
- Eyes: P4
- Intermission: Rewind
- Thordan II: P5
- Double Dragons: P6
- Dragon King Thordan: P7
Addle and Magick Barrier Usage
Please be sure to read Meru’s Addle and Magick Barrier Guide: https://bit.ly/3AHEMxZ for tips and disclaimers on your various mitigation options.
Manafication Timings
Unfortunately, because of the changes to Manafication in Dawntrail changing the granted combo to a limited-duration buff, rushing Manafication is no longer possible in this fight, because it needs to be delayed too long in Sanctity in order to avoid losing the free combo entirely. Therefore, you should align Manafication with your burst windows.
Potion Timings
The most common and useful potion windows in this fight are as follows:
- Openers (Door and P2). The additional damage is usually not needed given the very lenient DPS check, but it can be worthwhile to use a potion anyway given that it’s a free use and creates more leeway for deaths or mistakes.
- P3 raid buff window, during and after enumeration towers.
- P6 opener.
- P7 during either Gigaflare 1 or Akh Morn 3, or after Exaflare 1 and Gigaflare 2 (depending on which buff timing your party chooses.
Alternative potion timings can exist for more niche optimization (e.g. Eyes or later in P2), but are considered less common and their benefits to the party are more situational. The potion timings above are more suited to progression.
Embolden Timings
As always, Embolden should be used to achieve the best possible gains for your group, and be aligned with other raid buffs. In general, most parties opt for the following:
- Door: Opener, once Charibert is targetable.
- P2: Opener, after Sanctity.
- P3: During or after enumeration towers.
- Eyes: None.
- Rewind: Once Charibert is targetable.
- P5: Between Wrath of the Heavens and Death of the Heavens.
- P6: Opener, and either during Wyrm’s Breath 2 or after Touchdown.
- P7: During or after Gigaflare 1, during Akh Morn 3 / After first exaflare and after Gigaflare 2 (hold one minute burst for 20 seconds, only possible if two-minute buffs are used during Wyrm’s Breath 2).
AoE for Mana Generation and Holding DPS
During various phases, you may need to “hold DPS” to give more time for defensive cooldowns to come back up. One good example of this is P2; if you use Addle on Ultimate End, but then end up killing the boss during broad swings, your Addle will not be back up in time to mitigate the second stack during towers in P3.
When you need to artificially slow down how fast you kill a boss, the suggested approach would be to cast Veraero/Verthunder II, as these spells do noticeably less damage in single target scenarios but generate the most mana out of our regular GCDs (7 of white/black).
Phase One: Vault (Door Boss)
The DPS check in this phase is very lenient, and movement isn’t particularly difficult compared to Savage. As such, the main adjustments in this phase are around getting the most value out of two target spells or abilities.
Suggested Opener
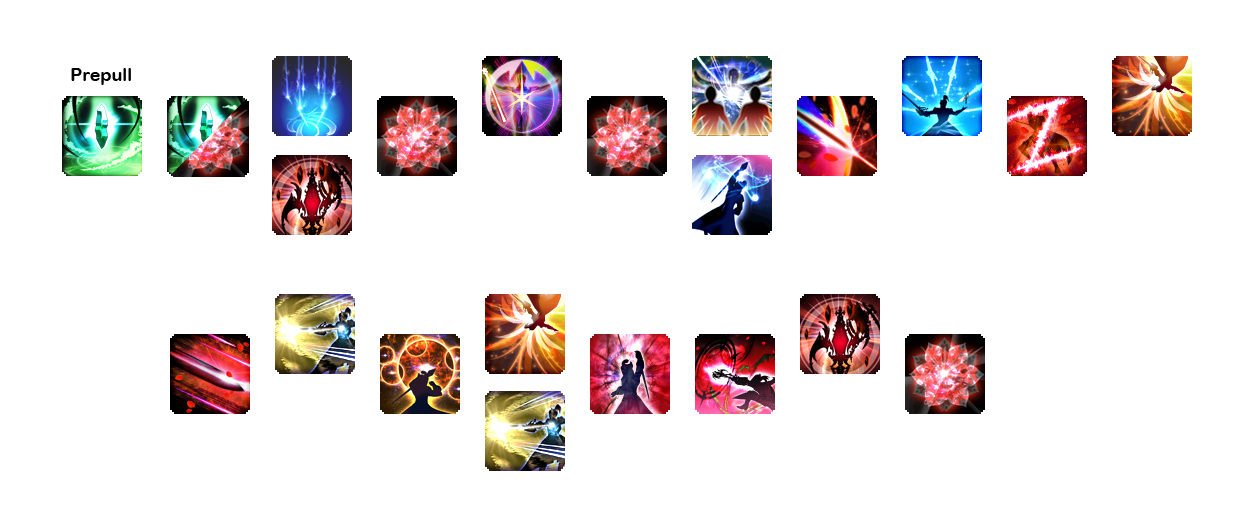
Opener notes:
- Your second GCD can actually be Impact instead of Veraero in this picture, but depending on your tanks, it might only hit one target (which is a loss).
- There are two Acceleration-boosted Impacts that will hit both targets, with the one after Resolution still falling under 15-second raid buffs if available.
- This alignment allows two uses of Contre Sixte on two targets before Adelphel disappears. But the second use is strict and has a risk of ghosting if weaved too late.
- The first Fleche is delayed for raid buffs, but this is optional. Using it before raid buffs (e.g. double weaved with Swiftcast if not using potion) would be better if you gain a use.
- If you want to use your potion in the opener, one ideal timing would be to weave it with the Swiftcast. The other alternative is to use a potion for a double melee combo after the playstation mechanic. Although there are no raid buffs, two sets of finishers cleaving both bosses can make up for it.
Two Target Phases
Jolt II/Verstone/Verfire into Impact is optimal on two targets at level 90, and so should be used as our main filler spell combo whenever the bosses are pulled together.
Since our melee combo finishers cleave, you should at minimum, save your second melee combo for when Adelphel returns from the dashes and jumps onto the tank. At this point you should be around 70|70 to 80|80 mana. Other combos in this phase can be used when you are 50|50 or above.
Second Manafication
Your second Manafication may come up before the Charibert phase begins, depending on your group DPS. In this scenario, you should generally use Manafication and use a melee combo on the two bosses, as killing these two bosses as soon as possible is more valuable than doing extra damage to Charibert. One exception to this is if the damage is not needed there and would be more useful on Charibert due to deaths or damage downs.
Phase Two: Thordan
Much like the door boss, the DPS check in this phase is also very lenient. This is a “trios” phase where all the difficult mechanics occur when the boss is untargetable, but when the boss is targetable, not much is going on at all. As such, most optimization around this phase revolves around oGCD usage and phase timings.
The standard play here is to do three melee combos during the phase: the opener, one flexible combo before or after Sanctity, and a final combo during raid buffs. From this point onward, you should build mana and aim to enter P3 with somewhere between 70|70 to 80|80 mana. If killing the boss too fast, consider asking your party members to hold damage (especially jobs that don’t need to build gauge) and use AOE abilities.
Suggested Opener
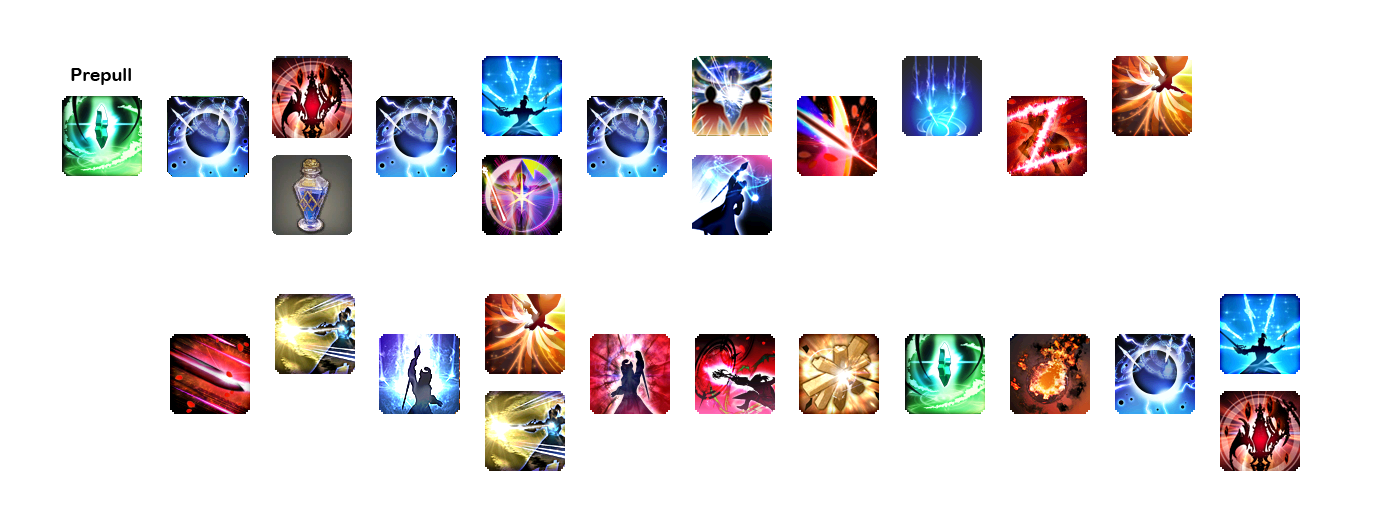
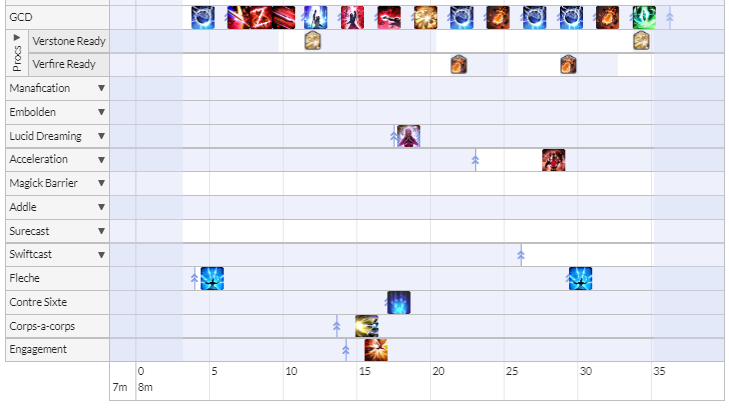
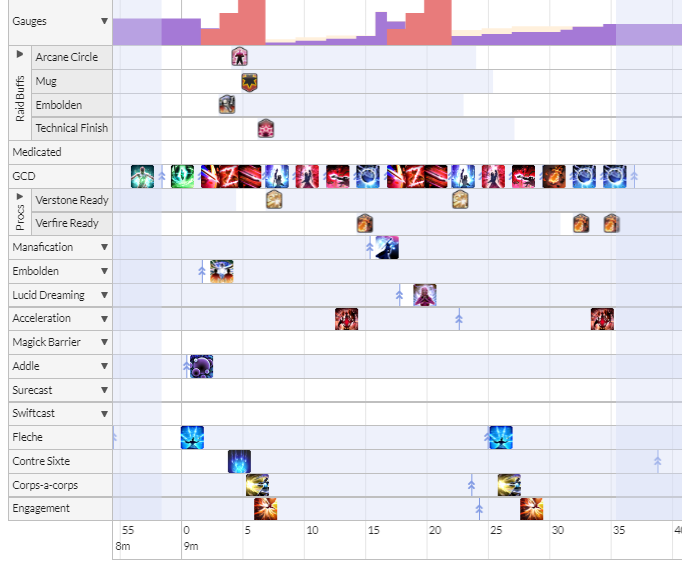
The standard opener is similar to our general purpose one, but due to the short phase, using the potion early is advised to catch the early Fleche, and also benefit from the full 30 seconds of the potion buff.
Strength into Sanctity
There is a short phase of uptime between the first two trio mechanics of this fight. You should be able to simply Dualcast through this whole phase and place a double melee combo into buffs later, but if your damage is high and you want to hold for a later killtime, you may decide to spend a combo here instead, or even hold your finishers from the second combo into P3.
If auto boss targeting settings are enabled, you can clip your first and last Contre Sixte of this phase (i.e. use it at the start before your first Dualcasted GCD) to squeeze out an additional use, then still get a final GCD off.
Example of Contre Sixte clipping with no combo:
However, this has a risk of ghosting the final GCD, even if the damage numbers appear. Veraero/thunder III are also higher potency than Contre Sixte. Only consider doing this if you want the extra leeway in damage and can execute it consistently. It is slightly easier on a 2.47 GCD, which involves using Crit/SpS food instead of Det/Crit.
Verraise during Strength and Sanctity
During both trio mechanics, it is possible to save seemingly unsalvageable runs by being aware of the positions of yourself and your other party members when you Verraise a fallen party member. Note that party members will revive at the location you cast Verraise on them. The simplest solution is to hold Swiftcast for this, but you can Vercure yourself during downtime if needed to prepare a Dualcast (i.e. while taking a lightning hit during Strength, and before dodging dashes during Sanctity).
This means that in Strength of the Ward, if you do not have a Defamation marker, you can revive your ally onto the middle tower (slightly closer to the party), and their resurrected, but damage-immune body will share the three person stack. Even if they are immobile, they will still soak the middle tower.
In Sanctity of the Ward, you can either resurrect your party member to the middle as soon as possible, allowing them time to quickly join their ice stack, or you can revive them onto an ice stack location. For example, if you are east and your fallen ally is west, you can revive them onto your ice stack position east and go west yourself (or call a swap with the west tank/healer if resurrecting a non-DPS).
These techniques can be situational and ruined by having a Defamation marker in Strength, and can be more situational to pull off if assigned to north/south due to meteor prey markers. Nonetheless, every minute saved will add up over time, making it a worthwhile habit to consider.
Reopener during Ultimate End
The reopener here is very flexible, and will depend on your overall fight plan.
Some players may wish to put more burst damage into Thordan when he has the Discomposed debuff (increase damage taken). If you wish to take advantage of this, you will want to start your melee combo five GCD spells after the boss becomes targetable. This will align your three finishers with the Discomposed debuff.
Otherwise, you can prepare a Dualcast with Vercure, and even an Acceleration before the boss is targetable while soaking your outer tower in Sanctity. You can then use back-to-back instant cast Veraero/thunder III before entering a melee combo, or simply go straight into melee combo after one cast. This allows you to weave more oGCD abilities earlier as required depending on your Addle plan and agreed party raid buff timing.
Broad Swings
Broad swings can generally be dodged with slidecasting, and one use of Acceleration and Swiftcast. The alignment with Dualcast will depend on how you reopen on Thordan. Position yourself behind Thordan inside the hitbox to reduce the distance you need to move for dodging.
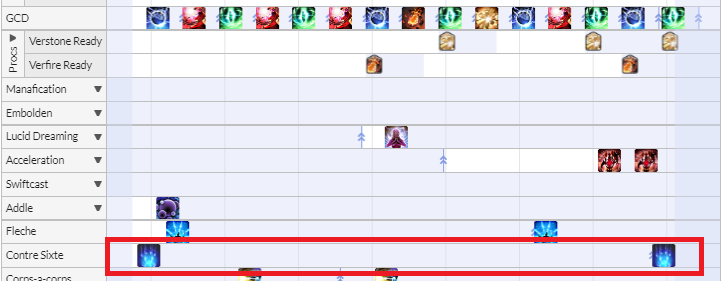
Preparing for Nidhogg phase: Mana Levels and Carrying oGCDs
Generally you wish to enter P3 with 70|70 to 80|80 mana. It is possible to enter Nidhogg at 100|100 by only doing two melee combos this phase or using excessive AOE spells, but there isn’t much benefit to doing so outside of very niche and specific circumstances.
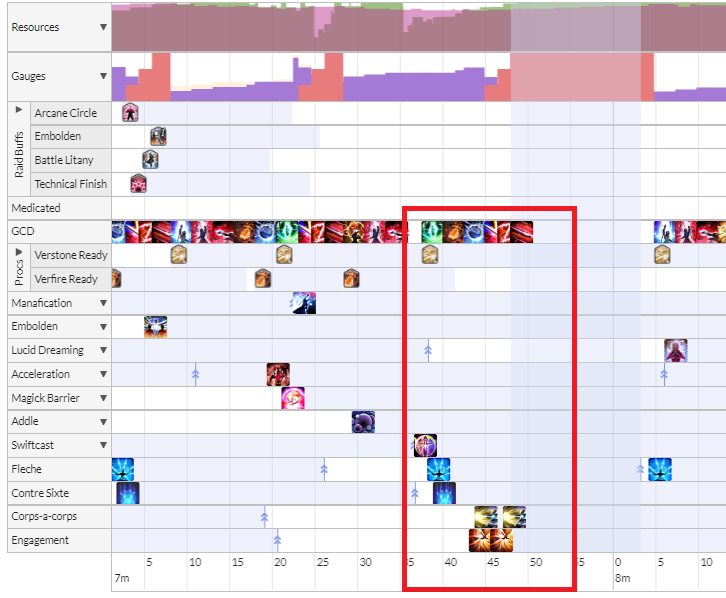
However, you can freely hold your** second uses of Contre Sixte, Engagement and Corps-a-corps **after Ultimate End, like in the image below. This can also lead to a fourth use of Contre Sixte in P3. Holding these oGCDs leads to a combined 670 potency of free oGCD damage for P3 (the phase with the tighter DPS check) that would likely not have been available:
Phase Three: Nidhogg/“Nidstinien”
This phase has the first “challenging” DPS check in the raid. It is a full uptime phase. In general, it is recommended to enter this phase with between 70|70 to 80|80 mana from P2, and to do four melee combos throughout the phase. Doing three or five are possible, but are generally for uncommon niche scenarios with limited benefit, and can adversely impact other phases.
Uptime for Towers
You can use your first melee combo for movement for the first set of towers.
Unless you are adjusting for the enumeration towers, the best use of sprint in this phase is if you are marked one south (thus soaking the third south tower), and you get an “out first” Gnash and Lash pattern.
If two towers are dropped too far into the boss, there is also a risk of getting clipped by Geirskogul if you loop fully around the outside. You can avoid this by taking the stack damage slightly inside the boss hitbox, then sprinting diagonally through the boss before curving around to the south tower.
If you have the “look away” tower (either Elusive Jump or Spineshatter Dive, depending on the strat you’re doing), do not try to greed the GCD. Instead, if you find yourself needing to use a hardcast just before the tower resolves, consider Vercuring yourself while facing out. That way, once your jump resolves, you can go straight into an instant-cast and move immediately.
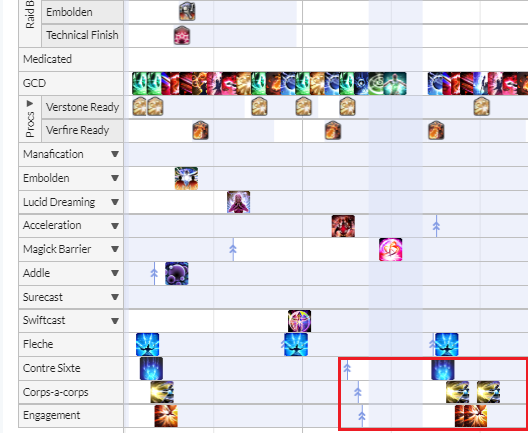
Potion Window
During and after Enumeration towers, we can do a standard triple melee combo for our two-minute window with Manafic. You should start your first combo any time during the Drachenlance cast before the Enumeration towers appear. This will allow you to use your melee combo finishers to bait the clone and move out, or even move to another tower if needed (if you are one of the adjusting players).
Example Potion Window

For this approach, you would aim for a clean triple melee combo. Note that it may not always be possible for the triple combo to be perfectly aligned with raid buffs, as buff timings can vary based on the group or even P2 killtime. What’s important is getting three sets of finishers under potion, and at least a partial double combo under raid buffs.
Other Notes on this Burst Window
Double Fleche
It is possible to put two Fleche under these potion windows. However, Acceleration/Swiftcast use for movement can change depending on the tower numbers and in/out patterns you get, which can make oGCD alignment inconsistent. The DPS gain is also marginal since at least one of those Fleche would fall outside of raid buffs, so it’s better not to stress over trying to do so.
Engagement and Corps-a-corps
While these oGCDs are not buffed by Embolden, consider holding a charge here to put under the potion window and party member raid buffs if possible.
Recovery
While it is possible to save a run by Verraising someone into their enumeration tower if they die to the first Drachenlance or tank autos, the timing for doing so is much tighter than P2 trios.
RDM should proactively revive party members over healers for almost all of the fight. With that said, the raid buff and potion window here (after enumeration towers) is one of the least convenient times for RDM to raise due to how many melee combos occur with raid buffs and potions being up. It is also one of the easier phases for healers to recover, given that there is minimal movement and raid damage here. Given the tight DPS check, you can give your healers a heads up to cover the first revive if someone dies to the tankbuster tethers.
Saving Movement Abilities for Eyes
After the potion window is complete, try to save at least one charge of Acceleration and Swiftcast for Eyes phase, as they may be needed for cleaner movement during Mirage Dives.
Phase Four: Eyes
Optimization and uptime in this phase revolves almost entirely around using Resolution to cleave both eyes, and managing your Mirage Dive movements with Acceleration or Swiftcast where required.
Assuming you did four melee combos in P3, you will get one melee combo at the start of the phase and another one near the end. If you do a partial combo at the end of the phase, it will carry on to the next phase without dropping off, and you will be able to complete the combo on Charibert.
Resolution Cleave
After a melee combo, you can hit both eyes by standing within the hitbox of one eye, and targeting the furthest one. However, try to time your melee combos in such a way that you are not attempting to cleave the eyes the exact same moment that Mirage Dives occur.
Intermission: Rewind
Saving oGCDs for the Spear
In this phase, the DPS check on Charibert is more forgiving than the one for the spear. If needed, you can save oGCDs from Charibert for burning down the spear once Charibert is below 29.9% HP. This includes your second Fleche, second Contre Sixte, and two charges of Engagement and Corps-a-corps.
If you do not wish to overcap on your movement oGCDs, you can use one charge of each as a compromise. Also note that holding your second Fleche for the spear will generally not lose you a use in P5 due to the phase transition duration.
Phase Five: Thordan II
This phase is much like the first Thordan, a trio based phase with a (mostly) lenient DPS check that cycles between “full uptime with barely anything happening” and “a lot of mechanics happening, but the boss is not targetable”.
Pre-Wrath of the Heavens
The period before Wrath of the Heavens is fairly flexible and your available mana and tools will depend on earlier phases. Instead of trying to execute a fixed opener, things to note are:
- Weave Fleche as early as possible to get two uses during this mini-phase, as the timing is fairly tight. Meanwhile, only one use of Contre Sixte is possible.
- If doing one melee combo with a prepared Dualcast proc, one Acceleration/Swiftcast will ensure you get a final GCD off before the boss jumps away.
- If not melee comboing, use one Acceleration and one Swiftcast to keep the cooldown timer running and have your last GCD be instant.
Example (one melee combo with a prepared Dualcast proc, Acceleration used):
Wrath of the Heavens is easier to recover than P2 trios, and you have more time to prepare a Vercure on yourself to proc Dualcast if Verraise is needed. Due to the party being spread out, you should also use Vercure on yourself before the Protean spread, especially if you had to take one of the initial knight dashes and are at low HP. That way, if you get Liquid Heaven baits, you have a free instant cast heal on yourself which can be the difference between life or death if your healers are busy or out of range.
Pre-Death of the Heavens
The standard approach here is to have a Dualcast ready from Vercure in downtime, then executing a double melee combo under raid buffs. You want to get two Fleche uses here. Two Contre Sixte uses are possible, but needs to be used in the same way as P2, and is more of a niche optimization.
Example reopener (no double Contre Sixte optimization):
Meteors
It is generally advised for the caster to use LB2 on the meteors. While it is possible to hit four, the positioning is extremely precise, and missing will lead to only hitting two. Any delay in casting the LB can mean wasted GCDs from your party members and yourself. It is more practical to just aim for three instead, either at a fixed waymark, or the ones nearest to yourself.
Clip: https://clips.twitch.tv/ApatheticTemperedNigiriBrokeBack-zqGt8oVekhdXgJLq
If not LBing the meteors (i.e. the ranged/second caster is LBing or the party agrees not to use it here), you can do a full melee combo under raid buffs, use an odd number of Acceleration and Swiftcast (one or all three), then finish the phase with a partial melee combo just as the Death of the Heavens cast bar reaches “Heavens”, near completion.
When the meteors appear, you will want to use Verfinisher and Scorch on one meteor, then use Resolution in a line on three other ones lined up (target the furthest).
Clip: https://youtu.be/G0ZbQMSHNkY?t=611
Phase Six: Double Dragons
While the DPS check here in terms of boss HP is quite low, clean enrage wipes can happen if players are not comfortable keeping uptime while doing mechanics safely. There is a lot of movement and some precision required in this phase. With how Hraesvelgr’s Vow works, it is also hard to recover from mistakes. You usually want to end this phase with around 90|90 or more mana heading into P7 to comfortably get 8 melee combos in the final phase.
Potion and Opener
Unlike many other phases, it is better to start your re-opener here (a double melee combo with Manafication) without preparing a Dualcast proc during downtime. This means using potion during downtime, then starting the phase with a melee combo immediately. This will make alignment better for cleaving both dragons with Resolution just before the first mechanic, Wyrm’s Breath 1. After Wyrm’s Breath 1 resolves, try to hold onto your instant cast abilities and save your mana for Wroth Flames later.
Wroth Flames
Starting a melee combo late into the cast will let you use your melee combo finishers for movement to get into your starting position. Following that, you can do one Dualcast safely at the starting position, then use three instant casts for movement (Acceleration and Swiftcast) to bait the Akh Morns and then start moving to your final spread or pair stack position.
Clip: https://youtu.be/YcoOeXy0EQU?t=739
Second Raid Buff Window: Touchdown vs Wyrm’s Breath 2
There are pros and cons to holding your second raid buff window all the way until Touchdown, or using them nearly off of cooldown during Wyrm’s Breath 2. Regardless of what you do, you will be able to get two uses in the final phase.
Post-Touchdown Raid Buffs
After Touchdown, both dragons stand there casting enrage. The cast itself is very slow, meaning the party simply has to just stand within range of raid buffs and hit the bosses.
It is common for some jobs to use this opportunity to build gauge for the final phase, meaning the value of the buff window is not maximized. However, this usually isn’t an issue due to the lax DPS check. If still progging, feel free to spend gauge on a melee combo on the dragons or use caster LB2 to guarantee you are able to see the next phase for practice purposes.
A potential downside to using raid buffs here is that it locks you into doing raid buffs around Gigaflare 1 and Akh Morn 3 in P7. While these timings line up well with mechanics and cooldowns (e.g. 1-minute burst for some jobs), it does reduce the healer’s ability to output damage during raid buffs, because they will be busier healing the party during Akh Morn 3.
Wyrm’s Breath 2 Raid Buffs
Raid buffs come off of cooldown some time before the Wyrm’s Breath 2 mechanic, and some groups will choose to use it here instead of holding it for Touchdown. Since this isn’t a “resource generation” phase, using buffs at Wyrm’s Breath 2 can result in more group DPS for P6. It also unlocks the option to use raid buffs in P7 after the first Exaflares, and subsequently after Gigaflare 2, which can be more comfortable for healers.
The downside to this is that, if not executed properly, it is easier for people to miss raid buffs while doing the mechanic if they preemptively spread out too far. Depending on the job and Wyrm’s Breath 2 strat, it may also be more difficult for some jobs to execute their burst windows properly while doing the mechanic.
Clip: https://youtu.be/ElRQd4ASBtw?t=796
Phase Seven: Dragon King Thordan
Compared to previous phases, P7 is fairly simple for DPS and is significantly more challenging for tanks and healers. Be sure your party has a clear mitigation plan before you start progging this phase, and review the DSR caster mitigation guide again (https://bit.ly/3AHEMxZ) if required. If your static or PF does not have any mitigation plan going in, fix that now.
This phase is full uptime with only a moderate amount of movement planning required. Your job is simply to do damage safely, do mechanics, burst properly under raid buffs, and use your mitigations on time. Be sure to enter the phase with around 90|90 mana if you can.
Auto-Attack Timing and Magick Barrier
After the increases to party buff range in 6.4, there is no real advantage to us taking any given auto attack in this phase. Therefore, you should be prepared to take whichever auto is assigned based on your role position. Ranged DPS typically take an auto after each Akh Morn’s Edge, and as the most common position for caster is R2/D4, you should expect to take the second auto of that set, unless your group decides otherwise.
Movement, Potions and Combos: Gigaflare 1 / Akh Morn 3 Buff Timings
If you opted for this buff timing (mandatory for post-Touchdown buffs in P6), the following combo timings are recommended for buff alignment and movement:
- One for the phase opener
- Three for Gigaflare 1 movement (triple combo, potion, buffs)
- One for Gigaflare 2 movement
- Three for Akh Morn 3 (triple combo, potion, buffs)
Save Swiftcast and Acceleration to handle Exaflare movements.
Movement, Potions and Combos: Post-Exaflare 1 / Gigaflare 2 Buff Timings
If you opted for this buff timing (optional and only possible if you used raid buffs during Wyrm’s Breath 2), the following combo timings are recommended for buff alignment and movement:
- One for the phase opener
- Two for first set of party autos into Akh Morn 1 (double combo, potion, buffs)
- One for second Exaflares
- Three for Gigaflare 2 movement into third Exaflares (triple combo, potion, buffs)
- One for Akh Morn 3 into enrage
Save Swiftcast and Acceleration to handle the first Exaflare after your opening combo and the Gigaflare 1 mechanic.
Congratulations!
Clear PoVs
God Okonkwo: https://bit.ly/3xTno97
Lana White: https://bit.ly/3DSW7Yo
Credits
RDM team of Mentors and Helpfuls at The Balance
- Have any questions?

 discord.gg/thebalanceffxivAuthors
 Argen Yin
 Argen01#4705
 Balance RDM Staff