The Omega Protocol (Ultimate) RDM Guide
This raid features a unique mix of multiple tight DPS checks, movement-intensive mechanics requiring real-time adjustment, and flexible optimization potential. That said, with some planning and smart resource management, Red Mage is able to perform well in this raid and bring a lot of value to a party.
There are six phases in this raid. Generally, every phase has a DPS check that requires some basic optimization, but the difficulty of Phase 2 and Phase 3 DPS checks tend to depend on party composition and buff timings, with Phase 2 benefitting cleave-heavy compositions and Phase 3 benefitting full uptime 2-minute burst compositions. The phases are commonly referred to by their number and will be referenced again as such later in the document. Refer to the below:
- Omega: P1
- Omega M/F: P2
- Omega Reconfigured: P3
- Blue Screen: P4
- Run: Dynamis: P5
- Alpha Omega: P6
Addle and Magick Barrier Usage
Please be sure to read Meru’s Addle and Magick Barrier Guide for tips and disclaimers on your various mitigation options.
Manafication Timings
Due to the 7.0 Manafication change putting the free combo on a cooldown, fully rushing Manafication is no longer a particularly viable option in this fight. It is technically possible to do with slow enough P1-P3 killtimes, resulting in being able to press Manafication and execute your melee GCDs before Delta in P5; however, this still requires Manafication to be delayed in Sigma until towers have resolved, and results in Manafication being desynced until the end of P6. This guide will still cover the timings for a full Manafication, but it is not recommended.
However, it is still very helpful to rush Manafication until P5 to gain extra movement in P3 and P4, then re-align for post-Delta buffs. This is still considered preferable to aligning Manafication, as the extra combo in Hello World is extremely helpful.
Buff and Potion Timings
In general, buff timings are standardized in P1 (on cooldown), P5 (after Delta, and then on cooldown) and P6 (on cooldown). Note that unlike many previous Ultimates, Phase 1 in this raid has a reasonably tight DPS check, so using a potion in the opener is generally a requirement. Otherwise, there are multiple ways to approach buff timings in P2, P3 and P4, which will be briefly outlined below with the pros and cons listed.
A. Monitors: 1 use in P2, 2 uses in P3, and 0 uses in P4 with melee LB3 (NA PF standard)
Melee LB3 is held for P4, and a second use of raid buffs is used at the end of P3 instead during monitors. The downside of this is that bursting during monitors can be suboptimal due to mechanics generally requiring some players to drop GCDs; however, with current damage scaling and killtimes, having extra damage in P3 is fairly common. This can sometimes be preferred if using LB1 at the start of P2, due to LB generation being tighter in P3 in that scenario.
- P1: Opening
- P2: Opening
- P3: Opening [Potion*], monitors
- P4: None (melee LB3 used in this phase)
- P5: After Run: Delta [Potion], and during Run: Omega.
- P6**: Opening, after second Cosmo Arrow, and after Magic Number
*If you only enter P3 with enough mana for a single melee combo, you can potion a double combo after the first set of towers instead as Manafication comes back up.
**Your potion in P6 can be used in any buff window, with the first and final being preferred as there are little mechanics happening and it is easier to have the mana for a triple combo potion in these windows.
B. 1 use in P2, 1 use in P3 with melee LB3, 1 use in P4
This is considered a solid option because all raid buff windows occur while no difficult mechanics are going on, and because 2-minute raid buffs will re-align with people who de-sync their 1-minute damage cooldowns at the end of P2. However, if you are forced to LB at the end of P1 or the start of P2, this will likely result in only having a melee LB2 for P3.
- P1: Opening [Potion]
- P2: Opening
- P3: Opening [Potion*] (melee LB3 used during this phase)
- P4: Between second and third sets of lasers
- P5: After Run: Delta [Potion], and during Run: Omega.
- P6**: Opening, after second Cosmo Arrow, and after Magic Number
*If you only enter P3 with enough mana for a single melee combo, you can potion a double combo after the first set of towers instead as Manafication comes back up.
**Your potion in P6 can be used in any buff window, with the first and final being preferred as there are little mechanics happening and it is easier to have the mana for a triple combo potion in these windows.
C. On cooldown: 2 uses in P2, 1 use in P3 with melee LB3, and 1 use in P4
This assumes there are two uses of 2-minute raid buffs in P2 (used on cooldown). The third use occurs in the middle of the Hello World mechanic in P3, and the fourth use occurs mid-way through P4. The benefit of here is that there is an extra use of 2-minute raid buffs in P2, but the P3 burst window during Hello World is more difficult to execute. This option can be helpful if there are deaths at the end of P1 or in P2, and extra damage is required to make the P2 DPS check.
- P1: Opening [Potion]
- P2: Opening, during burn phase at the end after meteors
- P3: Mid-way through Hello World [Potion] (between second and third set of towers)
- P4: Between second and third sets of lasers
- P5: After Run: Delta [Potion], and during Run: Omega.
- P6**: Opening, after second Cosmo Arrow, and after Magic Number
- **Your potion in P6 can be used in any buff window, with the final being preferred when going for a first clear as there are little mechanics happening and it is easier to have the mana for a triple combo potion in these windows.
Holding DPS
During certain phases, the party may need to “hold DPS” to give more time for damage or defensive cooldowns to come back up. Due to how our Manafication lines up in this fight, Red Mage is one of the jobs that benefits substantially from the party holding DPS. Note that if you need to artificially slow down how fast you kill a boss, but you still need to build gauge, you can cast Veraero/Verthunder II. These spells do noticeably less damage in single target scenarios but generate the most mana out of our regular GCDs (Seven of white/black).
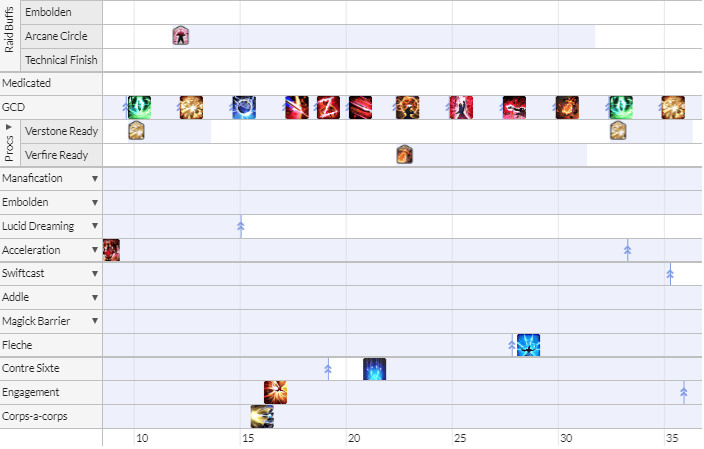
Phase 1: Omega
The DPS check in this phase is very tight compared to past Ultimates, and so a potion is often necessary. The two core mechanics of this phase, Loop and Pantokrater, are both movement-intensive. That said, there are reliable ways to handle them. The standard opener is fine for this phase, but depending on your party’s Loop strat, you may wish to hold all of your Acceleration uses + Swiftcast to move for the more undesirable tower and tether combinations. In that scenario, you can do the following alternate opener:

The damage loss here compared to the standard opener is almost insignificant (essentially double digit potency), so if you prefer to have all three instants available for Loop, do not hesitate to adjust to this opener.
It has also become commonplace in Party Finder to use buffs as soon as possible in P1 to account for a potential very fast killtime which results in buffs not being available for cleave at the start of P2. If you need to buff early, you can cast the same spell twice as the precast and first GCD, triple weave with Embolden, Manafication, and force-clipping a potion, then initiate a melee combo with Fleche, Contre Sixte, and your melee oGCDs. If doing this opener, it is recommended to weave Acceleration during the finishers, Dualcast, then weave Swiftcast, to set up three consecutive instant casts in case you have a difficult first movement, as well as aligning your Dualcast nicely for the rest of the mechanic.
Note that, in this phase, we want to build up to a double melee combo to cover the entire Pantokrater mechanic. After the opener, we strongly recommend not using a melee combo during the Loop mechanic. The reason is because while relying on instants and slidecasting can take a bit of practice for Loop, it is far more difficult to pull off during Pantokrator.
Loop Movement
Movement during Loop can appear challenging, but smart positioning can noticeably reduce the movement required. Keeping track of where you will be moving next for the mechanic and prepositioning can help reduce situations where you have to move far significantly. Most movement for this mechanic can be done with a single movement tool (Acceleration, Sprint, Swiftcast). Additionally, if you are one of the earlier tower numbers, you can stand inside later towers after losing your debuff, reducing movement needed to reach a safe spot from tethers.
Double Combo for Pantokrator
As Pantokrator starts, you should find yourself close to having enough mana for a double combo. For this mechanic, you want to be at 81|92 or higher mana around the time the second flamethrower pizza slice comes out, which also coincides with when the first marked missile player needs to start moving. If you are slightly below this number, you should have one use of Acceleration or Swiftcast available to help you fix this in one cast.
If doing the standard 90 opener, the cost of Program Loop being slightly tighter makes Pantokrator far more lenient. By the end of Program Loop, one charge of Acceleration and Swiftcast both become available and should be saved for Pantokrator itself. In this situation you should cast until the first flamethrowers appear at which point you can start your first combo. After your combo you can choose to use one of or both Acceleration and Swiftcast. Having these both available grants you leniency to adjust on the fly depending on your missile number.
Ending the Phase
In this phase, we want to use Manafication on cooldown, and for our last GCD of the phase to be Verholy/Verflare. This is because at the start of P2, we can cleave the bosses for two GCDs before Firewall comes up, so we want those GCDs to be Scorch and Resolution. You will also want to hold your last use of Contre Sixte. Holding Fleche, as well as one charge each of Corps-a-corps and Engagement, can also be beneficial depending on how ahead or behind you are of the P1 DPS check. Consider these oGCDs as flexible resources.
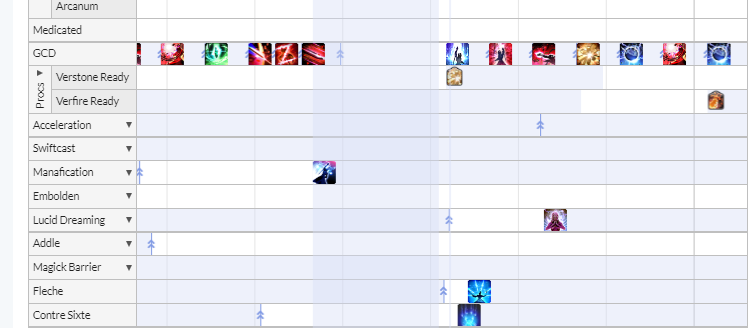
Phase 2: Omega M/F
Unlike the previous phase, there is little to no movement optimization in P2, especially if the party decides to just stack and mitigate meteors. Instead, optimization here revolves around planning our cleave timings. Typically, Manafication will come up here around the time Sagittarius arrow comes out. Use it on cooldown here. You should wait until after you’ve used Manafication to start a melee combo here, as you ideally won’t be comboing again before the end of the phase.
This should result in two and a “half” melee combos for the phase: a partial combo in the opener, one after party synergy to cleave, and one with Manafication coming up around the Sagittarius arrow cast. If required, there is an additional one that can be used during the burn phase to meet the DPS check, but it’s better to save this combo for P3 if you can.
Cleaves: Standard P2 Opener and Post-Party Synergy
The standard play here is to open the phase by pre-casting Embolden, then cleaving both bosses with Scorch, Resolution, and Contre Sixte. Following that, do not do a second combo despite raid buffs being up. This is because we can set up Scorch and Resolution to cleave again after Party Synergy, and the DPS gain in doing so will outweigh doing an additional combo on one target during buffs.
After party synergy, do one instant-cast GCD and two dualcast pairs (five GCDs total) before starting a melee combo to time your Scorch and Resolution to cleave. You may have to clip slightly at 2.48 to let Firewall fall off first, so make sure you see the buff icon drop off from your status bar before firing Scorch. Also consider standing slightly north or south to ensure your Resolution hits Omega F as she moves north for more consistency, although this is generally not necessary. After Resolution, the Sagittarius Arrow AOE will appear in three more GCDs, so prepare an instant cast for the dodge.
Clip: https://youtu.be/RCW7wsJYuFs
Holding Contre Sixte to cleave after party synergy is optional. If you do, you will lose a use during P2’s burn phase, so either way you only get three “uses” (boss hits) after party synergy.
Regular Opener When entering the phase with two finishers, you should use one additional instant-cast spell to gain a GCD pre-Party Synergy. Try to use this earlier in the phase to avoid oGCD bloat later, as your Fleche, Corps-a-corps, and Engagement will come off cooldown around the Party Synergy castbar, leaving less time to use each.
Caster LB1 Opener
In some groups, you may be asked to use caster LB1 at the start of the phase. If your party is having trouble meeting the DPS check for P2, this is an overall DPS gain. In this scenario, you would open the phase with whatever finisher you have available to cleave (ideally Resolution, but subject to P1 killtimes), then immediately LB1, followed by Fleche if available. If you try to weave Contre Sixte after the cleave GCD, the caster LB risks ghosting and is not as reliable.
Clip: https://youtu.be/HAnxqHPkLBY
Ending the Phase
During the burn phase, you ideally want to build up to 100|100 mana and allow yourself to overcap a bit, allowing you to carry more damage into P3. But, if required, you can use one more melee combo at the end of the phase. If your party has decided on “option C” of the buff timings (use everything on cooldown), 2-minute raid buffs will come up here. Also be sure to use any oGCDs available here as the P3 transition allows them to all be available for the reopener.
De-Synced Buffs Disclaimer
Note that, on occasion, some jobs may opt to use 2-minute cooldowns here and de-sync their buffs with the rest of the party, only to re-align it later.
This is common with Reapers, due to their raid buff being tied directly to resource generation. If the party has trouble meeting the DPS check for the phase (or low rolls on crit/DH RNG), it is also common for one job to be a designated “insurance” buffer here, preferably a Scholar or Ninja if there is no Reaper in the party. The next use of the de-synced buff comes up during Hello World movements when the party needs to spread out, so it’s better if the buff is a boss-targeted raid buff so people don’t have to worry about being in range when it goes out.
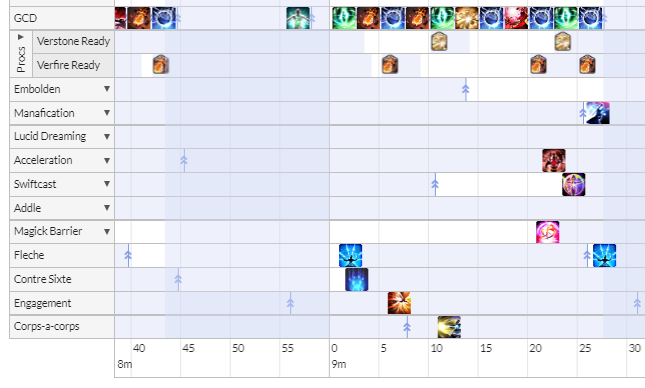
Phase 3: Omega Reconfigured
This phase is full uptime, and so optimization will mostly revolve around using your instant casts and melee combos properly. It is not a fast paced phase, but you may be required to move across a large area depending on tower RNG. The more resources you are able to carry over from P2, the lighter the DPS check for this phase will be.
Openers and Potion Window
If you are entering P3 with 100|100 mana, you can use a potion just before the boss is targetable (around the time the AoE puddle under the boss disappears after transition), and begin comboing immediately once Omega is targetable. Preparing a Dualcast proc with Vercure is also possible during the transition, but mana levels can sometimes be tight for ensuring you get all your melee combos in P4, which impacts mana levels in P5 and P6. This particularly applies if you play safe and drop a few GCDs if you get a monitor at the end of the phase.
If you are entering the phase with insufficient mana to do a double melee combo, you should instead do a single melee combo under raid buffs, and use a potion just before a double melee combo prior to Manafication coming back up off cooldown. Generally, a double Manafication melee combo under potion does more damage than a single combo under raid buffs, though it comes close in a full buff composition. Note that if you kill P3 too fast or delay the potion too long, it may affect P5 potion timings.
Movement During Hello World
In general, the safest approach is to dynamically adjust your unbuffed melee combo timings during this phase to handle more challenging movements (e.g. if your next tower spawns on the opposite end of the map), and use instant casts otherwise. Outside of the opener, you will get one more combo with Manafication, another ready immediately after (this one can be held for a de-synced buff or used flexibly for movement), and one at the end of Hello World which is ideally saved for movement during monitors.
De-Synced Buffs
If one raid buff was de-synced at the end of P2, that raid buff should come up sometime between the second and third patch tether breaks. Your mana should line up in such a way that you can use the flexible melee combo and save one charge each of Corps-a-corps and Engagement for the de-synced raid buff, which should also happen to align with movement toward your third set of towers.
Monitors and End of Phase
Regardless of whether you are using raid buffs during monitors, you should save your melee combo at the end of Hello World so you can freely move to your monitor position here. Try to avoid using your instants here if possible, because they can be more useful for movement in P4.
Once in position, if you have a set of monitors, do not greed every GCD. If you otherwise kept good uptime throughout the phase, you should still end the phase with close to 60|60 mana and Manafication coming off cooldown. Ideally, you will bring over a partial melee combo into P4, but placing the entire combo in P4 also aligns your Dualcast window perfectly for P4 movement.
Phase 4: Blue Screen
This phase has a moderately tight DPS check, but is mechanically quite simple and doesn’t require much optimization outside of moving efficiently. You will typically enter the phase with finishers from a partial combo at the end of P3. If you do a full combo, all three finishers, or just Resolution at the beginning of this phase, your Dualcast will align with the movement needed for first lasers. You can also move within the hitbox for this laser to reduce movement.
If the party is buffing in this phase (or if someone de-synced buffs in P2), the next use should be used between the second and third sets of lasers, as this is when 2-minute raid buffs aligns with people who used 1-minute personal DPS abilities on cooldown in earlier phases. Ideally, you would build mana for your next melee combo of the phase to occur around that time. Sprint should also be used somewhere in this phase, ideally for if you need to flex for a stack.
A third melee combo will be available towards the end of the phase, but if you are ahead of the DPS check, you can carry over the entire combo (or just your finishers) to the start of P5.
Final Fleche Use in P4
Depending on how fast or slow your previous phase killtimes were (and your oGCD alignment throughout P3), you may find a use of Fleche coming up at the very end of P4. The DPS check for P4 is harder, but you only need to get the boss below 20% HP. If you are ahead of the check, consider saving the final use of Fleche in this phase to get two uses before Run: Delta in P5.
Make sure to weave Fleche as your first oGCD after the boss is targetable in P5 to gain an additional use, as the first part of P5 is only slightly over 25 seconds in length.
Phase 5: Run: Dynamis
While P5 is the consensus hardest phase in the fight, most of the difficulty comes from executing “trio” mechanics while the boss is untargetable, making the damage optimization aspect of this phase fairly straightforward. While P5 is often considered the hardest mechanically, it has the lightest DPS check of all phases. Nonetheless, optimizing our damage for this phase is still valuable, as it allows some jobs to build resources for P6, and can potentially allow this phase to be recoverable even after a death depending when it occurs, allowing for more P6 prog or even a clear on the same pull.
Manafication Timings
If you are continuing to use Manafication on cooldown, your three uses will come up in this order:
- Two GCDs before the boss becomes untargetable, followed by the first three hits of your combo.
- Mid-way through Run: Sigma (downtime), after the towers have resolved.
- At the end of P5.
If you are not continuing to rush here, hold Manafication until the end of Delta, pressing it as the Near/Distant debuffs begin to resolve at the end of the downtime.
Vercure Usage
Red Mage lacks “free” self-mitigation when the boss is targetable, but given how the boss is not targetable in a lot of P5, Vercure becomes very useful for staying healthy. As a general rule of thumb, try to cast one whenever you are standing still, and save your second instant-cast one for times you can help heal yourself while moving. Times like this include (but are not limited to): while standing in position before Near/Distant World resolves in Run: Delta, after blue tether breaks in Run: Delta, before towers or before running around the arena in Run: Sigma, or while in position for monitor damage or Near/Far World in Run: Omega.
Buff and Potion Timings
Regardless of whatever 2-minute buff timing plan you opted for in P2-P4, buff timings in this phase revert to following a simple, standardized pattern: the first use (with potions) occurs after Run: Delta, and the second set of 2-minute raid buffs occur during Run: Omega.
There are two options for re-opening after Delta if you are not continuing to align Manafication. You can either rush to the middle and initiate a melee combo without a prepared Dualcast (in which case you should use your potion just after the final Near/Distant jumps), or you can prepare a Dualcast and use that to return to the boss before initiating a combo (in which case you will need to use your potion after the first GCD). Whichever option you choose, you will get two combos and four GCDs in this phase.
If you are continuing the Manafication rush, you will use three finishers, one full combo, and six GCDs, and should potion before the boss is targetable.
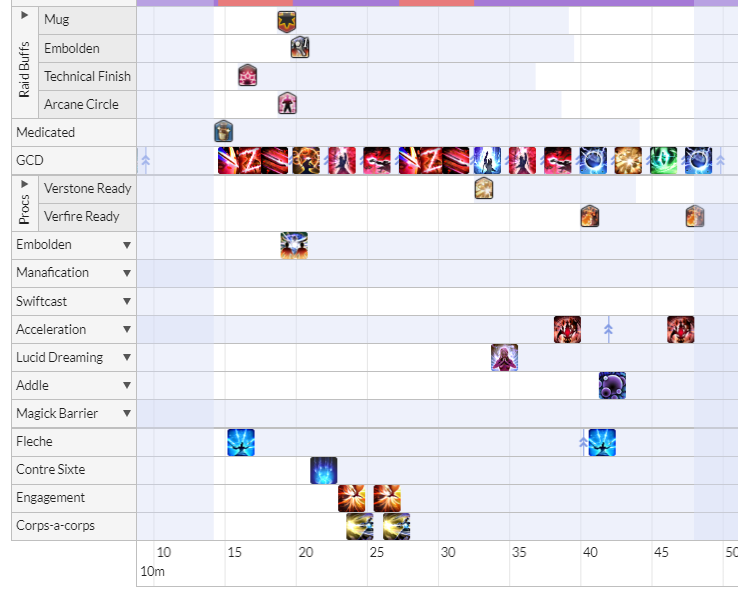
Tips and notes:
- It is safe to be in max melee range immediately after the Near/Distant World debuffs resolve, including if you are the last green/red tether and your partner is also max melee.
- The boss is targetable here for under 35 seconds, so you can hold Contre Sixte, and two charges each of Corps-a-corps and Engagement for party member buffs.
- The last GCD has a high chance of ghosting, even with full uptime or if you started the phase with a Verthunder/aero III cast. Use it anyway for the mana.
- Holding Fleche for buffs is possible too, but can become tighter and you may not get two in potion, so it’s not always worth it.
If opting for “option A” of the P2-P4 buff timings (using a second 2-minute window during monitors in P3), you will have raid buffs available before Run: Delta. However, you will not be able to use the full duration as they do not come up immediately into P5, and potions will not be up either if you used them in P3. Refrain from using them here and just stick to the standard plan of using buffs after Run: Delta.
Run: Omega (and Beyond)
This trio marks the first part of this phase where we have to do our rotation while also doing mechanics. That said, the movements aren’t too large, so complicated movement planning is unnecessary. The standard play is to start this phase with a single melee combo after Run: Sigma. You would have used Manafication during downtime in Run: Sigma around the time you get knocked back into towers. You would then hold your second combo for raid buffs, which doubles as a movement tool for dodging from the first safe spot from Omega’s clones into the second.
Optimizing oGCD use in Run: Omega
- You can only get two uses of Contre Sixte here, so put the second one under buffs.
- You can only get three uses of Corps-a-corps/Engagement here, so spend only one charge each at the start, and then you can save your second charge of each for raid buffs. The third charge for both abilities will come up during the buff window, but be careful not to use the second Corps-a-corps at the wrong time here and gap close into one of the clone kicks or slashes.
- It feels like three Fleche are possible here, with Fleche coming off cooldown at the very end of the phase, but you can generally only use two (even with zero drift), so it’s safe to save the second use for buffs.
If you have aligned Manafication, simply Dualcast for the rest of the phase. If fully rushing, Manafication comes back up near the end of Run: Omega. Spend one more combo here, then cast spells for the remainder of the “burn phase”. By the end, you should have around 80|80 mana. The boss only needs to be below 20% HP, so you can start casting AOE spells to build more mana if needed.
Alternately, you can choose to overcap to 100|100 and skip one full combo at the end, but at 80|80, ten combos are already possible in P6, but the last one is very tight and for slow kill times when barely beating enrage (making nine combos the norm for P6). Entering the phase at 100|100 makes the last combo easier to get if you are overperforming the DPS check for P5.
Phase 6: Alpha Omega
For the final phase, the baseline is to execute nine melee combos across the phase, with at least one in every buff window. Due to the large movements required for some mechanics, we would prefer to use melee combos to handle movement for some, and instants (Swiftcast/Acceleration) for others.
Movement, Combos and Potions
A: Entering P6 with ~80/80 mana:
Most commonly, your goal here is to begin by immediately spending a charge of Corps-a-Corps to start a melee combo, with Embolden after Redoublement. Manafication comes off cooldown shortly after your first combo, make sure to use it as well as the combo gained immediately here. Your combos here look like this:
- Opener
- Post opener before Cosmo Arrow (Manafication)
- Exaflare 1 movement
- Exaflare extended movement or Cosmo Arrow 2 movement (combo is flexible here)
5: During buffs at Wave Cannon 2 (Use Manafication on cooldown here)
6: Exaflare 2 movement
7/8/9: During Magic Numbers (ideally with potion) (Combo 7 can also be used for safe movement after your LB3)
Cosmo Arrow
Most of your instants during this phase will likely be used for Cosmo Arrow dodges. For the initial pulses of Cosmo Arrow it’s safe to cast during “two pulse” arrows, then rely on Acceleration/Swiftcast for “one pulse” arrows. Do not attempt to greed this mechanic, as it will easily end a pull.
Out pattern with combo: https://youtu.be/CVEho7efY1I?t=924
In pattern with casting: https://youtu.be/CVEho7efY1I?t=1002
Unlimited Wave Cannon (Exaflares) Both sets of Exaflares allow you to stay within max melee, allowing you to primarily rely on melee combos for movement. Before each set of Exaflares you should cast as long as you can in the center of the arena until the initial AOE appears beneath you, at which point you can begin your combo.
As the first Unlimited Wave Cannon has proteans immediately after it, you can either use a second melee combo to move to your position or an instant if you have any remaining after Cosmo Arrow. Avoid using all of your movement tools as the second Cosmo arrow happens immediately after this mechanic.
Limit Break
Caster Limit Break 3 is required to resolve Cosmo Meteor. To do this, Use LB3 as soon as you’re safe from the telegraphed AOEs, standing around the red line on the hitbox, allowing you to still be in proximity for healing as you’ll be animation locked for ~12.5 seconds. You need to place your LB3 at the center of the boss so that you can hit all of the meteors. It is strongly recommended that you use a macro to do this, as you will be running away from the boss to dodge the baited AOEs. Here is a working example:
/ac "Limit Break" <t>
/ac "Limit Break" <t>
/ac "Limit Break" <t>
/ac "Limit Break" <t>
/ac "Limit Break" <t>
/ac "Limit Break" <t>
/ac "Limit Break" <t>
/ac "Limit Break" <t>
/ac "Limit Break" <t>
/merror off
/micon "Limit Break" action
Potion Usage
There are three buff windows in this phase, and one possible potion. While every window has the same amount of buffs, your goal is to use a potion where you get the most value out of it. Most commonly, this is during Magic Number where you can execute a triple melee potion (The first melee begins ~17/18 seconds before Embolden, and the potion after the first Verholy/Verflare). If you are doing reclears and the boss dies long before enrage, you can consider moving your potion to one of the other buff windows. However, when pushing for a clear, it is strongly encouraged to just use potion for the final buff window as there is a strong chance you may kill close to enrage.
Congratulations!
Fight POVs
Mazz Maryoku: https://youtu.be/CVEho7efY1I
–
Credits: RDM team of Mentors and Helpfuls at The Balance https://discord.gg/thebalanceffxiv & https://www.thebalanceffxiv.com/
- Have any questions?

 discord.gg/thebalanceffxivAuthors
 Balance RDM Staff