The Basics
Welcome to the basic guide for Sage, which should give you everything you need to get started. This guide is meant to be fairly basic and does not cover every little detail. However, it should point you in the right general direction and give you a feel for the class.
Author and Acknowledgements
This guide was written by Wynn Dohz, with special thanks to Shy and all the other healer mentors.
Overview
Sage is a very powerful healer with a smooth flow and straightforward skills. Sage brings high personal damage, tons of free healing, and low cooldown mitigation to the party. Kardia is a unique buff with no duration that will heal its target for free when you use an offensive Global Cooldown (GCD). Addersgall is your main gauge resource, with a free charge every 20 seconds, allowing powerful off-Global Cooldown (oGCD) heals to be used. It is also the only healer with a gap-closer.
What Makes Sage Unique?

It is pretty straightforward to play at a decent level, and is not all that hard optimize if you want to take your gameplay further. However, it does suffer from having the weakest GCD heals. If you are trying to recover from mistakes, it is a challenge to get the raid back on track. If you are completely new to healing, you may want to learn the basics on White Mage, which does not have this particular disadvantage.
Sage has the highest personal DPS of all the healers, but does not have a raid buff. It has a very high amount of free healing, which is any healing that does not require a tradeoff in the form of damage output. While it does have GCD heals as a last resort, they are a bit weaker than other healers. Thus, while Sage is one of the best healers at keeping the party alive and topped up, it is one of the worst at recovering when things go downhill, requiring the player to be proactive rather than reactive. However, its relatively low cooldowns make that a little easier than you would think. While all healers require some degree of planning for their movement, Sage has a multitude of tools to make it easier, including being the only healer with a gap-closer.
Comparison to Other Healers
If you have played any of the other healers, this may give you a better idea of what to expect from Sage.
Compared to White Mage: Both White Mage and Sage are the “greedy” healers in that they have high personal damage output, but lack in raid buffs. However, Sage has significantly higher amounts of free healing, as Lily heals are still a DPS loss. However, White Mage has somewhat better options for recovering out of a bad situation. While they both ideally want to use their burst during raid buffs, SGE and WHM have a bit more leeway, as the other healers have raid buffs that they need to keep on cooldown. If those healers forget to use such an ability, even just for a couple GCDs, it can become out of sync with their other abilities or party buffs.
Compared to Scholar: Their abilities have some parallels (for example, Kerachole is similar to Soil), and both are technically considered “Shield Healers” (or “Barrier Healers”). However, Scholar has less free healing, as its Aetherflow heals cost a small amount of damage. However, as mentioned in the White Mage section, Sage is more “freeform,” as it does not have a raid buff that needs to be planned out.
Compared to Astrologian: Astrologian is the polar opposite in terms of damage. AST contributes the lowest personal DPS, but has the strongest buffs. However, Sage is similar to Astrologian in terms of not giving up damage to use its heals - they have the highest amount of free heals available.
Playstyle
As with the three other healers, Sage has a 30 second dot with a 1.5 cast time filler GCD. However, having a burst GCD on a charge system is what distinguishes it from other healers. By using charges rather than a hard cooldown on its primary burst, you do not have to worry quite as much about hitting specific amounts of spell speed, making it somewhat more ideal than other healers if you aren’t going to be able to gear up as quickly.
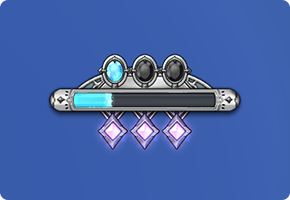
Apart from resources shared by all healers, such as mana, Sage has three main resources:
- Phlemga charges - two charges max, 45 second charge time, allows one cast of Phlegma.

- Addersgall stacks - three charges max, 20 second charge time, allows one use of Druochole, Kerachole, Ixochole, or Taurochole.
- Addersting stacks - three charges max, gains a charge when the shield from yourEukrasian Diagnosis is fully consumed.

The bar on the gauge shows the charge time for Addersgall. Current Addersgall charges are displayed at the top of the gauge and Addersting stacks are displayed at the bottom.
As mentioned, Sage has the widest range of heals that do not sacrifice any damage and does not have any cooldowns longer than three minutes. As such, it feels very straightforward to play, as optimizing damage output need not involve minimizing heals to nearly the degree it does on the other healers.
Opener

Using Toxikon enables us to precast Eukrasia and may gain an additional cast through the fight. As before, Sage can also comfortably precast Dosis and then immediately apply Eukrasian Dosis as an alternate opener.
Additionally, check out other openers on the Openers page.
Rotation and Priority
The standard rotation is again similar to other healers in that you would want to make sure your DoT is active 100% of the time. Between DoT refreshes, use Dosis.
However, you have three additional GCDs and one oGCD that are useful against single targets (even if some of them have AoE damage too):
- Phlegma
- Toxikon

- Pneuma

- Psyche
Phlegma is a damage gain, while Toxikon and Pneuma are damage neutral. Psyche is an oGCD and can be used losslessly. Let’s talk about the best times to use each one.
Phlegma
As it is a DPS gain, you should try to use it when raid buffs are active to maximize your damage output. This typically means trying to dump as many charges as possible just after each two-minute mark (e.g. in the opener, a few seconds after 2:00, 4:00, etc). However, be sure to not let it overcap. Apart from two-minute bursts, it is best used for movement. Lastly, be mindful of bosses going untargetable and dump charges before the boss goes away if you might otherwise overcap (for example, before going into adds phase in P3S).
Toxikon
Toxikon’s advantage is that it has the same potency as Dosis, but is instant cast, thus allowing free movement while using it. Toxikon requires Addersting charges. You start the instance with three out of three charges. After that, these can only be attained by having your shield from Eukrasian Diagnosis be fully consumed. However, using Eukrasian Diagnosis and Toxikon is still a damage loss compared to using two Doses. Therefore, the ideal way to use it is to apply the shields during downtime, such as a raid mechanic where the boss is untargetable, or between dungeon pulls. This will give you one to three charges to use. You can repeat this process during any downtime that may exist in the fight, giving you a few more charges to use.
Pneuma
Pneuma is also the same potency as Dosis, but it comes with a fairly powerful AoE heal attached. Its 600 potency heal can be boosted to 900p using Zoe, making it one of the strongest raw heals. However, being exactly the same potency as Dosis, it should not be used on a single target if the healing is not needed.
Psyche

Psyche can be considered functionally an oGCD Phlegma as a 600p AoE. Notably, it should be used on cooldown after its first use in the opener, so you will have one Psyche cast per minute. Psyche has an extremely high application time of almost 2.1s, so ensure that it is used well-before an enemy goes untargetable.
Healing
Kardia

First, let us talk about Kardia. Kardia is an indefinite buff, similar to Dance Partner. You can put it on a party member and it will remain on them for the duration of the raid (persisting even through wipes). It simply causes any of your offensive GCDs to apply a 170 potency heal to the target.
Kardia is completely free. It should always be on someone. The main tank is usually not a bad choice. However, it can also help for some unplanned healing situations, like if someone fails a mechanic and takes unnecessary damage. Kardia has a five second cooldown to switch it to a new target, so it can be changed every few GCDs if needed.
Addersgall Heals
These oGCD heals require a stack of Addersgall. Since you get a charge every 20 seconds and can store up to three, you can use these very frequently. In fact, each of them restores 7% of your mana, so you should use them liberally even if not necessarily needed.
- Kerachole - Provides a 10% mitigation and 100p regen for 15 seconds to nearby party members. Functionally very similar to Scholar’s Sacred Soil, but does not need to be placed (for better or for worse). Its 30 second cooldown means it can be up half the time, and the 500p total healing is more than Ixochole. Generally, this should be your go-to ability for incoming AoE damage. The damage reduction does not stack with Taurochole.

- Ixochole - A simple 400p AoE heal on a 30 second cooldown.

- Taurochole - A single target, 700 potency heal, plus 10% damage mitigation for 15 seconds. 45 second cooldown. The damage reduction does not stack with Kerachole.

- Druochole A single target, 600p heal. This does not have a cooldown.

Generally, Addersgall heals should be your first and foremost healing tools, as using them restores mana.
Other oGCD heals
Next up, your other oGCD heals. These do not cost anything other than the cooldown itself, so they should be your second priority for healing behind Addersgall heals.
- Kardia - See the Kardia section above.
- Physis - AoE regen plus heal boost on a 60 second cooldown. The regen is 650 potency total over 15 seconds (five ticks of 130p each). The healing up effect only lasts ten seconds and affects all incoming healing on affected targets.

- Haima - A shield that repeatedly reapplies itself when absorbed (up to five times, not including the initial shield). Each shield is 300 potency, so the best case scenario is 1800p total absorbed. It also applies a small heal at the end of the duration based on how many stacks are remaining, so it can still be useful even if only two or three stacks are consumed.

- Panhaima - Like Haima, but AoE, with a lower potency to compensate.

- Holos - Applies a 300p heal, a 300p shield, and a 10% incoming damage reduction to nearby party members. While you should try to use it when you will benefit from all three (for example, topping the party up before a raid-wide), there may be situations where it is okay to use it when the party is already at full HP.

- Philosophia - Grants a raidwide regenerative buff called Eudaimonia that heals players for 150p for each spell that the Sage casts and buffs GCD heals by 20% for 20s. This is a button that is exceptionally useful in a number of ways, and is on a 3m cooldown as a result.
Again, these cost nothing - try to use them as much as possible!
GCD Heals
Excluding Pnuema as previous discussed, GCD heals should be your last resort. They cost damage, and Sage’s GCD heals are not particularly effective. You have Diagnosis as a single target, with Eukrasia adding a shield. Prognosis is an AoE heal, with Eukrasia also adding a shield. Generally, the Eukrasian versions are preferred, but both versions should be avoided if possible.
However, they are free to use during downtime, mana aside. This can help with Toxikon stacks as well as free shields.
Utility
- Icarus - Your gap-closer. You are the only healer with a gap-closer, so make good use of it. It can be used on an enemy or party member.

- Soteria - Temporarily boosts the healing from Kardia by 50%. Useful for when you need a little extra free single target healing or general tank upkeep.

- Zoe - Increases the potency of the next GCD heal by 50%. The important part is the Pneuma counts as a GCD heal, so you can make full use of Zoe while not sacrificing damage.

- Pepsis - Converts shields from your GCD heals that are currently applied to raw healing. Like Scholar’s Emergency Tactics, but in reverse (you use the heal first, then use Pepsis). This skill is fairly uncommon in actual use, so do not feel like it is going to waste if you do not use it.

- Rhizomata - Gives you a charge of Addersgall. Since Addersgall heals give mana, this can help with MP management even if the healing is not needed.

- Krasis - Increases healing received by a target. You should cast this on the target that you want to heal, not yourself. It will increase all forms of healing received by the target and works multiplicative with other boosters such as Soteria.

Leveling/Dungeon Gameplay
Dungeons are pretty straightforward, since Kardia makes dungeons a breeze.
- Throw Kardia on the tank.
- Spam Dyskrasia on packs, as well as Phlegma when available.
- DoT packs as you walk up to them.
- Use oGCD heals before dipping into GCD heals while fighting - you can use your 60 second cooldowns every big pull, and 120 second cooldowns every other big pull.
- Charge up Toxikon by applying Eukrasian Diagnosis to the tank before reaching a pack.
Gearing/Materia
Sage is affected less by Spell Speed than the other healers. You typically just want Critical Hit wherever possible, with Determination and Direct Hit being the runner-up choices. Sage has very good mana economy, so extra Piety is generally unnecessary.
- Have any questions?

 discord.gg/thebalanceffxivAuthors
 Balance SGE Staff
 Wynn Dohz
xp#0001
Wynn Dohz
xp#0001