Introduction
Welcome to the basic guide for Monk, which will cover all of the information necessary to get you off your feet and onto your hands. Included is a look into the various systems that come together to define the Monk playstyle, suggested openers, and explanations on how to correctly form burst windows.
Throughout this guide we will be referring to all skills as if you were level 100. This is significant if you are still leveling, as some skills start out with a different name and upgrade upon reaching a certain level. The skills affected by this are as follows:
| Initial Name | Upgraded Name |
|---|---|
| Arm of the Destroyer | Shadow of the Destroyer |
| Steel Peak | The Forbidden Chakra |
| Howling Fist | Enlightenment |
| Flint Strike | Rising Phoenix |
| Tornado Kick | Phantom Rush |
| Elixir Field | Elixir Burst |
| Bootshine | Leaping Opo |
| True Strike | Rising Raptor |
| Snap Punch | Pouncing Coeurl |
Monk Basics
Uptime
As a Monk, uptime should be your top priority. Uptime itself is a multifaceted word; firstly, it refers to how physically close you are to an enemy. You can’t punch that which you are far away from, and as such always keep in mind that you want to be as close as possible for as long as possible. Of course, if you have to step away to do a mechanic or dodge an aoe do so, but the mind of a Monk should always be looking to minimize the amount of time we spend not-hitting something; whether that’s not running so far away to do aforementioned mechanics, or running back to the boss sooner after aoe damage snapshots, it is something to always be working on.
Secondly, uptime refers to the amount of time you spend hitting the boss. It’s great if you can stay within striking distance of your foe permanently, but if you aren’t pressing buttons, you’re not doing any damage. Don’t fret too much about only wanting to press the “correct” buttons for your rotation; pressing something is better than pressing nothing. You have plenty of time to review mistakes and correct yourself on what you should’ve done after the fact, the key is to make sure you’re always doing something.
Of course uptime isn’t exclusively important to Monk, but it is a key aspect to being a good Monk, and so it’s important to keep these principles in mind as you’re learning; after all, as the job with the fastest GCD in the game, each second wasted not casting is comparably more valuable to a Monk than to another job.
Positionals
It’s unlikely that you’ve made the decision to play Monk while remaining unaware of the P-word, but in case you’ve not come across it before, a “positional” is a skill that only gains maximum effect when used at a specific part of an enemy’s hitbox: in Monk’s case, either flank or rear. Alas, where we once had six positionals, in Endwalker we’ve been reduced to having simply two:
- Demolish deals maximum damage when executed from behind an enemy.
- Pouncing Coeurl, on the other hand, is best used from an enemy’s flank (side).
Missing either positional is a 60 potency loss, which will add up over a fight. Try to ensure you’re never missing any positionals.

The arrow on the top indicates the target’s front. The the two arrows either side are another indication of where a target is facing, as well as defining the left and right of a boss. The entire section at the back where the double line ends counts as the “rear”, whereas the double lines either side count as the “flank”. As such, you are able to stand at the intercardinal of a hitbox and take just a step to the left/right to adjust for your positionals, as opposed to having to run all the way from directly rear to directly left, for example.
In some instances you will encounter a hitbox that is a completely closed circle. These enemies are omnipositional, meaning you will always get the positional bonus regardless of where you are.
The Form System
Forms are a concept unique to Monk, and are what separates it from standard combo-based melee jobs. Unlike other jobs that simply have combos that trigger each other in a static manner, you can combo any GCD into any other GCD - providing that you’re progressing your form forward. Each GCD also enhanced when used in the correct form, meaning you want to keep your forms advancing forward and not break your combo, else you’ll drop your form and your damage will suffer.
You progress through the three forms Opo-opo, Raptor and Coeurl one at a time, looping back around to Opo-opo after Coeurl:
- In Opo-Opo form, Leaping Opo, Dragon Kick, and Shadow of the Destroyer are enhanced. Using an Opo-opo GCD grants you Raptor form.
- In Raptor form, Rising Raptor, Twin Snakes, and Four-point Fury are enhanced and usable. Using a Raptor GCD grants you Coeurl form.
- In Coeurl form, Pouncing Coeurl, Demolish, and Rockbreaker are enhanced and usable. Using a Coeurl GCD grants you Opo-opo form.
Core GCDs
As previously mentioned, Monk has six core single-target GCDs.
 | Dragon Kick has a potency of 320. When in Opo-Opo form, it will grant Opo-opo’s Fury. |
 | Twin Snakes has a potency of 420. Twin Snakes can only be executed from Raptor form and will grant Raptor’s Fury. |
 | Demolish has a potency of 360, or 420 when executed from the rear. It can only be executed from Coeurl form and will grant two Coeurl’s Fury. |
 | Leaping Opo has a potency of 260, or 460 when you have Opo-opo’s Fury. When in Opo-Opo form, Bootshine will always crit. |
 | Rising Raptor has a potency of 340, or 540 when you have Raptor’s Fury. It can only be executed from Raptor form. |
 | Pouncing Coeurl has a potency of 310, or 520 when executed from the flank and when you have Coeurl’s Fury. It can only be executed from Coeurl form. |
 | Form Shift is a unique GCD, as it’s not directly a part of our rotation, but it does enable our rotation. Form Shift grants the Formless Fist buff, which allows you to use any GCD and gain its additional form effects. Since this GCD does no damage, we only ever use it before pulling an enemy or during downtime. |
Basic Rotation in a Vacuum
With the knowledge of these GCDs, we can actually already begin to build what will be the foundation of our rotation. Now, we know that we’re going to be doing a three-step combo, but that we have two options for GCDs at each step; how do we decide which one to press?
Effectively, each step of our rotation has a Filler and a Spender option. Dragon Kick, Twin Snakes and Demolish gain you Fury, these fill the respective job gauge to full, thus Filler. Leaping Opo, Rising Raptor and Pouncing Coeurl will spend the Fury from the respective job gauge, thus Spender.
At each step, consult your job gauge, is there a Fury ball for your current form? Press the Spender GCD. Is it empty? Press the Filler GCD. This means we end up alternating Dragon Kick with Leaping Opo, Twin Snakes with Rising Raptor and for every Demolish we follow with two Pouncing Coeurl. The GCDs on the hotbar will also light up correctly following this logic, as such the glowing buttons can be followed as well.

AoE Rotation
Our AoE rotation is quite simple. As opposed to other jobs that will have an entirely different combo for AoE, we simply have an AoE option for each of our forms.
 | Opo-opo form has Shadow of the Destroyer, a circle AoE around you with 110 potency which becomes a guaranteed critical hit when executed with its form bonus. |
 | Raptor form has Four-Point Fury, another circle AoE around you with 120 potency. |
 | Coeurl form has Rockbreaker, another circle AoE around you with 130 potency. |
| Icon: | | | | | | | | | |
|---|---|---|---|---|---|---|---|---|---|
| Targets | Leaping Opo | Dragon Kick | Shadow of the Destroyer | Rising Raptor | Twin Snakes | Four-Point Fury | Pouncing Coeurl | Demolish | Rockbreaker |
| 1 | 460* | 320 | 120* | 540 | 420 | 140 | 520 | 420 | 150 |
| 2 | 460* | 320 | 240* | 540 | 420 | 280 | 520 | 420 | 300 |
| 3 | 460* | 320 | 360* | 540 | 420 | 420 | 520 | 420 | 450 |
*Always crits.
While the AOE GCDs are very simple in Dawntrail, when to use them at Level 100 is not as obvious. Shadow of the Destroyer is always a gain on 3 targets, Four-Point Fury is only a gain on 4 targets. For Rockbreaker it depends on the amount of Critical Hit one has. We need at minimum 5035 Critical Hit for Rockbreaker to be worth it on 3 targets, otherwise it is only worth it on 4, this absurd number is probably not attainable in Dawntrail. If a AOE of some form is not worth using on a certain number of targets, we use the regular single target versions of that form.
| Icon: | | | |
|---|---|---|---|
| Critical Hit | Shadow of the Destroyer | Four-Point Fury | Rockbreaker |
| Below 5035 | 3 targets | 4 targets | 4 targets |
| Above 5035 (incl.) | 3 targets | 4 targets | 3 targets |
Chakra
| Filled Chakra Gauge | Chakra Gauge in Brotherhood |
|---|---|
 |  |
 |  |
Chakra is the simplest of our three job gauges. Chakra can be stacked up to five times, and once five stacks have been built, we can spend them on either a single target oGCD or an AoE Line oGCD, depending on the scenario. In Brotherhood, our Chakra can be stacked up to ten times.
 | First is Meditation, a GCD with a one second cooldown that opens a single Chakra upon being pressed. When outside of combat it generates five stacks of Chakra instantly. |
 | We then have two traits: Deep Meditation I & II. Deep Meditation I grants an 80% chance of generating a Chakra upon landing a critical weaponskill. Deep Meditation II turns that 80% chance into a 100% chance. |
 | Finally, we have Brotherhood. Brotherhood has multiple effects, but in this section we’ll just talk about the effect pertaining to Chakra. Upon execution, party members within 15 yalms will gain the effect of Meditative Brotherhood for 15 seconds. While this buff is active on an ally, every time they execute a weaponskill or a spell, there is a 20% chance that you will gain a stack of Chakra. While the buff is active on yourself, you have a 100% chance to gain a Chakra each time you execute a weaponskill and the Chakra Limit is increased to 10. |
Brotherhood Chakra gain is based on damage application. This means that following the use of a GCD with a slower damage application such as Demolish, your Chakra gain will occur much later in the GCD roll than it would after a Snap Punch, for example.
We can spend our Chakra on either of the following two oGCDs:
 | The Forbidden Chakra is a single target attack with a potency of 400. |
 | Enlightenment is a line AoE with a potency of 160. |
Beast Chakra - How They Work
Beast Chakra was introduced in Endwalker, and hinges around the changes to Perfect Balance.
Perfect Balance has has two charges and a 40s cooldown. Upon executing a weaponskill, it grants a Beast Chakra of the corresponding Form. We can then spend these Beast Chakra on one of four Blitz weaponskills depending on the Chakra we had accumulated. Upon using any of these Blitzes, we’re granted Formless Fist, allowing us to proceed with our rotation without having to do any GCDs without their form bonus.
| - | Description | Example |
|---|---|---|
 | If we have three of the same type of Beast Chakra, our Masterful Blitz will become Elixir Burst, an AoE with a potency of 900 that deals 40% less damage to all subsequent targets hit. Using Elixir Field will grant us a Lunar Nadi. |  |
 | If we have three different Beast Chakra, our Masterful Blitz becomes Rising Phoenix, an AoE with a potency of 900 that deals 40% less damage to all subsequent targets hit. Using Rising Phoenix will grant us a Solar Nadi. |  |
 | If we have two different Beast Chakra, Masterful Blitz becomes Celestial Revolution, a single-target attack with a potency of 600. Using Celestial Revolution will grant us a Lunar Nadi by default, but if we already possess the Lunar Nadi it will instead give us a Solar Nadi. |  |
 | If we have both the Solar and Lunar Nadi active, any combination of three Beast Chakra will turn Masterful Blitz into Phantom Rush, an AoE with a potency of 1500 potency that deals 40% less damage to all subsequent targets hit. It consumes both Nadi upon use. |  |
Our Goal will be to get as many Phantom Rushes as we can in a fight. For this we will need a Lunar Nadi and a Solar Nadi. Using Rising Phoenix grants us a Solar Nadi. For Solar Nadis 3 Beast Chakras of different forms are required, one Opo-opo, one Raptor and one Coeurl Beast Chakra. We use one GCD of each form as per our Fury Gauge. For the Lunar Nadi we will need to use an Elixir Burst, which is granted by generating 3 Beast Chakra of the same form. The best form to use here is alternating our Opo-opo GCDs. This is because Leaping Opo is our strongest GCD.
Having collected both Nadis, our next use of Perfect Balance will grant us the Phantom Rush Masterful Blitz, regardless of which Beast Chakra we have used. Even though it does not matter which Beast Chakra we use to get the Masterful Blitz, Opo-opo will again be the strongest.
We want to avoid using Celestial Revolution at all costs, however it is somewhat benevolent and will still progress us towards building a Phantom Rush.
Riddle of Fire + Brotherhood
| Icon | Name | Effect | Duration | Cooldown |
|---|---|---|---|---|
 | Riddle of Fire | Increases damage dealt by 15%. Grants Fire’s Rumination. | 20s | 60s |
| Brotherhood | Grants Brotherhood and Meditative Brotherhood to all party members within 30y. Brotherhood increases damage dealt by 5%. | 20s | 120s |
On the face of it, Riddle of Fire and Brotherhood are pretty simple skills. We press Riddle of Fire and do more damage for the next 20 seconds. We press Brotherhood and both we and our party do more damage for the next 20 seconds. While the burst windows that we build around these skills using the rest of our kit can be complex, the actual usage of these skills themselves are very simple. In a full uptime vacuum we simply press them on cooldown every single time they come back up. Make sure you’re always weaving RoF in the latter half of your GCD roll to ensure you get a full 11 GCDs under the buff.
In Dawntrail, Riddle of Fire has the additional effect of granting Fire’s Rumination, which allows us the use of Fire’s Reply during RoF.
Riddle of Wind
| Icon | Name | Effect | Duration | Cooldown |
|---|---|---|---|---|
 | Riddle of Wind | Reduces auto-attack delay by 50%. Grants Wind’s Rumination. | 15s | 90s |
Functionally, you can think of Riddle of Wind as a DoT, or as a damaging oGCD. Given that it has a 90s CD, it’s sometimes going to fall out of buffs; this is okay. In a vacuum, you just press Riddle of Wind on CD forever, getting the maximum amount of uses while every other usage misaligns itself from your buffs.
We will look at how - and more importantly, when - to optimise the use of Riddle of Wind later.
In Dawntrail, Riddle of Wind also grants Wind’s Rumination, allowing the use of Wind’s Reply during its effect.
Fire’s Reply and Wind’s Reply
| Icon | Name | Effect |
|---|---|---|
 | Fire’s Reply | Can be used while under the effect of Fire’s Rumination granted by Riddle of Fire. This ranged attack explodes around an enemy with 1400 potency and for 40% reduced potency for enemies around the primary target. Also grants Formless Fist after use. |
 | Wind’s Reply | Can be Used while under the effect of Wind’s Rumination granted by Riddle of Wind. This medium range attack hits everything in a line for 1040 potency for the first target, and the remaining targets at 40% reduced potency. |
Fire’s Reply features a 20 yalm range and is our second highest hitting skill in our kit with 1400 potency. Ideally it is always used after an Opo-opo form GCD, as it grants Formless Fist, allowing us to continue with another Opo-opo form GCD right after. Its great range makes this also a very good downtime tool if it happens to align.
Wind’s Reply features an awkward 10 yalm range and is also a fairly high hitting skill with 1040 potency. As opposed to Fire’s Reply, Wind’s Reply can be flexibly used during the duration of Riddle of Wind and Wind’s Rumination. It does not break combo, and can also be used as a downtime tool.
Utility and Misc. Skills
This is the part where I cover everything that’s been missed until now. We’ve covered everything you’d need to know in a dummy scenario, so now let’s take a quick tour of the toolkit that we find ourselves using as soon as we leave the dummy and get into a real encounter.
 | Six-Sided Star is a GCD with a potency of 780, but double the recast of every other GCD. In Dawntrail SSS also consumes all your Chakra with the same 80 potency per Chakra as The Forbidden Chakra. While doing two GCDs is always more potency than doing one SSS, this is useful in scenarios where you don’t have the time to do two GCDs, or before you disengage from a target. A situational skill, you’ll either use it before running out of a big aoe, before a boss dies, or before a boss goes untargetable for whatever reason. It also applies a small movement speed buff for five seconds. Overall a very useful utility GCD. |
 | Riddle of Earth is an oGCD with a 120s CD. It reduces damage taken by 20% for 10 seconds, and if damage is taken during this period you are granted the effect of Earth’s Resolve, a 100 potency 15 second duration heal over time. Also grants Earth’s Rumination for 30 seconds, allowing the use of Earth’s Reply |
 | Earth’s Reply can be used while under the effect of Earth’s Rumination. It creates a small AoE around you that heals for a considerable amount. It has increased healing potency while also under the effect of Earth’s Resolve. |
 | Thunderclap is our mobility tool, an oGCD with a 30s CD and three charges. It can target both your enemy or a party member, and provides us a decent amount of flexibility, being able to zip around up to three times in a row. |
 | Mantra is an oGCD with a 15s duration and a 90s CD. It increases healing received by you and all party members within 30y by 10%, which is quite a strong mitigation tool. Given that a lot of the shields in this game (Succor, Aspected Helios, etc.) are based on the amount of healing done, it means that Mantra can be used to provide both increased healing and greater shielding. You should discuss with your healers when to use it for maximum benefit. |
 | Feint is an oGCD with a 15s duration and a 90s CD, which lowers the target’s physical damage dealt by 10% and magic damage dealt by 5%. This is a very nice tool now, as we’re finally able to use it in fights that have no physical damage sources. As a tool for both progression and optimization it’s invaluable, and you should discuss with your healers and tanks where it’s best used for maximum effect. |
 | Arm’s Length is an oGCD with a 6s duration and a 120s CD. It nullifies almost every knockback/draw-in effect in the game, which is useful for keeping uptime when a boss tries to push you away. It can also be used to allow new solutions for mechanics. |
 | True North is an oGCD with two charges and a 45s CD. For its 10-second duration, it nullifies all positional requirements of your weaponskills. Even though we only have two positionals left, this is still useful for situations where for whatever reason you literally cannot get into the right position. |
 | Bloodbath is an oGCD with a 20s duration and a 90s CD. It converts a portion of physical damage dealt into healing; very useful for keeping yourself alive in a pinch. Sync it up with a buff window for even bigger heals. |
 | Second Wind is an oGCD with a 120s CD. It instantly heals you with a cure potency of 500. Similar to Bloodbath, it’s good to keep yourself alive in emergencies. |
 | Leg Sweep is an oGCD stun on a 40s CD. It’s generally not ever used, as the few stuns that do pop up across the various encounters in this game are typically covered by a tank. Still, not entirely worthless if no one else in your group knows/is able to correctly time their stun. |
Rotational Choices
Burst in Theory
Riddle of Fire, Brotherhood, and Fire’s Reply
Firstly, we want to get the maximum number of uses of each of these buffs available to us in a given encounter. This means that generally speaking, following on from their first use in the opener, both Riddle of Fire and Brotherhood will be used on cooldown.
This has the added bonus of keeping these 2 buffs in sync not only with each other, but also with the 2 minute party buffs of the rest of our team.
RoF has a duration of 20 seconds, which means Monk can fit 11 GCDs into a late-weave RoF. To “late weave” refers to pressing an oGCD in the latter half of the GCD roll, rather than simply pressing it immediately following the GCD.
Brotherhood also has a duration of 20 seconds, and while it is still possible to catch 11 GCDs under both Brotherhood and Riddle of Fire simultaneously, it requires some precise weaving. This idea will be discussed in the advanced guide, but for now good general use of Brotherhood involves simply early weaving it on each use. Early weaving, the inverse of late weaving, is pressing an oGCD as soon as possible following the previous GCD.
Of course, as a raid buff we are also aiming to keep Brotherhood in sync with our groups buffs as closely as possible, which is done by keeping it on cooldown and minimising any potential drift.
Using Riddle of Fire also grants us one use of Fire’s Reply during its duration which should never be left unused. As Fire’s Reply grants us Formless Fist, we are aiming to sandwhich it between Opo-opo GCD’s - that is, to always use it after an Opo-opo GCD (Leaping Opo or Dragon Kick), and to always follow it up with another Opo-opo GCD.
Odd and Even Windows
Riddle of Fire has a cooldown of 60 seconds, where Brotherhood sits at 120 seconds. This results with us pressing Riddle of Fire every minute, where ever other minute it will be paired with Brotherhood. Given that half of our burst windows consist solely of RoF and the other half have both RoF and BH, we have names to distinguish between them: even and odd windows.
The windows are named after the minute they occur in an encounter. RoF and BH are used together at the start of the fight and then align every 2 minutes (0, 2, 4, 6…), hence even window. RoF is used on its own every minute after even windows (1, 3, 5, 7, …), hence odd window.
As all raid buffs in the game - including our very own BH - have a cooldown of 2 minutes, we prioritise this window over the odd window. With the cooldown of Perfect Balance being 40 seconds, this allows to fit the following GCDs into each window:
- Even: 2x Masterful Blitz, 1x Fire’s Reply
- Odd: 1x Masterful Blitz, 1x Fire’s Reply
- Wind’s Reply should also be used in both windows, whenever Riddle of Wind aligns.
Riddle of Wind and Wind’s Reply
As mentioned, Riddle of Wind being on a cooldown of 90 seconds means that it will only align with a Riddle of Fire every other use if used on cooldown (every 3 minutes). Using RoW will allow us to use Wind’s Reply once during its duration. This naturally means that just as RoW, Wind’s Reply also does not always align with every RoF window.
While using Riddle of Wind on cooldown guarantees the maximum usages, sometimes we can strategically delay RoW to make it align with RoF, we do this only if it does not lose us an overall usage. This again requires knowledge or a good guess of the kill time, if it is unknown, Riddle of Wind is best used on cooldown.
As an example, take a hypothetical encounter with a duration of 4 minutes and 30 seconds.
Pressing Riddle of Wind on cooldown would result in a total of 3 uses; 00:00, 01:30, 03:00. This sees one RoW in the opener, and one in an odd window.
However, we could instead use it at 00:00, 02:00, and 03:30. This is still 3 total uses, but we’ve shifted a use out of the odd window and into the even window.
Where Fire’s Reply is restricted in where it can be placed due to granting Formless Fist, Wind’s Reply can be used freely within the duration of Wind’s Rumination instead, being able to be placed absolutely anywhere within the 15 second window.
Perfect Balance and Opo-opo Optimisation
Perfect Balance allows us to use GCDs of any of the 3 forms and using the resulting Masterful Blitz grants us Formless Fist. As mentioned previously, Opo-opo GCDs are our strongest regular GCDs, as such we are looking to optimize the use of Perfect Balance to maximize our Opo-opo GCDs.
First and foremost we do this by placement of Perfect Balance. Ideally it should always be placed after and follow an Opo-opo GCD.
Secondly is sequencing. When using Perfect Balance to execute an Elixir Burst or a Phantom Rush, we are exclusively using Opo-opo GCDs. When building a Rising Phoenix, we are forced to use one GCD of each form. It might not be immediately obvious, but the order of those GCDs do matter.
A very common optimisation we can make for the Solar PB sequence for Rising Phoenix is pressing PB slightly before RoF following an Opo-opo GCD, such that RoF will come up before one of the three GCDs of the sequence. We can then order the three GCDs from weakest to strongest, which will often result in a weaker GCD being moved before RoF and stronger GCDs into RoF. Examples will be shown in the Burst in Practice section.
Third is the placement relative to buffs. Perfect Balance has a 40 second cooldown and allows us to hold 2 charges. Our burst windows occur along 120 second intervals. We can fit 3 uses of Perfect Balance across this 2 minute span of time. We have established that the even window is the stronger of the 2 burst windows, and so we will put 2 uses of Perfect Balance into our even windows, and 1 use into our odd windows.
Nadi Alignment and Overcapping
Keeping in mind that Opo-opo GCDs are our strongest form and Phantom Rush being our strongest GCD, we aim to optimise the amount of both, and also moving as many into Riddle of Fire and other buffs. If we follow the guideline of using two Perfect Balance in even windows and one Perfect Balance in odd windows, then we will collect a Solar Nadi and a Lunar Nadi in our opener, which will naturally give us our first Phantom Rush in the first odd minute window.
If we strategically overcap the same Nadi by generating the same one twice, we can move Phantom Rush into our 2 minutes and subsequent even windows instead. This is usually preferred as the even windows contain both your buffs, as well as buffs of your party members. While ensuring that our strongest GCD is fully buffed sounds enticing, it might cause us to lose a Phantom Rush overall, as we are effectively pushing back the PR by one Perfect Balance usage. However with the buffs to Phantom Rush and Lunar sequences in Dawntrail, the loss of a Phantom Rush is usually not very significant the longer the fights become. Our preferred Nadi to overcap is the Lunar one, as it produces more Opo-opo GCDs.
The choice of optimal Nadi Alignment can change from fight to fight, but will mostly depend on the kill time.
Burst in Practice
Let’s briefly touch on the Riddle of Fire, Brotherhood and Perfect Balance rules as a refresher before we start to put them into use.
- Always press RoF and BH on cooldown, keeping them aligned
- Always late weave RoF
- Always PB after an Opo GCD
- Always Opo GCD with Formless Fist (after Masterful Blitz and Fire’s Reply)
- 1 PB in Odd windows, 2 PB in Even windows
These 5 key pieces of information are all we need to construct our odd and even burst windows.
Solar Odd Windows
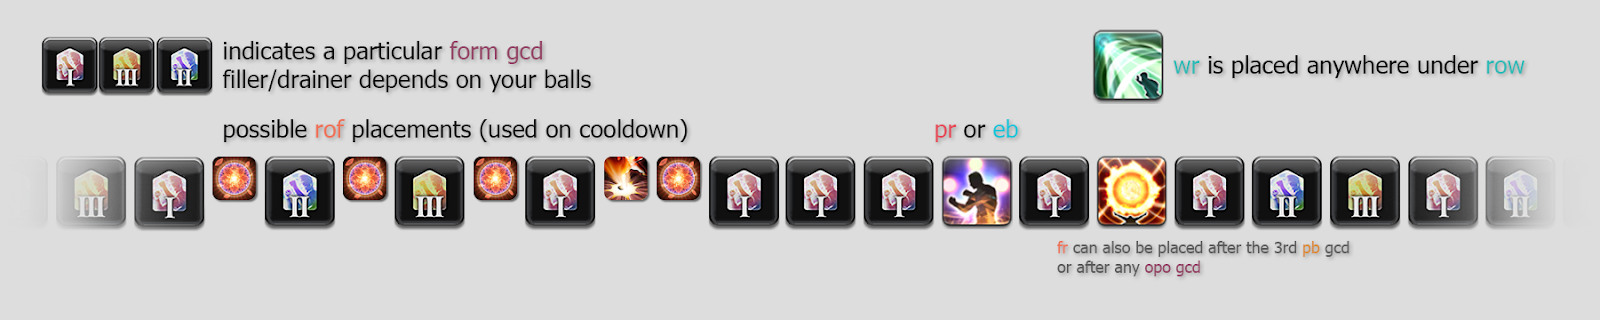
A Solar Odd window is, as the name suggests, is an odd window consisting of a single Solar nadi (Rising Phoenix).
To perform a Solar Odd window, we are looking to use PB before RoF. As touched on previously, this is in an effort to shift weaker GCDs outside of Riddle of Fire where possible, by using the Perfect Balance GCDs in the order of weakest > strongest.
We want to place the PB after the Opo-opo GCD that occurs when RoF has around 2-7 seconds left on cooldown. This will ensure that the resulting Rising Phoenix becomes ready after the usual 3 GCDs and will always fit into RoF. We then follow the Rising Phoenix with another Opo-opo GCD that is granted to us by the Formless Fist.
The following infographic shows how our desired Solar Odd windows will look:

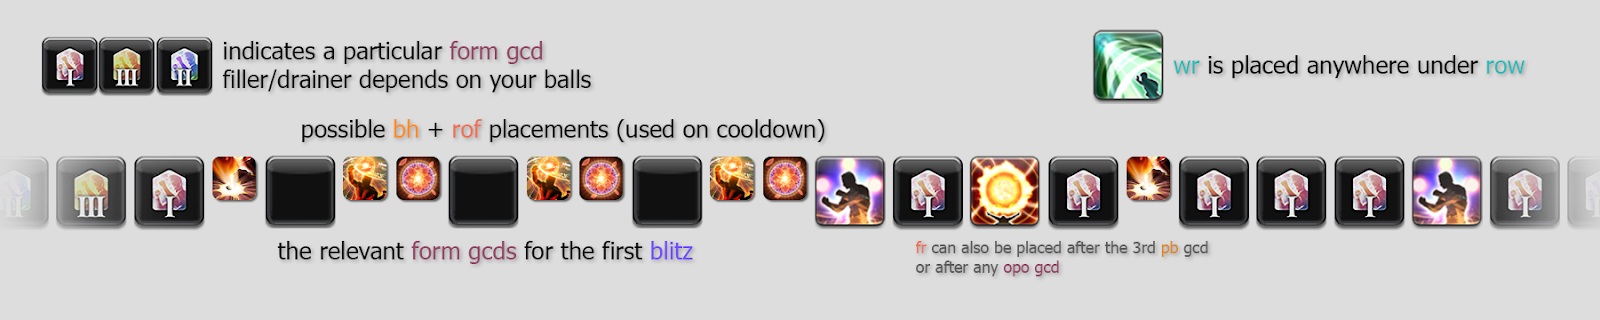
Lunar Odd Windows
A Lunar Odd window is an odd window where we are doing a Lunar Perfect Balance sequence (3x Opo-opo GCDs), but not necessarily generating a Lunar solar nadi. This is because these Odd windows can either consist of Elixir Burst, which will generate a Lunar nadi, or a Phantom Rush, which will instead spend both nadi.
To perform a Lunar Odd window, we are looking to use PB after RoF. This is because, as we continue to mention, Opo-opo GCDs are our most valuable GCD, and so we want to maximise the amount of potential buffed Leaping Opos within this RoF window.
Specifically, we will be placing the Perfect Balance use after the first Opo-opo GCD that occurs following the use of Riddle of Fire. This ensures that all of the relevant GCDs, including our Masterful Blitz and Fire’s Reply, will fall within the burst window.
Below is an image demonstrating how these Lunar odd windows will look.
“Umm Actually” Lunar Odd Windows
While using PB after RoF is almost always correct, there is one specific case where this is unfortunately not quite optimal. This is mostly being included for brevity and completeness of this guide, as in reality this can be hard to recognize on the fly, and rarely ever actually occurs.
Essentially this window happens if a Leaping Opo happens 2 GCDs (around ~3s) before RoF comes off cooldown, in which case pressing PB before RoF is better. This will allow us to move a Dragon Kick out of the window, and instead trades it with a Raptor GCD, allowing for a gain of - at most - 220 potency in RoF.
Below is a visualisation of what a “normal” lunar odd window featuring a Leaping Opo in this position looks like, and what an “Umm Actually” window looks like in comparison.
Even Windows
Our even windows will include the following mandatory GCDs:
- 2 Masterful Blitz
- Fire’s Reply
- 2 Formless Fist used on Opo-opo GCDs
- 3 Perfect Balance GCDs (ideally a Lunar sequence)
- Wind’s Reply - if available
That’s 8 (9 with WR) GCDs that we need to squeeze into our 11 GCD RoF window. This requires us to use Perfect Balance prior to Riddle of Fire, as there is simply not enough space in the 11 available RoF GCDs to fit 2 full Perfect Balance uses in tandem with all the requisite Opo GCDs and Replies.
Thankfully this ends up making it so that regardless of our Nadi state, all of the even window entries are the same, and so identifying how to being an even burst can be summarised in the following manner:
When you press an Opo-opo GCD 2-4 GCDs before RoF and BH come off cooldown, follow it with a Perfect Balance
- Alternative identifier: when you press an Opo GCD while RoF and BH have between 2-7 seconds left on cooldown
This timing ensures that the Masterful Blitz built from our first PB will always be under RoF and BH, while also having enough space left over to fit the rest of the burst into Riddle of Fire. This is the exact same principle used in Solar Odd windows.
From here we just follow the 5 key rules as established. The first Masterful Blitz will either be a Solar or a Lunar sequence, depending on nadi state going into the window. If it is a Lunar sequence we will spend the PB GCDs on Opo-opo Form, and if it is a Solar sequence we will instead order the 3 different form GCDs from weakest to strongest. We use the Formless Fist granted by Masterful Blitz on an Opo-opo GCD. And follow it by a Lunar sequence PB. The Fire’s Reply is placed appropriately after the Opo-opo GCD following either of the Blitzes as usual, or after the 3 PB GCDs. Its Formless Fist is also followed by an Opo-opo GCD. Wind’s Reply can be placed anywhere in this sequence.
Below is a visual of how even windows will look.
Fixing the -3 PB
In the instance that you misidentify a -3 PB (3 GCDs before RoF) window, you will arrive at what is known as ’the dreaded Even 0 window’. PB, RoF and BH will come up in the same GCD, requiring a triple-weave to stick to our established rules.
Thankfully there is an elegant solution to this problem.
Instead of triple weaving PB, BH, and RoF, the solution is to double weave BH and RoF as standard, then immediately follow up with Fire’s Reply. From here you can continue as normal; with your Opo GCD -> PB windows.

Fire’s Reply Flexibility
Throughout the previous sections the usage of Fire’s Reply has been statically defined, placing it immediately after an Opo GCD that follows a Masterful Blitz in every use case. However, if you have been paying close attention to the rules that we are following as we established them, you may realise that there is actually more flexiblity in where Fire’s Reply can be used than it first appears.
In all but name, Fire’s Reply is exactly the same as Masterful Blitz - it requires no form, and grants us Formless Fist. This means that we could, for example, execute a Perfect Balance, spend our 3 Perfect Balance GCDs, and then instead of immediately following with the Blitz, we could instead use Fire’s Reply > Opo GCD > Masterful Blitz instead. In terms of potency nothing changes, but this does allow us to move around the single ranged GCD that is available in our burst window, which can be very beneficial to us in encounters where being in melee range 100% of the time is not a given.
This has been touched on slightly when discussing how to fix a broken -3 PB window, but in leaning into this flexibility we find a world of possiblity. You could opt to use Fire’s Reply after the 2nd blitz of an even window instead, or pending the 2nd sequence of Perfect Balance GCDs before using Masterful Blitz.
In odd windows you also have the opportunity to briefly sit on Fire’s Reply, performing another loop of your basic 123 combo before using Fire’s Reply following the next Opo GCD instead.
This flexibility makes Fire’s Reply a very powerful uptime tool, as it allows us to roll our GCD even when out of range. This said, very often you might find yourself in a situation where you need to leave melee range, but there is no suitable FR use that maximizes the Opo-opo GCDs. In such cases it can and should be used more flexibly after any GCD, as a lost GCD is always worse than using FR sub-optimally.
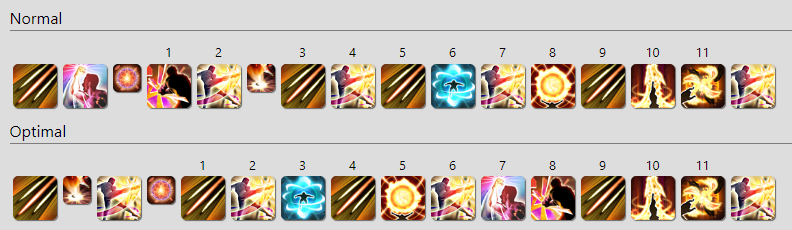
Openers
With Nadi Alignment and Overcapping in mind, there are two primary openers available to us, though additional options and variations exist. Our best options are the Double Lunar and Solar Lunar openers and their variations. The popular variations that every player should know for each opener is the 5s Buff variant and the 7s Buff variant.
The reason these 2 different variations exist is because certain other jobs have different preferences for when they burst/buff in their opener. As either option is fine for us, we can accommodate whatever timing best suits the rest of our party.
The Solar Lunar opener aims to maximize the amounts of Phantom Rushes throughout an encounter, as it does not overcap Nadi like the Double Lunar opener does. Double Lunar sets us up with a Nadi overcap, ideal for shifting the Phantom Rush into Even windows instead. Depending on which nadi state we begin a fight with, our following odd and even windows will be different.
Solar Lunar


Above are the most popular Solar Lunar openers. The choice will largely depend on your party’s preferred buff timing. Most party compositions will prefer 5s Buffs.
The Solar Lunar opener sets up for Lunar Odd windows and subsequent Solar Lunar Even windows.
Double Lunar


Above are the most popular Double Lunar openers. The choice will largely depend on your party’s preferred buff timing. Most party compositions will prefer 5s Buffs.
The Double Lunar Opener sets up for both the Double Lunar and the Triple Lunar path, which is the amount of times we overcap the Lunar Nadi before continuing building Nadis as usual.
- For Double Lunar we want to continue with Solar Odd windows and Double Lunar Even windows. This path will have Phantom Rush as our first Masterful Blitz in the Even windows.
- For Triple Lunar we do Lunar Odd windows and Solar Lunar Even windows. This path will have Phantom Rush as our second Masterful Blitz in the Even windows.
Picking Your Path
You can play any of the openers and subsequent paths without a very large loss, however will of course always be an optimal choice for any given situation. This optimal choice is always strongly related to kill time, as the wrong kill times for Double Lunar and Triple Lunar can result in the loss of a Phantom Rush. As such, in a vacuum, Solar Lunar tends to be safest option for personal damage, as it maximizes the amount of Phantom Rushes for any kill time. While losing a Phantom Rush used to be a bigger loss in Endwalker, even if it is put into Even windows. In Dawntrail it is no longer that big of a loss, and a couple of buffs might already be enough to make it better in terms of party dps.
For the kill times the PR is not lost, Double Lunar and Triple Lunar will perform a lot better than Solar Lunar, while the latter will only perform slightly better when it gains a PR over the other paths.
With this in mind, if the kill time is unknown, we recommend either the use of Solar Lunar or Double Lunar. While the choice of the former is the safest option, the Double Lunar path can be chosen, as it is a larger gain for most kill times compared to Solar Lunar, and is only a small loss otherwise for the remaining kill times, especially when factoring in party buffs.
For optimized settings, the kill time is usually known and the path can be picked accordingly. In terms of buff contribution and keeping your friends with party buffs happy, both Double Lunar and Triple Lunar will be the preferred paths, even if it comes at a slight loss of personal dps, and sometimes even party dps with a small amount of party buffs.
Still have questions? Check out the FAQ page where some may be answered.
- Have any questions?

 discord.gg/thebalanceffxivAuthors
 Perfect Balance
 wulf#8419
 Nyan Pls
nyanpyon
Nyan Pls
nyanpyon