Welcome to the encounter guide for the second tier of Endwalker.
As an important forewarning, allow me to repeat for the billionth time; Monk is a very flexible, very kill-time dependent job. What works at some times won’t work at others, so please don’t take the things contained herein as gospel to be replicated 100% of the time; you’ll still need to apply a little bit of brainpower to figure out what you want to be doing.
Proto-Carbuncle
Thunderclap is your friend. Some patterns are worse than others, just engage brain a little before you dash so you don’t get yourself killed.
Devour is the biggest parse killer in this fight, as so many people just default to holding CDs and don’t stop to consider if they’re losing RoFs, BHs, or PBs as a result.
As for how to handle Devour; It depends on the killtime.
If the boss is dying anywhere from XX:20 to XX30, you’re going to want to press RoF on CD before Devour so you don’t miss a use at the end of the fight.
At this point you then have the decision of whether or not you use 2 mins here or delay them till 5 mins. If killtime is around 7:20, you can afford to hold BH till 5 mins and get the 2nd use at 7 mins just fine still. As for blitzes, you can do either a single blitz or a double blitz before Devour. Single Blitz is risky as it overcaps on PB for about 20 seconds, so you may lose a use depending on the killtime. Double Blitz effectively inverts your rotation for the rest of the right, where you’ll be doing 1 Blitz (Phantom Rush) in the even windows from here, and 2 blitzes (EF and RP) in the odd windows.
Do an early opener to get more RoF value pre-Devour and pre-boss dying.
If the boss is dying later than this; XX:40 - XX:00, you can afford to drift RoF at various intervals in order to double blitz in an odd window. I won’t go too in depth on specifically what to do here because this giga depends on killtime, you can drift different amounts at different times to better suit a certain KT. If you’re unfamiliar with RoF drifts/double odd blitzes then go back to the guide and read about it there before you jump into the rotation planner to figure something out.
Here you can find a download for the Monk planner with various different concepts that can be applied to this fight; again I must state your mileage will vary, different killtimes favour different things, do not take this as a “I copy this spreadsheet and do max damage” type thing. This is simply to give you some ideas that you could consider applying to your own gameplay, tweaked to suit your party composition and your boss kill time.
Hegemone
Literally a striking dummy; no fun allowed. The stuns are so short SSS isn’t even worth it.
Agdistis
Another striking dummy. Again, stuns incredibly short - roughly 3 seconds. Using SSS actually eats up more of your GCD than you’d lose from just keeping your GCD rolling as usual.
Make sure you’re pulling as close to 0 as possible so you can get the Twin Snakes off before the first knockup.
Hephaistos: Human Mode
3rd striking dummy of the tier. Brief hold at 2 mins/early openers are both solutions to the problem of dog first 2 min CDs, depending on what your group wants to do.
If you’re enrage progging, make sure you hold your final RoF at 7 mins to double blitz.
Hephaistos: Freak Mode
The massive chunks of downtime due to the High Concepts alongside the Phoenix damage buff means this fight has a lot of room for optimisation, but as is always the case it all depends on your killtime, comp, and your groups willingness to adjust burst windows.
It’d be impossible for me to go through absolutely everything you could do in this fight, so instead I’ll again advise you to check out the rotation planner if you want to figure out how to play perfectly for your specific situation.
That being said, I can offer some general advice that worked out well enough to clear week 1 pre-nerfs, so should suit you fine if you want to do a bit more damage but don’t have the mental fortitude to sit in Microsoft Excel for hours on end sweating over single digit potency gains.
First up is phase 1; opener as usual, but don’t RoF at 1 min. Instead you can afford to hold it and do a double blitz here (double Lunar recommended to make the re-opener after HC less awkward)
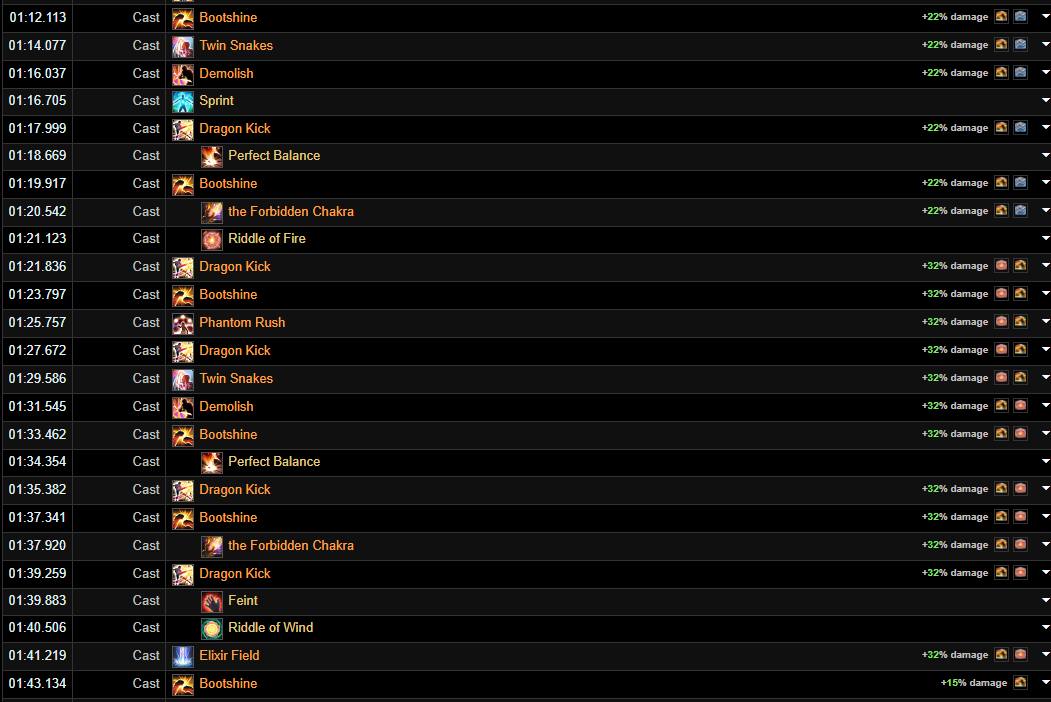
We’re starting after HC with a Lunar Nadi filled, so we’re going to need to do a Solar-Lunar reopener along these lines;
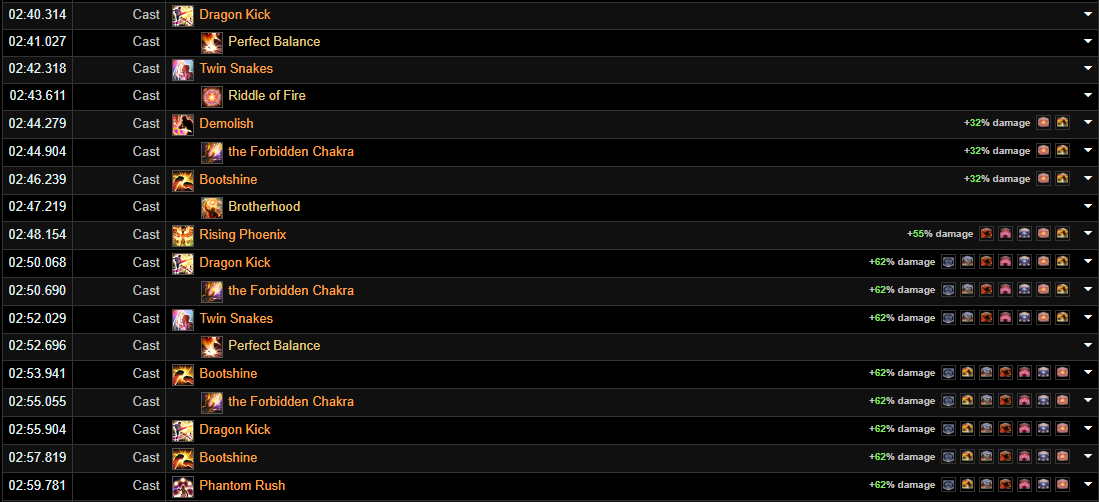
The rest of this phase follows in a standard manner, Odd window followed by another Solar Lunar Even.
At the end of HC2 you want to prep a Lunar Nadi in the downtime, doing a naked EF before entering the final phase.
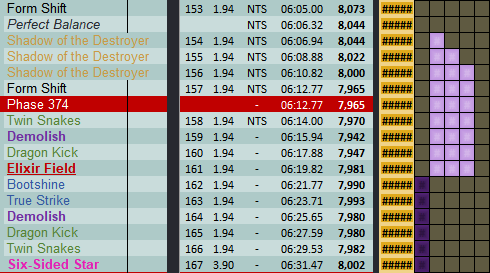
From here you’re doing another Solar Lunar reopener, trying to squeeze in a pot somewhere.
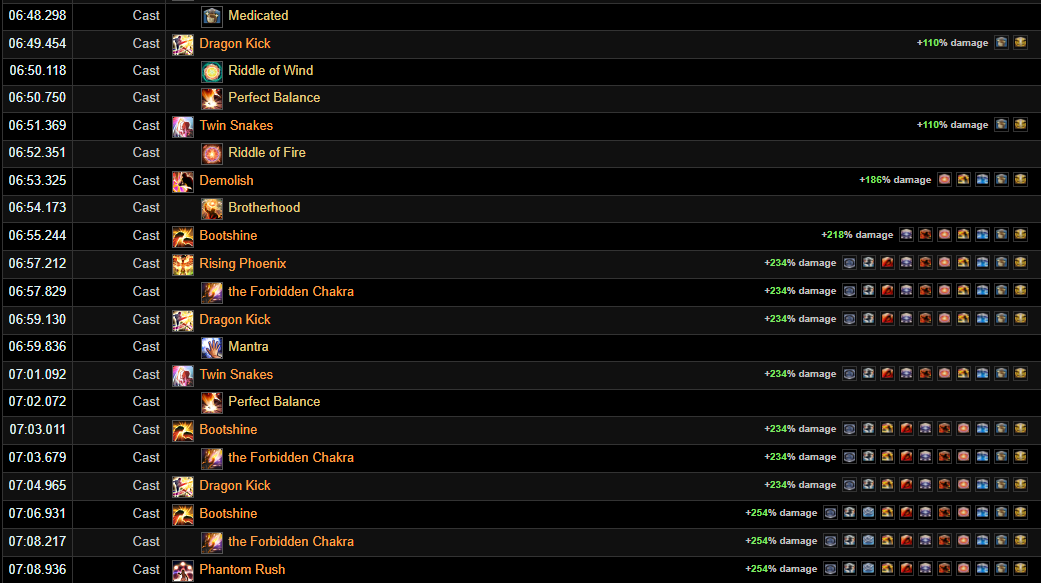
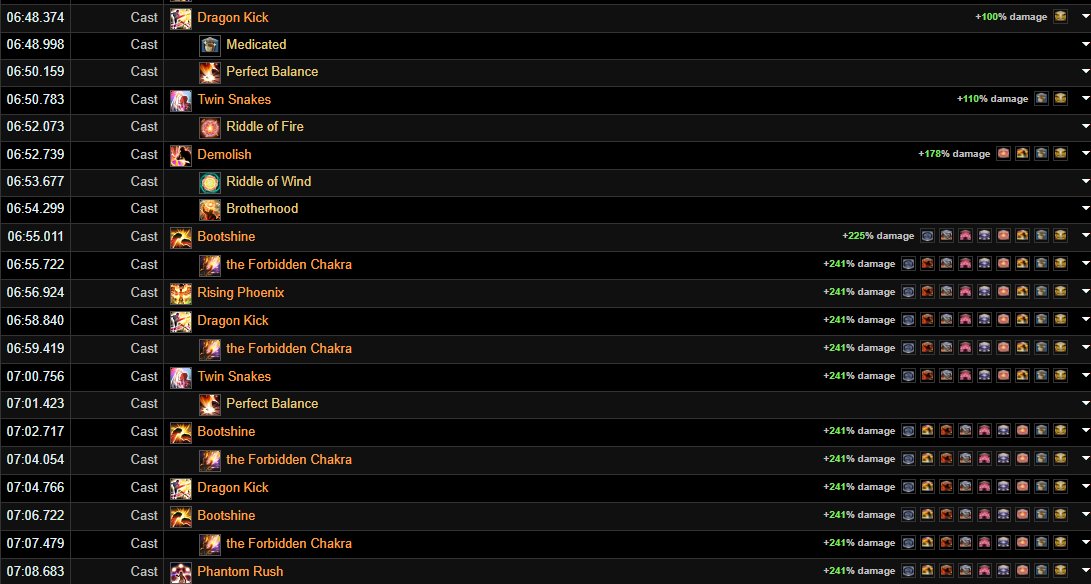
Assuming the boss survives for long enough, you can then delay your final RoF for a double Lunar, just like you did in P1.

