Hi it’s Mr PB here to talk to you about some ideas to keep in mind that should help you safely progress on your beetle-killing journey. This is not a “max dps speedkill big parse” style document, this is a document containing ideas that can be implemented to ensure you’re safely meeting the required dps checks in each phase by allocating damage smartly.
Disclaimer: This is an in progress document, things may change retroactively as later parts of the fight are uncovered/planned.
Things will vary based on comp and killtime.
Everything in this document is a suggestion, there are practically infinite possibilities for Monk in this fight - you could look at 10 different Monk logs and find 10 different ways of playing the fight. I strongly encourage that if you have any doubts about what’s presented in this document you do your own research as it is absolutely possible that there are other ways of dealing with each phase/dps check that have simply been missed due to the nature of the job. YMMV.
Phase 1 - Omega
Omega is a standard Double Solar up until around the end of the fight, where you’ll want to prep your Phantom Rush so you can hit it in the P2 opener. You can full uptime Pantokrator even with the worst strats with a combination of Sprint, Running out at the last puddle drop, and going no further than max melee
It is imperative that you end this phase on a Twin Snakes, as the downtime between phases is miniscule and at best you’re going to be able to get a few meditates in.
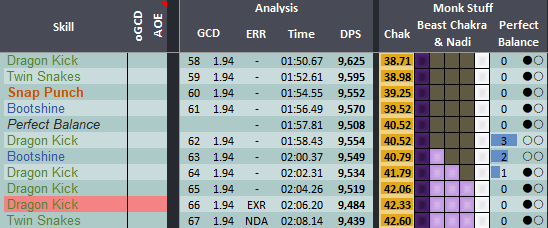
This generally means that the end of the phase is going to look akin to this for you, though killtime variations will mean you need to adjust on the fly to end on the Twin.
Phase 2 - Omega M/F
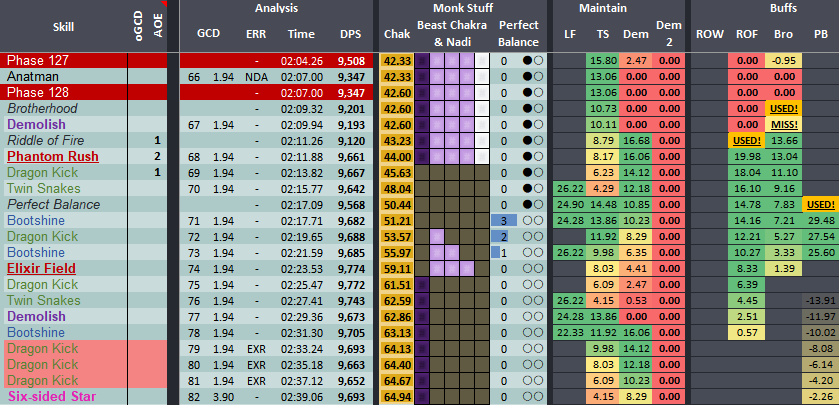
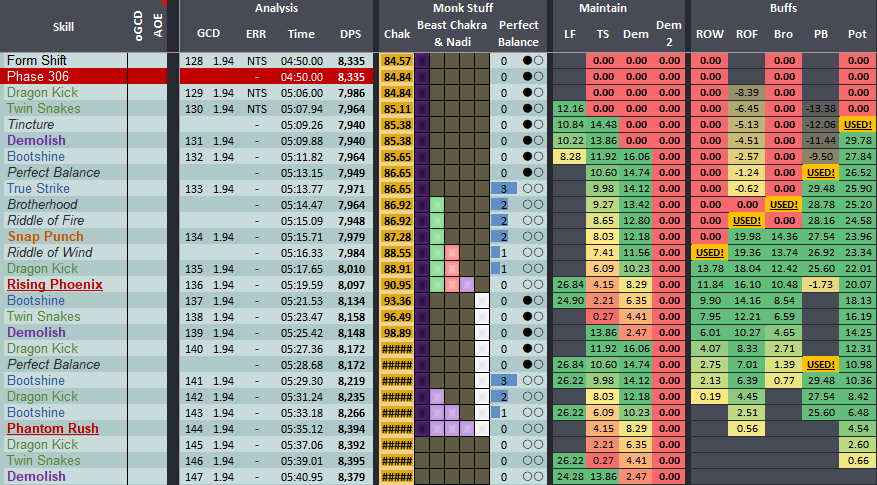
Above is the suggested reopener sequence for P2.
We want to use Brotherhood before Omega becomes targetable because it takes years to apply, which is made more painful by the way buffs ripple. Take a look at this for example:
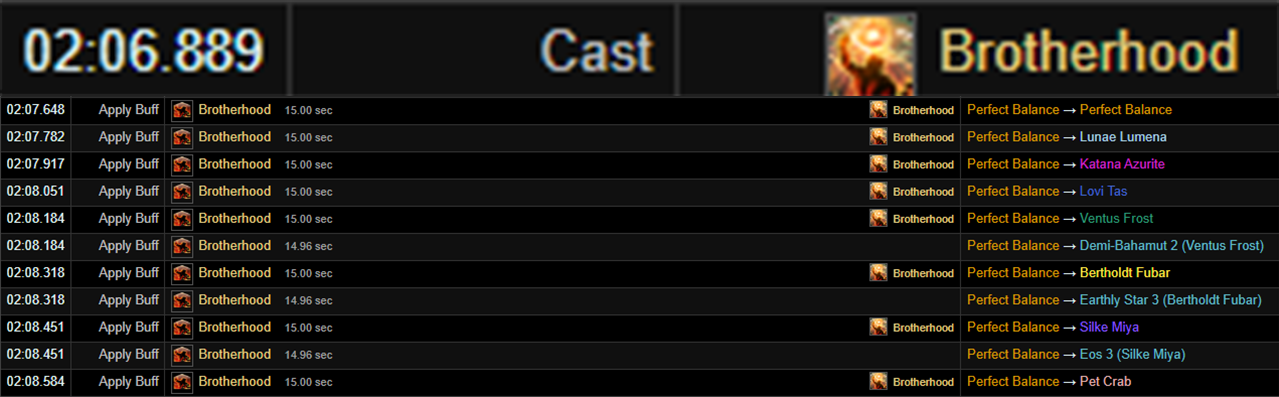
Cast at 2:06.889, applied to the 8th party member at 2:08.585. For this reason you’re going to want to prepop Brotherhood in order to ensure it’s actually on your party members when they’re cleaving both bosses. Priority targets should stand closer to you to get an earlier ripple, less valuable jobs should be further out.
If your group isn’t using buffs early enough to catch your Phantom Rush, you can instead opt for a 2GCD-> Blitz opener, effectively following the same principle but starting out Demolish - Dragon Kick - PR. This is a single digit personal DPS loss, but made up if you can get additional buffs onto Phantom Rush.
If you do choose to do a 2GCD->Blitz opener, I advise macroing your Demolish - if you’re not sure why I’m telling you to do that, check out the Macromania section in the Monk googledoc guide.
The next uptime sequence should look something as follows.
We’re able to put 2 blitzes into our reopener Riddle of Fire, and with some filler DKs we can push Phantom Rush back to after Firewall expires in order to cleave both bosses yet again.
The DPS check for this phase is actually quite relaxed, so the rest of the phase isn’t massively important. The key things are keeping our RoF on CD and using PB at the right times, setting up our PB CD and Nadis for later phases with tighter checks. You’ll want to hold damage at the end of the phase until as close to the enrage as possible so the resource jobs in your party can build as much gauge as possible, and so that your PB charges will be off cooldown later on when you really need them.
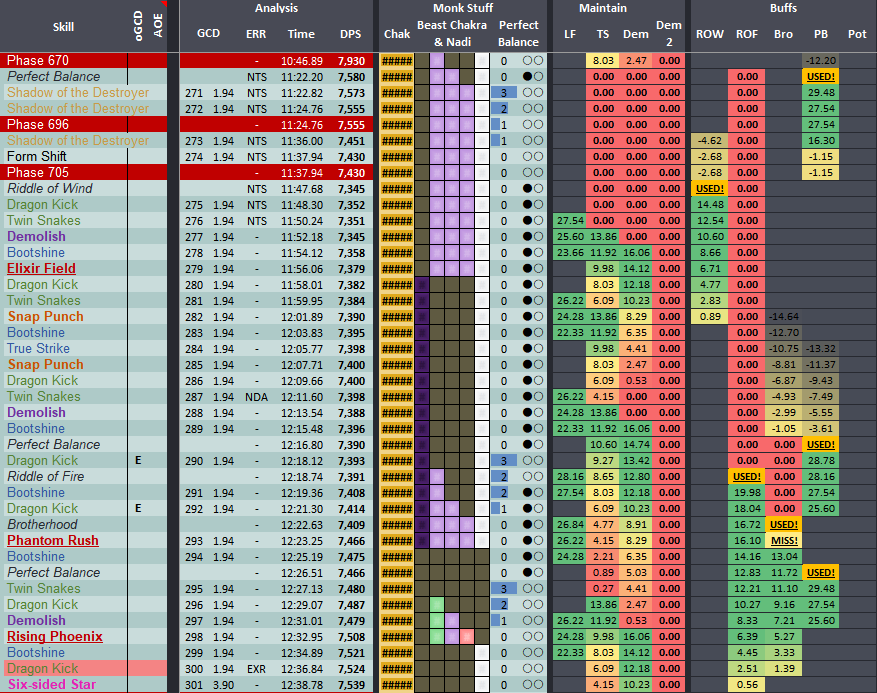
Phase 3 - Omega Reconfigured
WARNING
YOU ARE NOW ENTERING THE DANGER ZONE
You may be familiar with the concept of the buff cap - if not, the tl;dr is that you can only have 30 buffs active at one time. Monk has a lot of personal buffs, not just all of our riddles and damage buffs but things like Perfect Balance, Formless Fist, our forms. The mechanics in this phase apply a lot of buffs to you, and in the “wrong” comp something like this may end up happening to you;

If you want to avoid dodging your own Riddle of Fire/having Dance Partner + Devilment removed from you/a myriad of other fun side effects of a 30 buff limit, you’re going to want to make sure you remove your FC buffs, and then consider creating a macro to cleanse any unnecessary status effects that you can click before entering your burst to ensure you’re as ready as you can be to receive your groups damage buffs.
Something like
/statusoff Mantra
/statusoff Riddle of Earth
/statusoff Bloodbath
/statusoff True North
Really any buffs that you can think of to remove that are less valuable to you and your team than, say, the game forcibly pushing dance partner off you. (Why yes this did happen to me, how can you tell?)
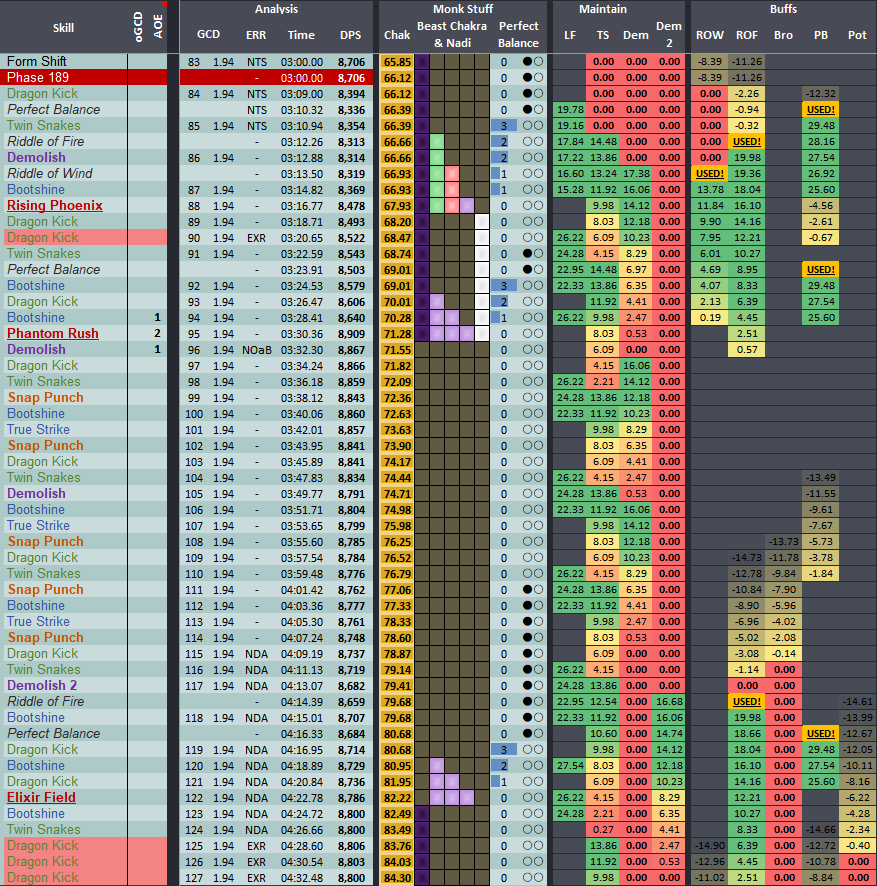
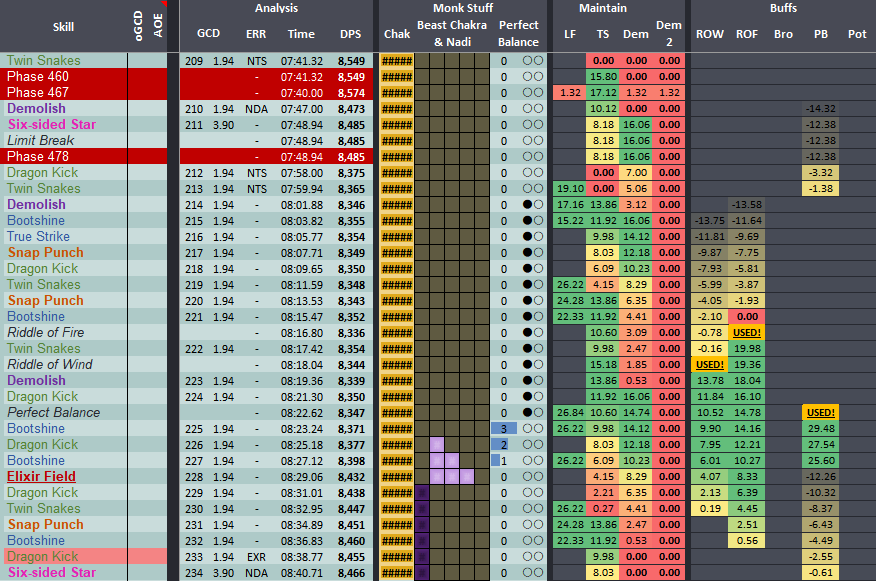
Warnings aside, here’s your opener:
Ideally you’ve held on previous phases long enough that your RoF and PB CDs come up at the right time here.
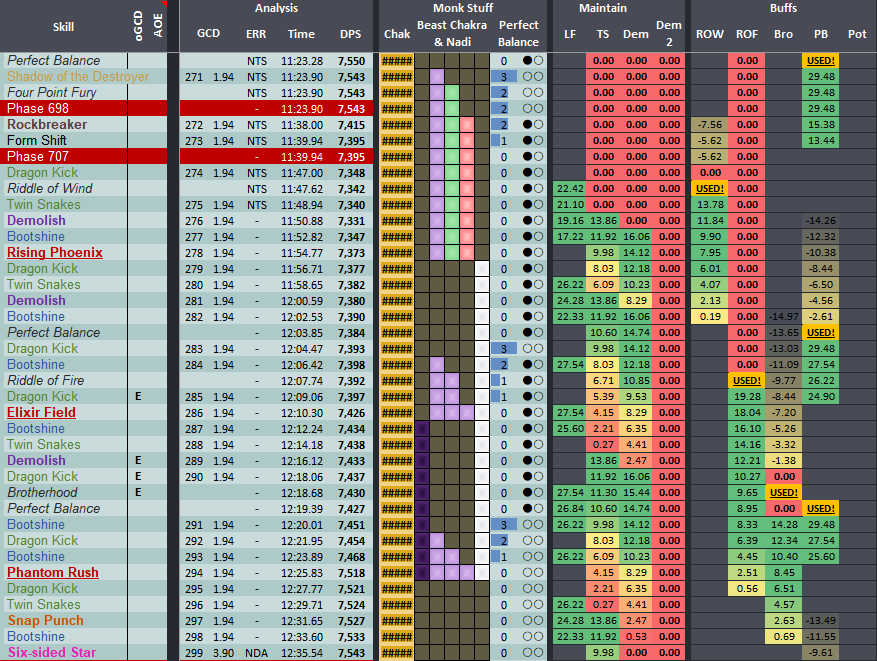
It is at this point, dear reader, that the idea of an encounter doc for this fight falls apart even further. Depending on your comp, your damage, and how your group plans out their damage to meet future checks, you’re going to need to find the least-bad way of shuffling your own damage around. The P3 DPS check is quite lax, and so once again it’ll be held close to the enrage for the benefit of your resource jobs being able to pump hard into the Blue Screen check, and so you may or may not find yourself needing to push Blitzes/Brotherhoods.
If you need to dump your whole burst window to meet the P3 check, the rest of the phase is fairly standard ending on a normal burst window that’ll likely look something like this;
Use the following RoW on CD to ensure you get a use in P4.
If you’re meeting the P3 check no problem and intentionally holding to prolong the phase for your resource jobs, you can instead choose to hold the final PB and move it into the P4 check.
This can mean either doing a single Elixir Field on your next odd window into a solo Rising Phoenix in the even window, or using a Rising Phoenix on the next odd window followed by a lone Elixir Field in the even window. There is a grand total of roughly 1dps between either option, so whatever’s easiest for you.
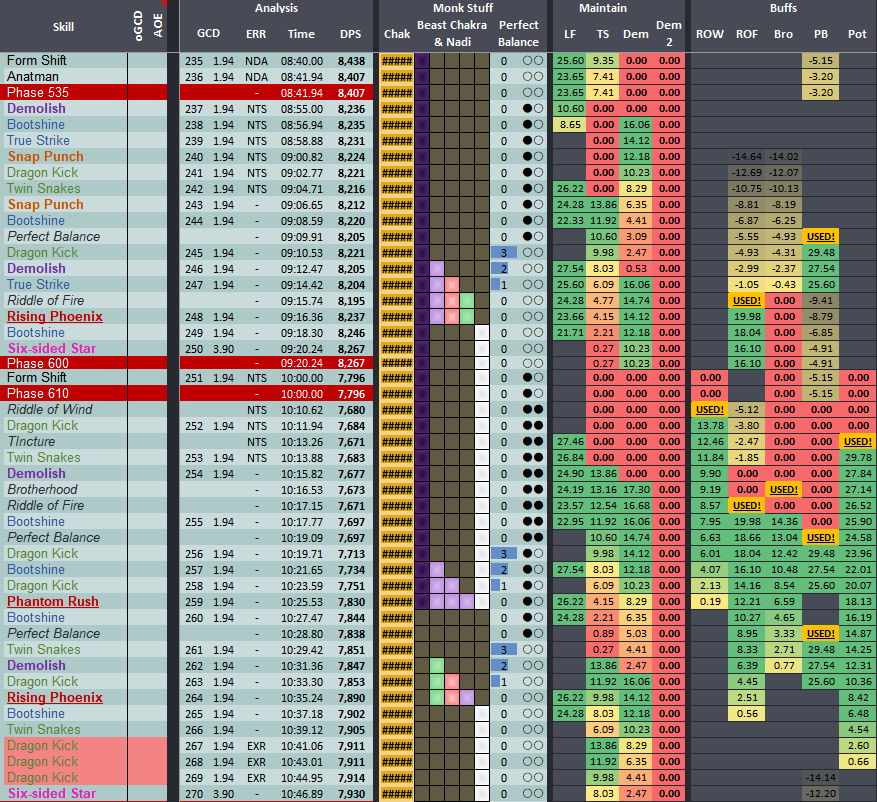
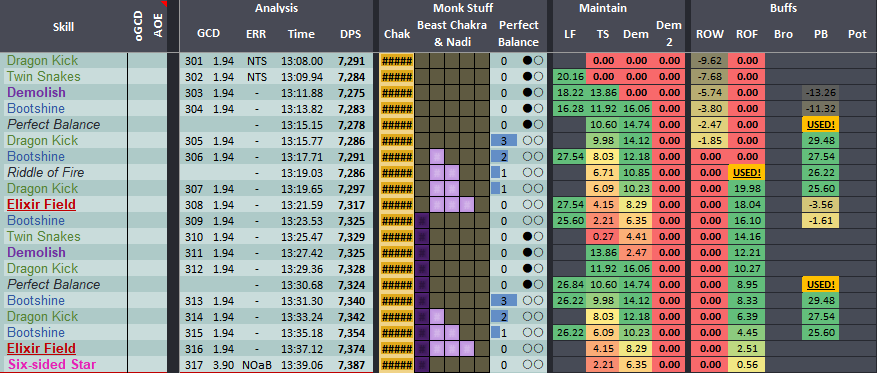
Phase 4 - Blue Screen
Moving into P4, as mentioned you can either fit 1 or 2 blitzes in here depending on your groups needs. You’re also almost certainly going to be the one LBing in this phase as a Monk so prepare mentally.
Whether you choose to double or single blitz, you’re going to end up doing something like this.

Phase 5 - Run: Dynamis
Hello. Welcome to Phase 5.
The first instance of uptime is cringe, but yes you have to press RoF there because the downtime is so long you’re throwing it away if you don’t. The amount of GCDs you get in that RoF(generally between 1-4) / the RoF injection point in the uptime following Trio 2 is based on how soon you’ve been getting RoF on CD in previous phases combined with how slow/fast the phases have been dying.
The following uptime will see you being able to do a more normal burst window with a tincture. You want to get Riddle of Wind on cooldown ASAP so that it lines up better with your P6 opener.
Next is our first instance of a downtime pre-PB prep. Make sure you use it early enough to get the CD rolling, and don’t finish it until late enough that you’re able to get the EF off in an ideal spot in the uptime. It’s a naked blitz, but there’s nothing we can do about that. Holding the PB is a waste, so there it is.
Final uptime we get to pop off an odd window before the long transition into the final phase.
Phase 6 - Alpha Omega
Congrats on hitting P6, that basically concludes our work here. We’re totally done, nothing left to talk about. I won’t insult your intelligence, this final phase is basically just 4 minutes and 30 seconds of standard Double Solar gaming, a welcome phase to relax in after everything that’s led to this moment.
Given the phase timing, it’s worth noting that you can save Riddle of Wind for each 2 minute burst window without losing a usage. You can also potion on any of the 2 minute windows, whichever is least inconvenient for you.
Alright, that’s us done for now, enjoy your clear and thanks for reading!
Phase 5 - Run: Dynamis (Evil Mode)
Just kidding we’re not quite done.
It isn’t really worth getting into, but I feel like I’d be doing you a disservice if I didn’t point this out. You probably noticed that even with the naked blitz in P5 we overcapped on PBs a good amount. This might’ve got you thinking, “What if we simply did not do that. What if we did not overcap.”
The answer is, we get an additional Blitz in P5.
The thing is, while this is technically a DPS gain over the whole fight, it’s cursed as hell and will cause you to do less damage in P6 as it’ll knock you out of Double Solar and into Optimal Drift. You can avoid this by instead opting to do an Elixir Field instead of a Rising Phoenix in the first uptime, capping a Lunar Nadi. This means every following Even burst is going to be a Solar-Lunar, RP->PR window.
The DPS check in P5 is incredibly lenient already and can be cleared with deaths comfortably, so really the only reason to do this is to boost your parse, which is likely not going to look amazing anyway due to all the holding that occurs in this fight. An added benefit to parsing that this brings is the fact that if you have good DPS in P6 the boss is going to die before you can get your 2nd Blitz off if doing a Lunar-Solar sequence, where the earlier PB usage of a Solar-Lunar burst means you’re blitzing earlier and therefore less likely to miss/ghost the damage.
Below are some examples of how your timers might align going for an additional blitz in P5 - as always though, if you do choose to implement something like this into your rotation, I urge you to plan it out for yourself and see how it aligns with your group and your killtimes. There’s a lot of freedom with downtime PBs so you could end up with something vastly different to what’s presented here.

- Have any questions?

 discord.gg/thebalanceffxivAuthors