Introduction
Ninja is a fast-paced yet flexible job with a high focus on a powerful burst every one and two minutes. It is unique from other jobs with its utilization of Ninjutsus, a combo-like system allowing a Ninja to form a multitude of ranged attacks. We have a personal buff every minute (Kunai’s Bane) where we emphasize landing all of our biggest attacks within 16.25s, and a raid buff (Dokumori) every 2-minutes that lasts 21s.
If you want a melee job with the most flexibility for disengagements and has a fast-paced burst phase and relaxing filler phase, then Ninja might just be the job for you!
This guide assumes you are level 100 and wish to learn the job for savage or ultimate raiding, even if completely fresh!
Other topics such as handling downtime and mult-targets is included. As such, this is a comprehensive guide.
If you’re looking for Advanced Optimizations such as Extended Standard or JP, check the advanced guide on this site.
Resources
⦿ Rotation Planner: Includes a visualization of a 6-minute rotation, but primarily allows anyone to create a rotation with calculated values.
⦿ XIVAnalysis is good for checking general mistakes and viewing a timeline.
⦿ XIVGear is useful for creating gearsets for any job
Core Concepts
⦿ Ninki is one of two gauges, and allows us to accumulate resources for use of Bhavacakra, Hellfrog Medium or Bunshin.
Furthermore, we ought to avoid ever overcapping on Ninki, even if we must burn gauge right before Trick Attack. Overcapped Ninki is potential oGCD loss, which is a far larger loss than the gain of getting more Bhavacakras under Trick.
Additionally, any GCDs that consume Bunshin will gain an additional +5 Ninki.
| +5 | +10 | +15 | +40 | +50 |
|---|---|---|---|---|


  |  | 
 |  |  |
⦿ Kazematoi is our second gauge and forces a similar playstyle to our former Huton gauge. We fill this gauge with Armor Crush and spend this gauge with Aeolian Edge. Each consumed stack grants +100 potency to Aeolian Edge, making the normally 440p skill be 540p.
Armor Crush gains 2 Kazematoi to a maximum of 5 and Aeolian Edge spends 1 Kazematoi. It is important to note that we should never overcap Kazematoi, as this is a flat DPS loss.
⦿ Ninjutsus are unique abilities that we formulate with the mudras: Ten, Chi and Jin. Refer to this cheat Sheet for all the different mudra combinations.
⦿ Kunai’s Bane is an AOE targeted personal buff that increases damage by 10% you do to the afflicted targets for 16.25 seconds every minute. Our goal is to utilize Kunai’s Bane and fit as many high potency abilities as we can before it ends.
⦿ Dokumori is our raid-buff that afflicts the target with a vulnerability debuff that increases damage taken by 5% for everyone hitting the target every 2-minutes for 21.0s. We ought to couple this closely with Kunai’s Bane to maximize our damage output.
⦿ Pet Potency: Bunshin is our only pet and anything that Bunshin executes will use ‘pet potency’ instead of potency listed on our tooltip. Yes, the tooltip isn’t real.
This is because pets don’t benefit from party bonus and have a lower job-modifier. To put simply, pets do less damage.
Pet potency is roughly x0.92 of their listed tooltip.
- Phantom Kamaitachi is 552 potency
- Single-Target bunshin hits are 147 potency.
Standard Openers

- Suiton prepull preparation should be at -6.0 seconds and cast approximately -0.90 seconds on the timer. This will shorten our cooldown on mudra and ensure we can get x2 Raiton under Kunai’s Bane after the opener
- Ideally drift Dokumori 1 GCD post opener, to allow for better alignment with all other raid buffs. We use it so early in the opener due to Bunshin.
- Can catch the last Raiju (Extended Standard) with very late woven Kunai’s Bane. More in the Advanced Guide.
- Similar to the above with Suiton and drifting Dokomori.
- This uses Kunai’s Bane a GCD earlier, but is a slightly weaker opener.
- This opener is preferable on 2.10 GCD due to inherit drift on that speed.
- Similar to 4th GCD Standard except Dokumori is much better aligned with other raid buffs in the party.
- Main difference is Bunshin is 1GCD later throughout the fight and is a slightly weaker opener. <br
Standard Rotation
Filler & Kazematoi
Outside of our Kunai’s Bane & Dokumori burst windows, our filler is straight-forward. A majority of it will be using our combo route Spinning Edge → Gust Slash → Aeolian Edge / Armor Crush, and allows us to continue doing damage until our next burst window.
We should only use Aeolian Edge when our Kazematoi Gauge has at least 1 kazematoi. Otherwise, we ought to use Armor Crush to build. It is also important to build enough gauge so that we use Aeolian Edge in Kunai’s Bane and Dokumori instead of Armor Crush.
Positionals
Aeolian Edge is a rear positional while Armor Crush is a flank positional. Since we have flexibility on how we build/spend kazematoi, we should line our usage up so it’s convenient to hit a rear or flank positional.
Ninki
Throughout our rotation we will be building resources and spending Ninki as needed. Optimally, it is best if we pool our Ninki as high as possible without overcapping for our Kunai’s Bane window, then dump as many spenders as weave space provides. Generally this will look to be between 1 to 3 Bhavacakras/Zesho Meppo per Kunai window.
| Ability | Icon | Potency | Usage |
|---|---|---|---|
| Bunshin |  | N/A | Use on cooldown. Don’t hold for Kunai's Bane unless holding it won’t cost you a usage. |
| Bhavacakra |  | 380 or 530 | When there are 1 - 2 targets. Only use on 3 targets if Meisui is active. |
| Zesho Meppo |  | 550 or 700 | When there is only 1 target, else Deathfrog Medium. |
| Hellfrog Medium |  | 160/target | When there are 3+ targets. |
| Deathfrog Medium |  | 300/target | When there are 2+ targets. |
Ninjutsus
Cheat Sheet: Easy to view guide for all Ninjutsu combinations. Remember, only the last mudra matters for what ninjutsu gets created.
It is important for a Ninja to understand and confidently know each Ninjutsu combination, as our rotation demands excessive use of Ten, Chi and Jin to formulate some of our strongest GCDs. With a 20 second cooldown on our mudras, we expect to get 3 natural Ninjutsus per minute.
- One ninjutsu will be used on Suiton or Huton to prepare Kunai’s Bane.
- The other two will be used on Raiton, Katon, or Doton.
Kassatsu provides us with an additional Ninjutsu every minute and should be used as Hyosho Ranruu or Goka Mekkyaku. This means a total of 4 Ninjustus will be cast per minute.
| Ability | Icon | Potency | Usage |
|---|---|---|---|
| Suiton |  | 540p | Use with 1 - 2 targets. |
| Huton |  | 240p / target | Use over Suiton with 3+ targets. |
| Raiton |  | 740p | Use with 1 - 2 targets. |
| Katon |  | 350p / target | Use over Raiton with 2+ targets if Doton is active. Else, 3+ targets. |
| Doton |  | 80p / tick per target, for 7 ticks. 560p / target full duration. | Targets afflicted with Doton for the full duration will endure 560p (or 80p per tick). Use on 2+ targets if targets remain in it for the full duration. An additional 50p (Hollow Nozuchi) is added per target upon use of Hakke Mujinsatsu, Katon, Goka Mekkyaku and Phantom Kamaitachi. |
| Hyosho Ranryu |  | 1,690p (with Kassatsu). | Use with 1 - 2 targets. |
| Goka Mekkyaku |  | 780p / target (with Kassatsu). | Use with 3+ targets. |
Multi-Target Overview
| Ability | Icon | Potency | Usage |
|---|---|---|---|
| Huton | | 240p / target | Use over Suiton with 3+ targets. |
| Katon | | 350p / target | Use over Raiton with 2+ targets if Doton is active. Else, 3+ targets. |
| Doton | | 80p / tick per target, for 7 ticks. 560p / target full duration. | Targets afflicted with Doton for the full duration will endure 560p (or 80p per tick). Use on 2+ targets if targets remain in it for the full duration. An additional 50p is added per target upon use of Hakke Mujinsatsu, Katon, Goka Mekkyaku and Phantom Kamaitachi. |
| Goka Mekkyaku | | 780p / target (with Kassatsu) | Use over Hyosho with 3+ targets. |
| Death Blossom & Hakke | | 100p / target & 130p / target respectively | Use if 4+ targets. If Doton active, use if 3+ targets. |
Standard Burst Windows
Since Ninja’s damage is primarily focused on our burst windows, and less on our filler, it is important to be confident with the execution of our Kunai’s Bane and Dokumori burst windows.
Our burst can be split into two types: Odd Windows (1m,3m,5m…) and Even Windows (0m,2m,4m…). Our even windows will have our 2-minute cooldowns while our odd windows will not.
Odd Window
This is a window that happens every odd minute or is better identified by its absence of 2-minute cooldowns. This window is easier to execute than the Even Window, for there are a lot less abilities we will cram within the window.
We ought to try to fit in:
x1 Hyosho, x2 Raiton, x2 Raiju, x1 Dream Within A Dream and as many Bhavacakras as we have available. An extra 2 GCDs will also make it into this window.
Additionally, we should prioritize Aeolian Edge over Armor Crush by ensuring we have enough Kazematoi gauge going into Kunai’s Bane.
If Bunshin was used 45s within an odd Kunai’s Bane, and Phantom Kamaitachi was NOT used to disengage from the boss, we should also have x1 Phantom Kamaitachi within an odd window.
Examples
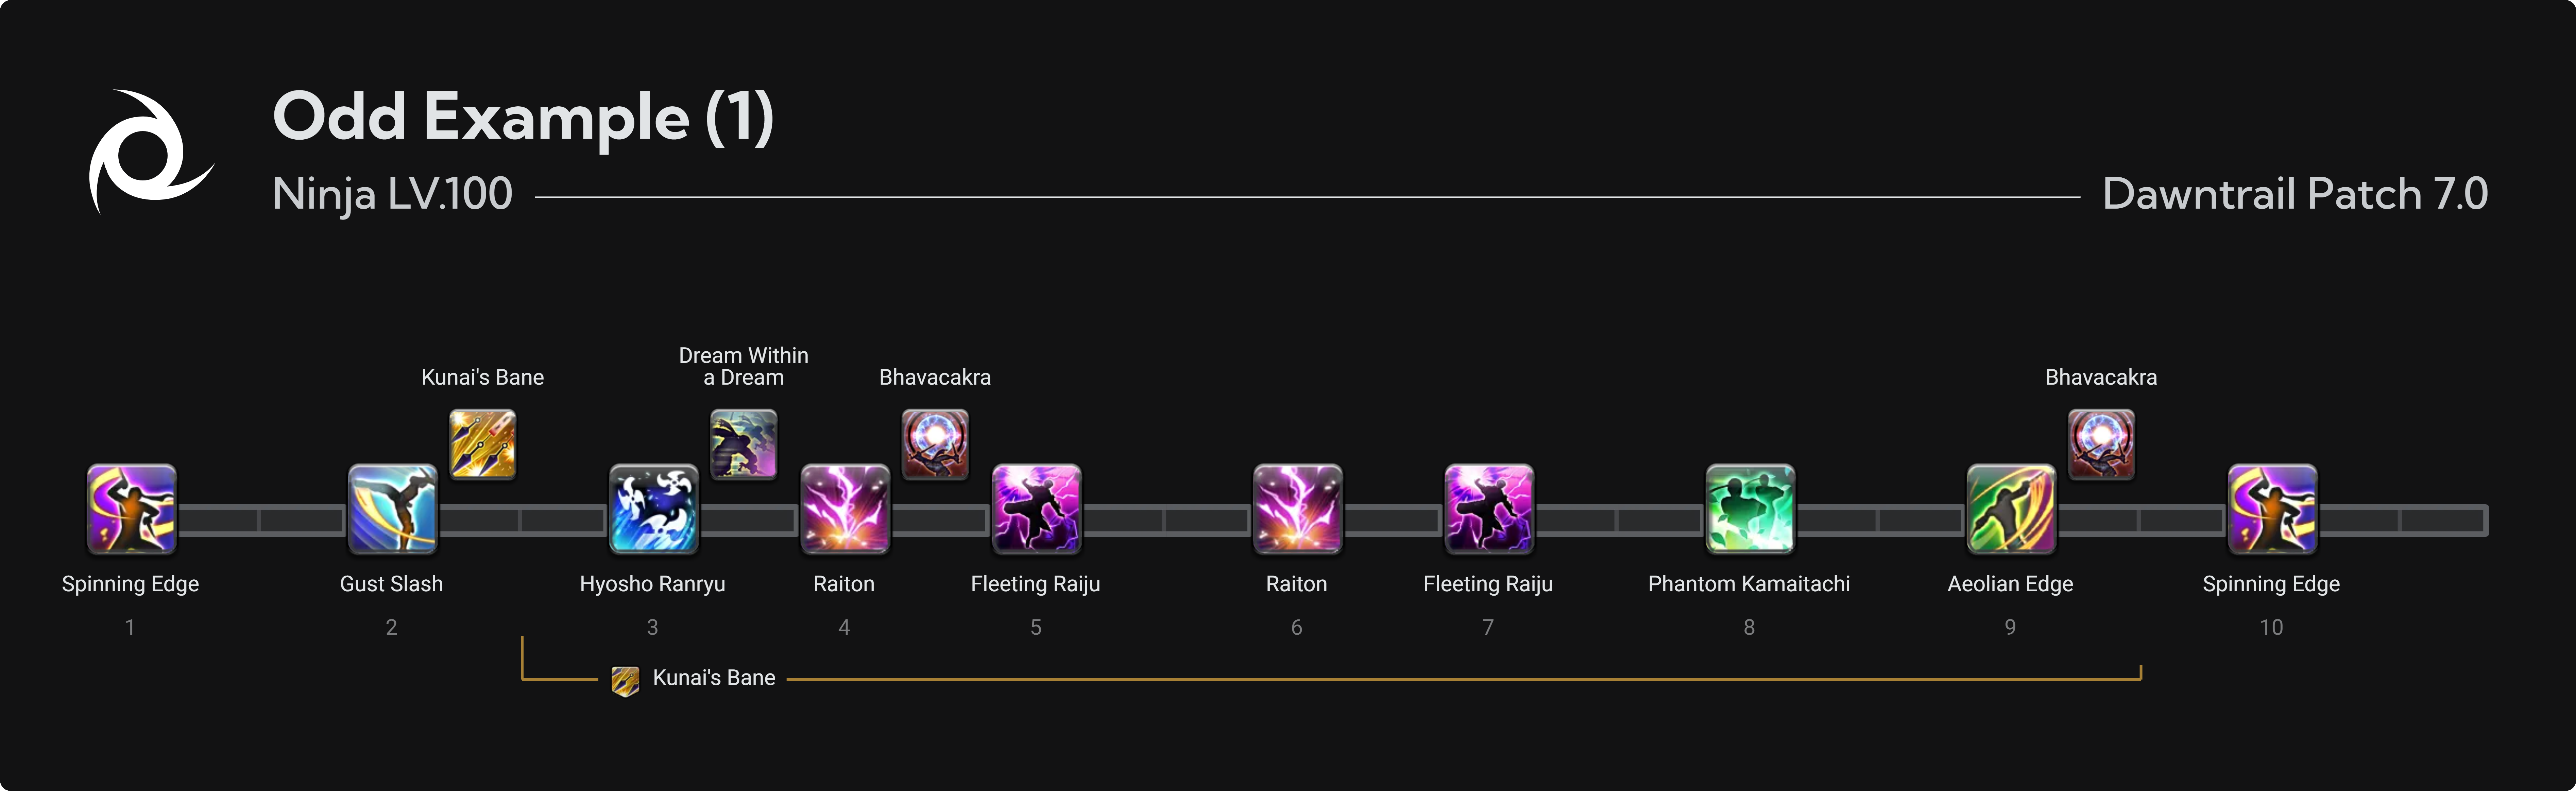
- Example of a fairly standard odd window, where we have Phantom Kamaitachi available.
- Bunshin isn’t active in this window.
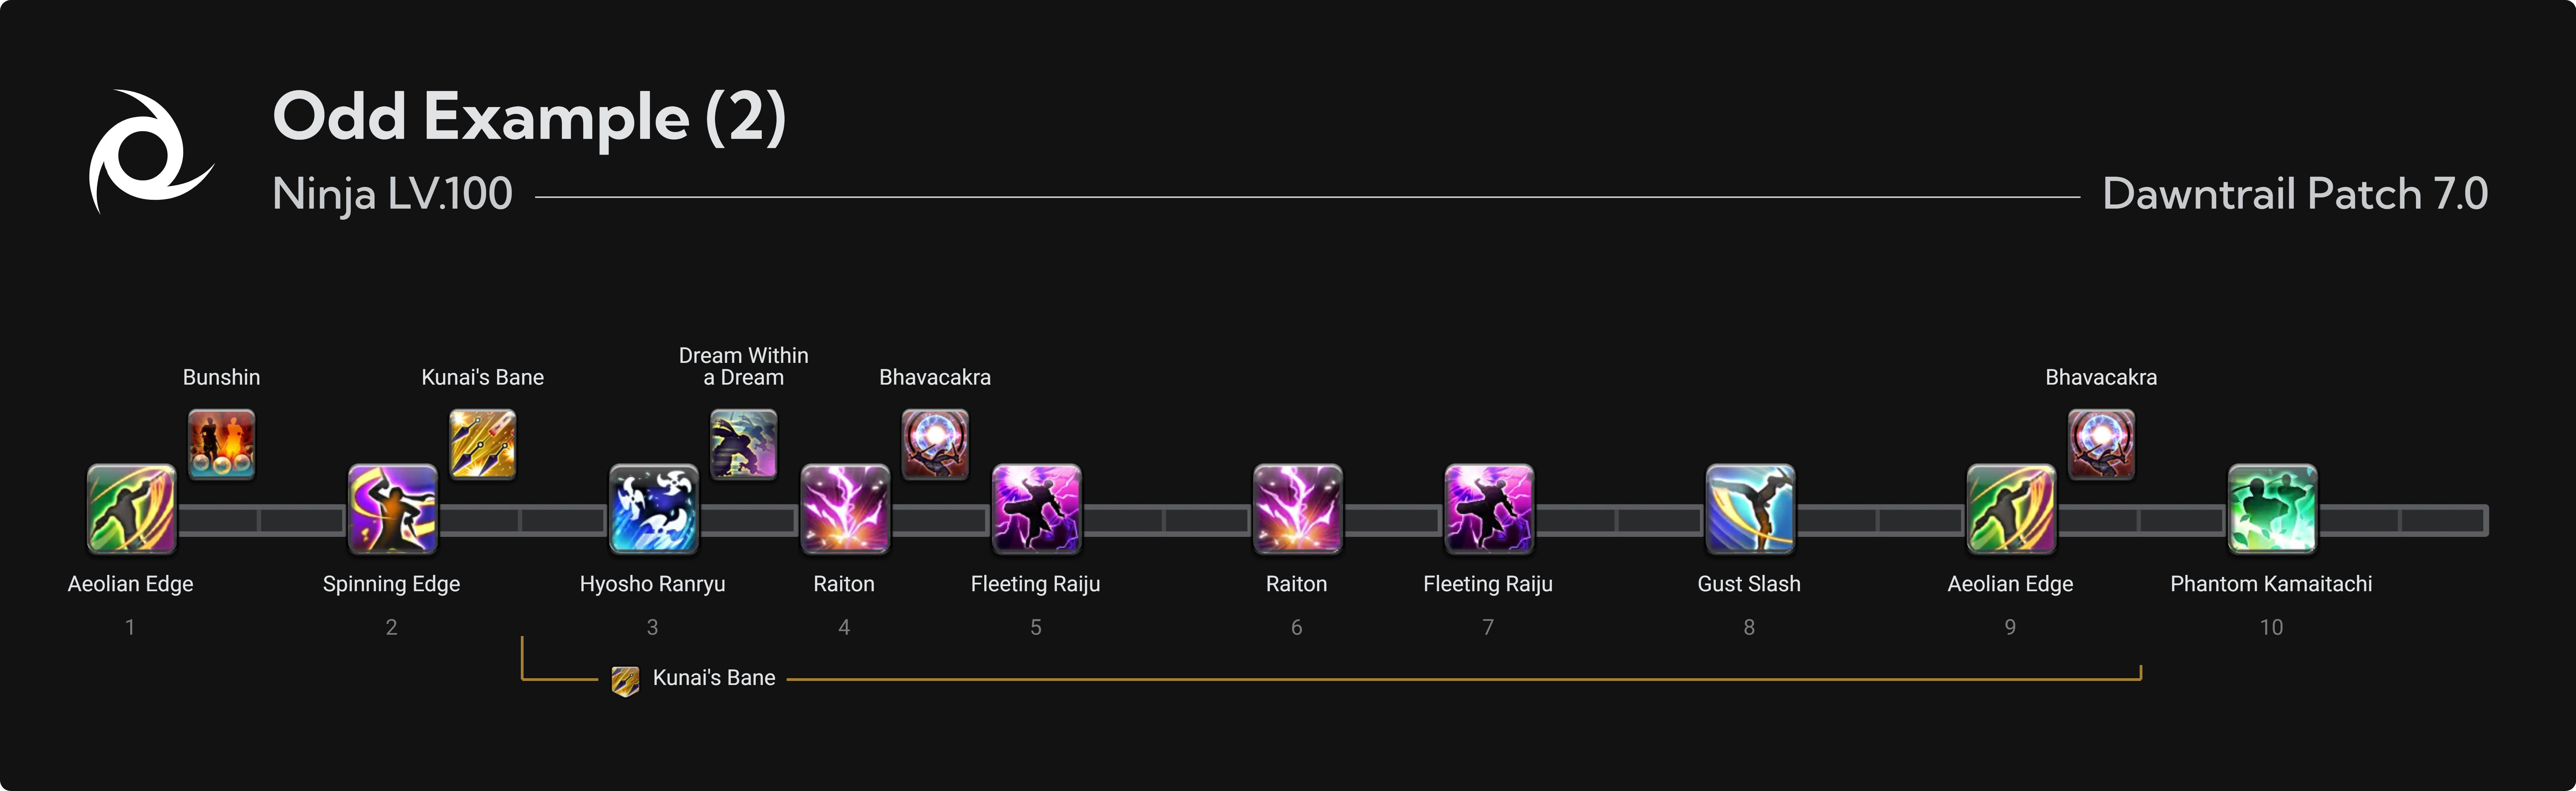
- In this example, Bunshin is active and we opted to push Phantom Kamaitachi after Kunai’s Bane to allow Aeolian + Bunshin to fit in instead (687p > 552p).
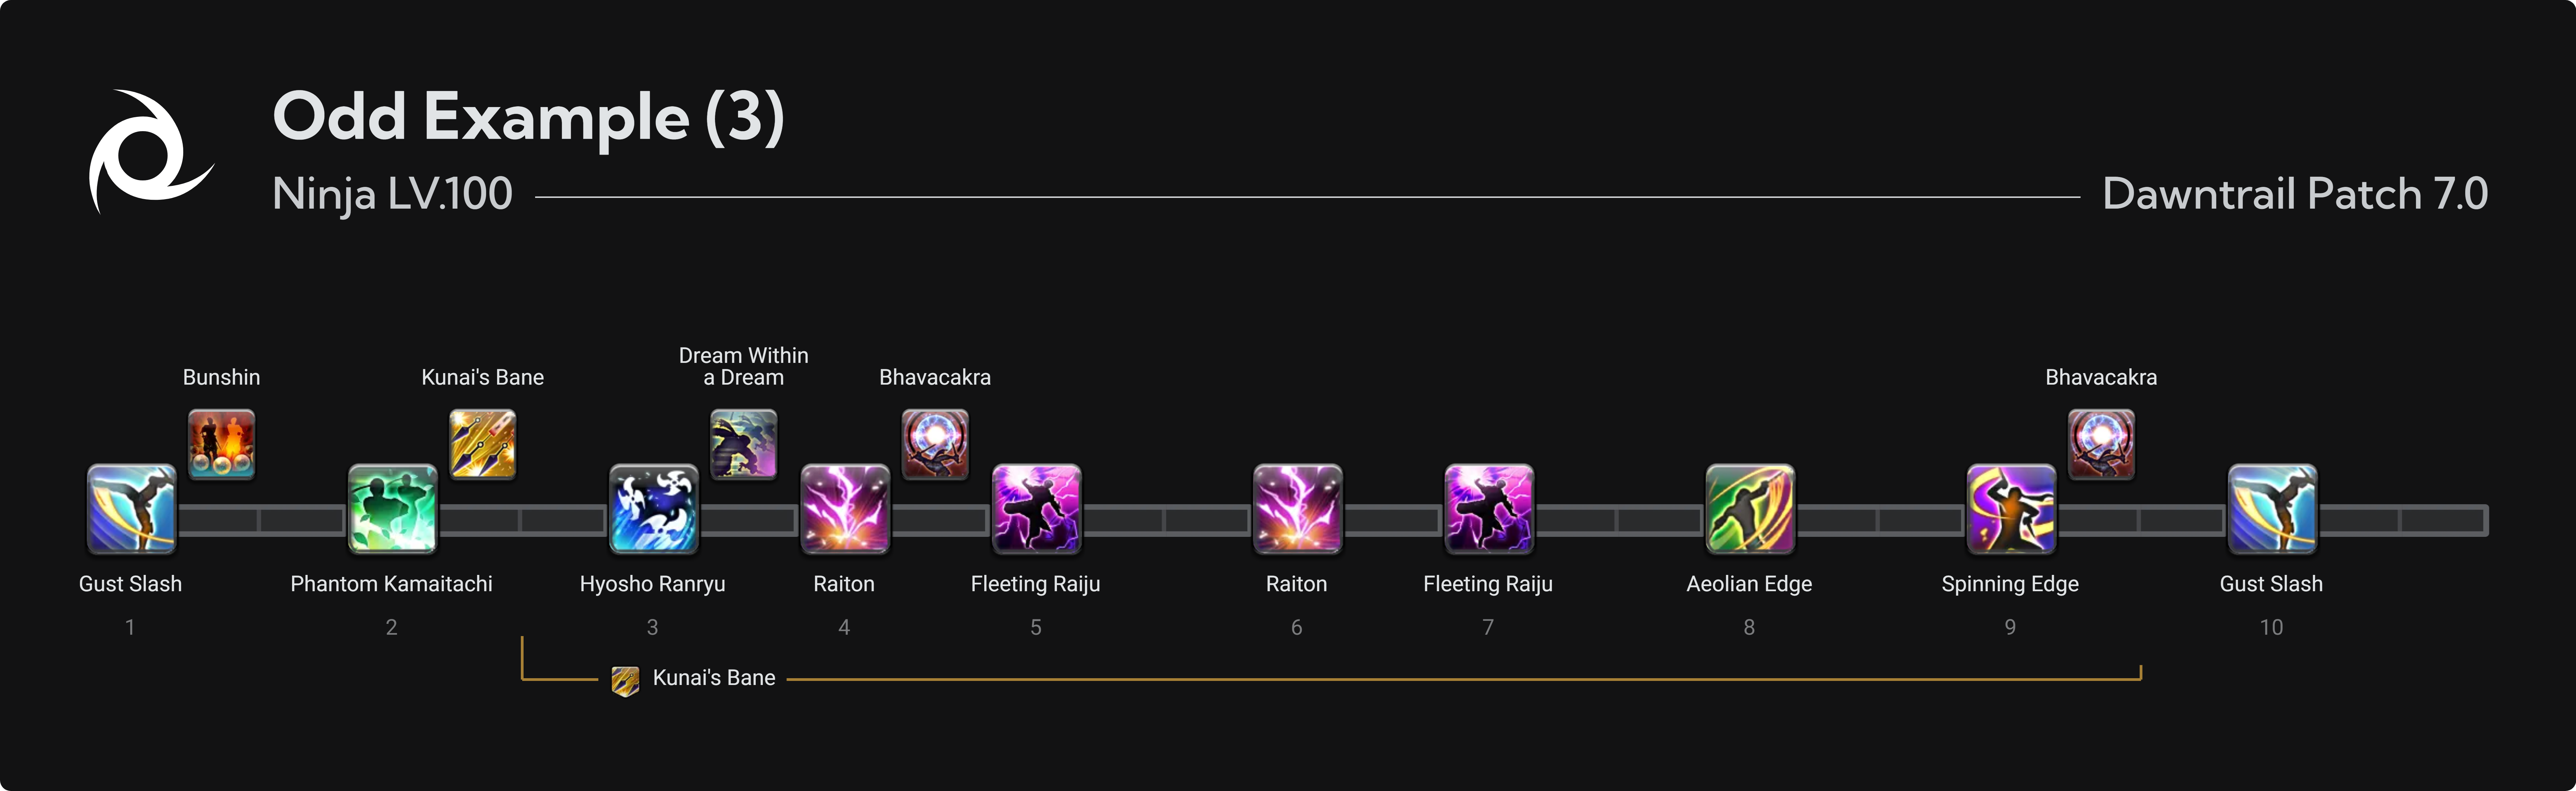
- Very similar to the above, but our first non-Raiju GCD choices are between Aeolian or Phantom Kamaitachi. In this case, we put Phantom Kamaitachi first to get Aeolian into the window.
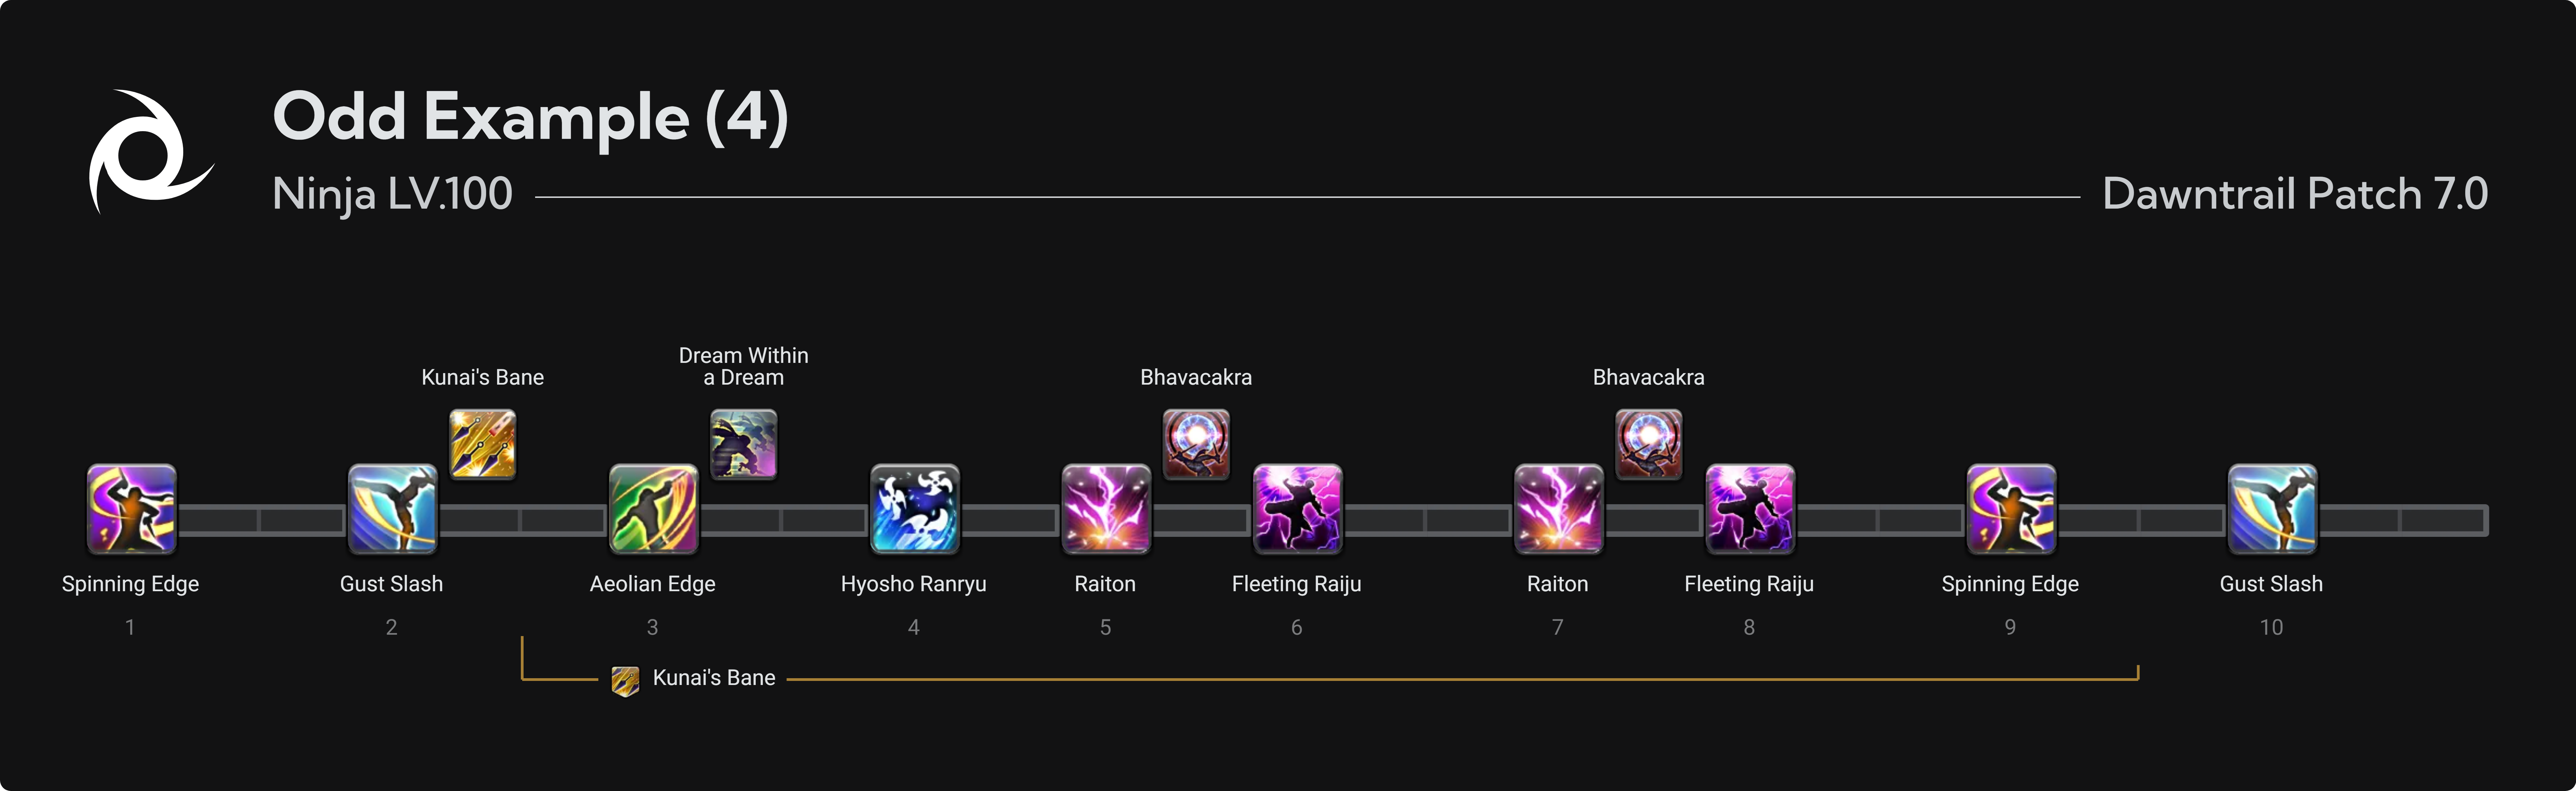
- Similar to the first example, but we used a GCD as the first thing in Kunai’s Bane. This method could help alleviate Dream Within A Dream drift.
Even Window
This is a window that occurs every even minute or is a window that has all our 2-minute cooldowns available. The Even window is much like our Odd Trick, but is stronger for we will be also bursting within Dokumori and have all our other 2-minute cooldowns.
- Kunai’s Bane should have: x1 Hyosho, x2 Raiton, x2 Raiju, x1 Ten-Chi-Jin, x1 Tenri Jindo, x1 Zesho Meppo, and as many Bhavacakras as we have available.
It’s better to swap out x1 Raiju for Aeolian Edge or Phantom Kamaitachi if the additional ninki gain gains a Bhavacakra in our burst. Example: our opener.
Phantom Kamaitachi often won’t be in this window. As it is pet potency and is less than our Raijus. Additionally, it’s less potency than Aeolian & Armor Crush when Bunshin is active, as Bunshin does NOT apply to Phantom Kamaitachi.
- Dokumori should have: x1 Kunai’s Bane, everything listed in Kunai’s Bane above, and:
- If Doku woven early: +2 GCD
- If Doku woven mid or late: +3 GCDs
That means you should always fit in x3 Raijus into Dokumori. And 1-2 addional GCDs based on how Dokumori was weaved.
There is an additional optimization regarding 2-minute windows where Kunai’s Bane is late woven to catch +1 GCD. It’s a bit tight and therefore can be found here: Further Optimization
Examples
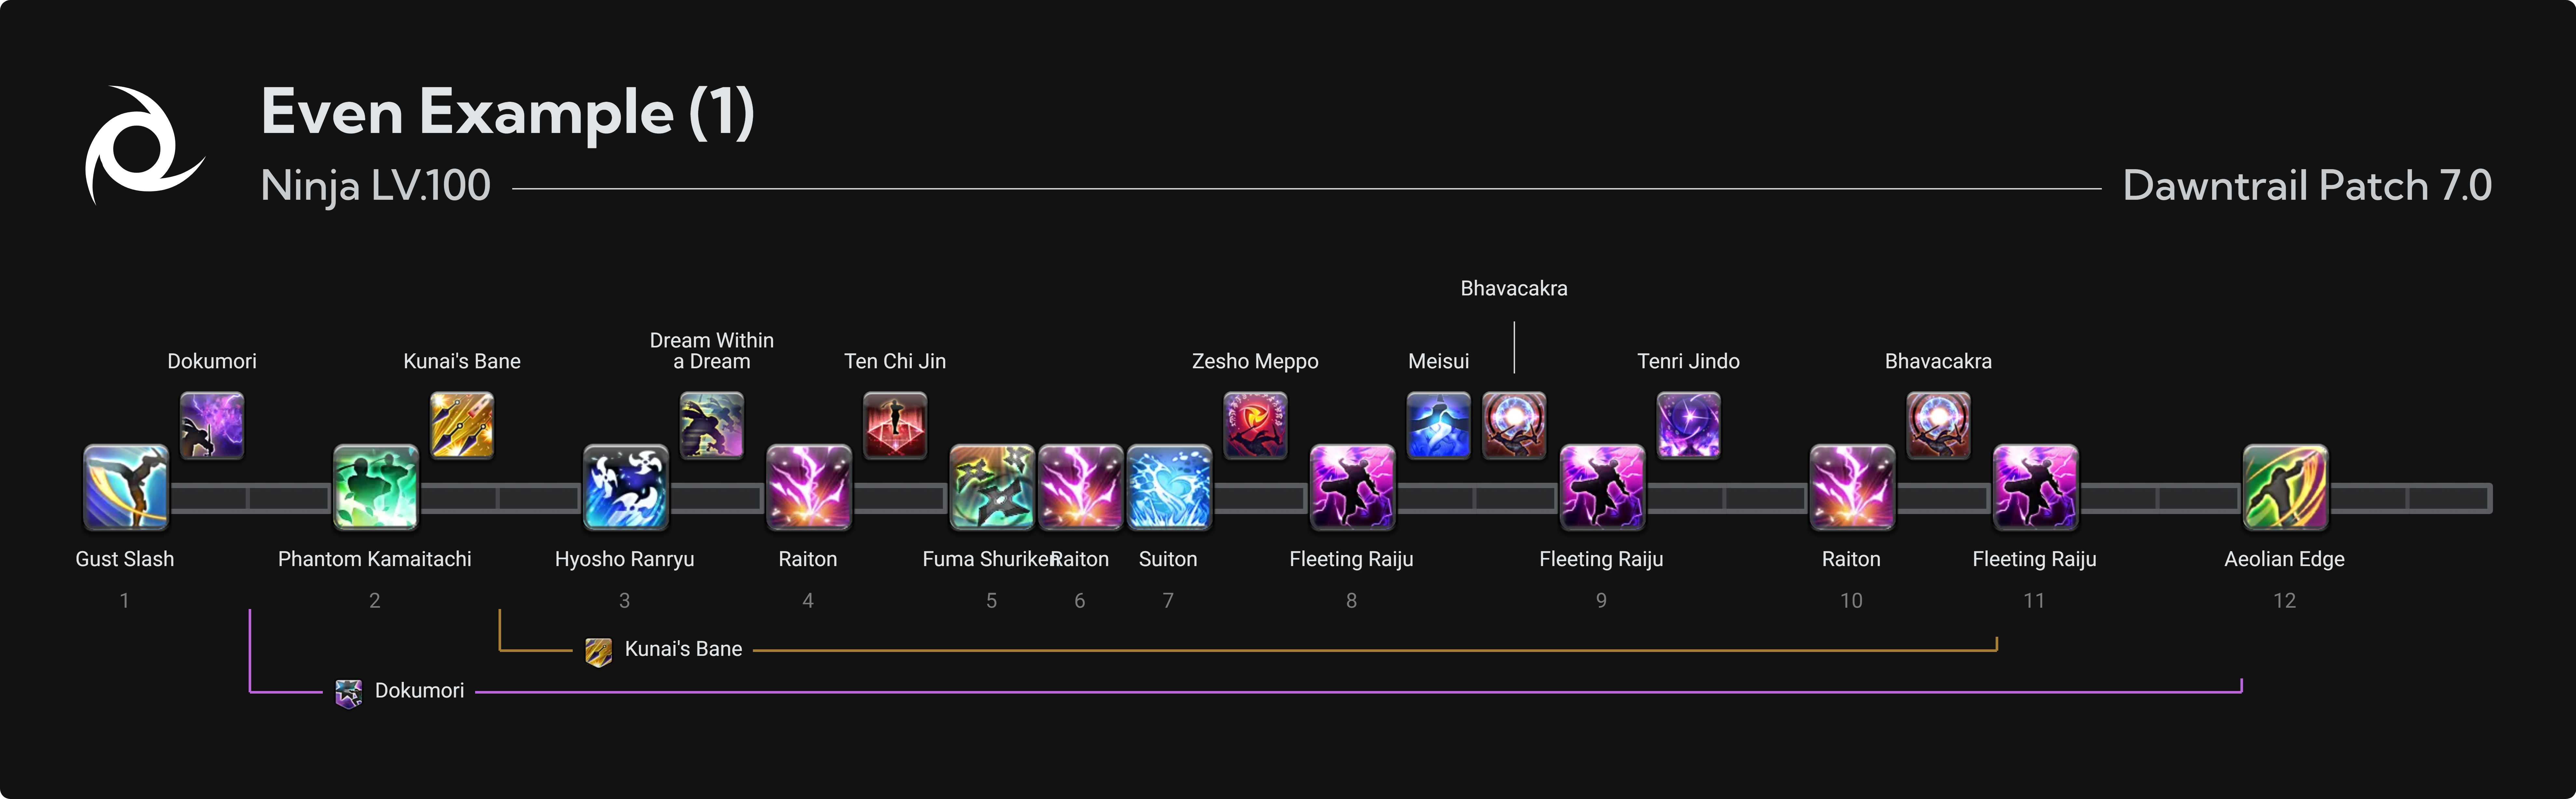
- In the above example, Dokumori is an early weave and therefore catches 4 GCDs.
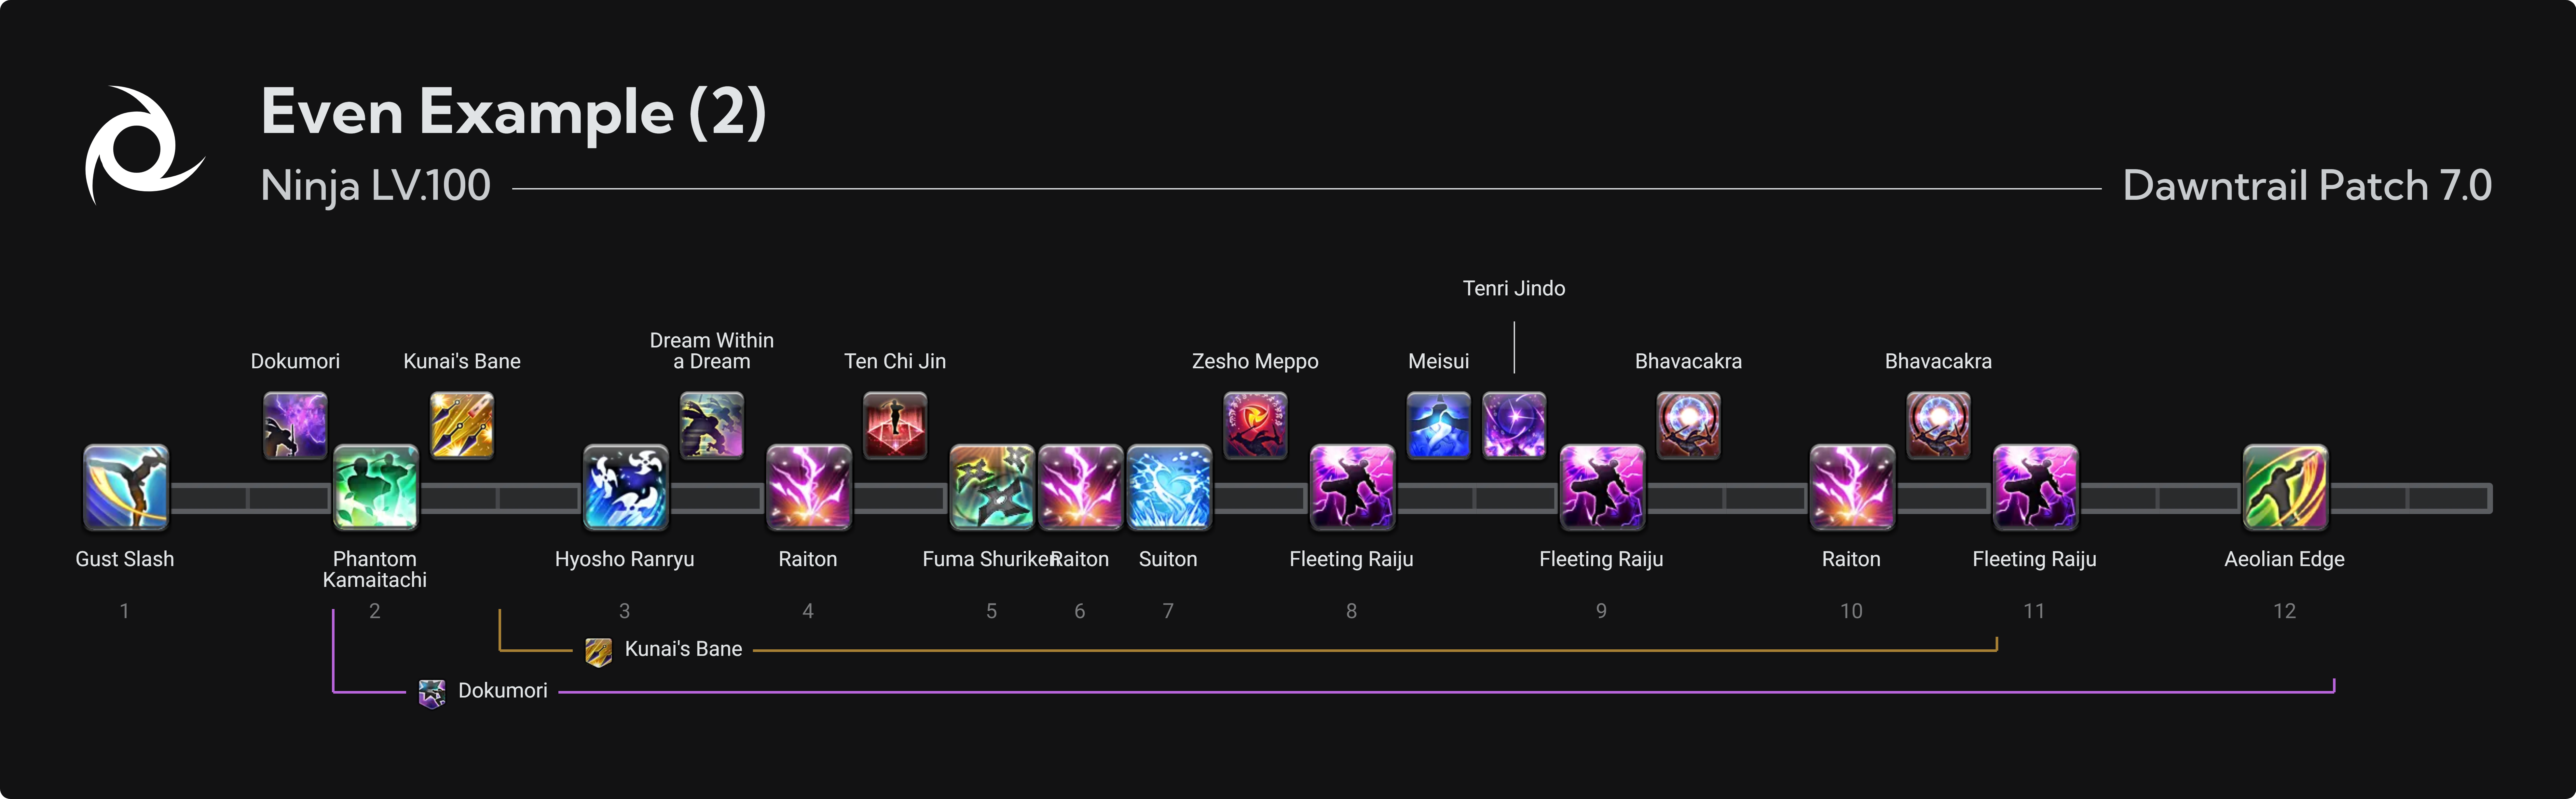
- Similar to the first example but Dokumori is late weave and therefore catches 5 GCDs.
Miscellaneous
Boss Disengagement
Ninja is considered the most flexible melee in terms of disconnecting from the boss. As every Ninjutsu is ranged and Phantom Kamaitachi isn’t necessary for our burst window. Below is a simple priority:
- If Kunai’s Bane is less than 22s on the timer, starting preparing Suiton (takes 2.5s to cast Suiton).
- If the disengage is within 45s after Bunshin, use Phantom Kamaitachi.
- Use Raiton, even if that one less Raiton in Kunai’s Bane.
- Throwing Dagger.
If the boss disengage is during burst, it’s somewhat annoying due to our melee weaves. But with clever planning, you can keep 100% uptime on a boss.
Note that our auto attacks are melee, so try to stay on the boss whenever possible.
Downtime
Downtime == Boss untargetable.
Unlike certain melee, NIN handles downtime easily. Not just rotationally, but for our damage as well. The more a NIN can burst in uptime segments, the better. For us, the only thing to keep in mind is:
- If downtime is long enough that our mudras may overcap, spend all available mudras before downtime begins.
- Prepare a ninjutsu during downtime and right before the boss is targetable. That way we aren’t wasting time preparing a ninjutsu when the boss is targetable. This can yield an additional GCD by the end of the fight.
- Have any questions?

 discord.gg/thebalanceffxivAuthors
 Jackal
 jackal#0002
 Balance NIN Staff