Introduction
Welcome to the Basic Machinist Guide! Within this document, you’ll find all the information you’ll need to play the job well. The links below can be used as teleports to other pages if you need the information while learning the job. Any questions can be directed to the Machinist channels in our Discord.
Job Overview
Machinist is a fast-paced physical ranged job that excels at quick burst damage and has the added benefit of free movement. While the base rotation for this job is somewhat strict, Machinist excels in dumping burst into raid buffs with flexible use of its gauge system. This guide aims to break down the job’s rotation into something easy to digest while providing good practices to follow for overall gameplay.
If you’re new to the job and would just like a basic overview of Machinist during the leveling process, click here.
Machinist Heat & Battery Gauge
Machinist comes with two gauges. The Heat Gauge (top) is used to Hypercharge which costs 50 Heat. The Battery Gauge (bottom) is used to summon your Automaton Queen to fight alongside you for a specified amount of time based on the amount of Battery you had at the time of summoning. You must accrue at least 50 Heat or Battery to use their respective abilities, and neither should be allowed to overcap if possible.

The Two-Minute Loop and Rotational Theory
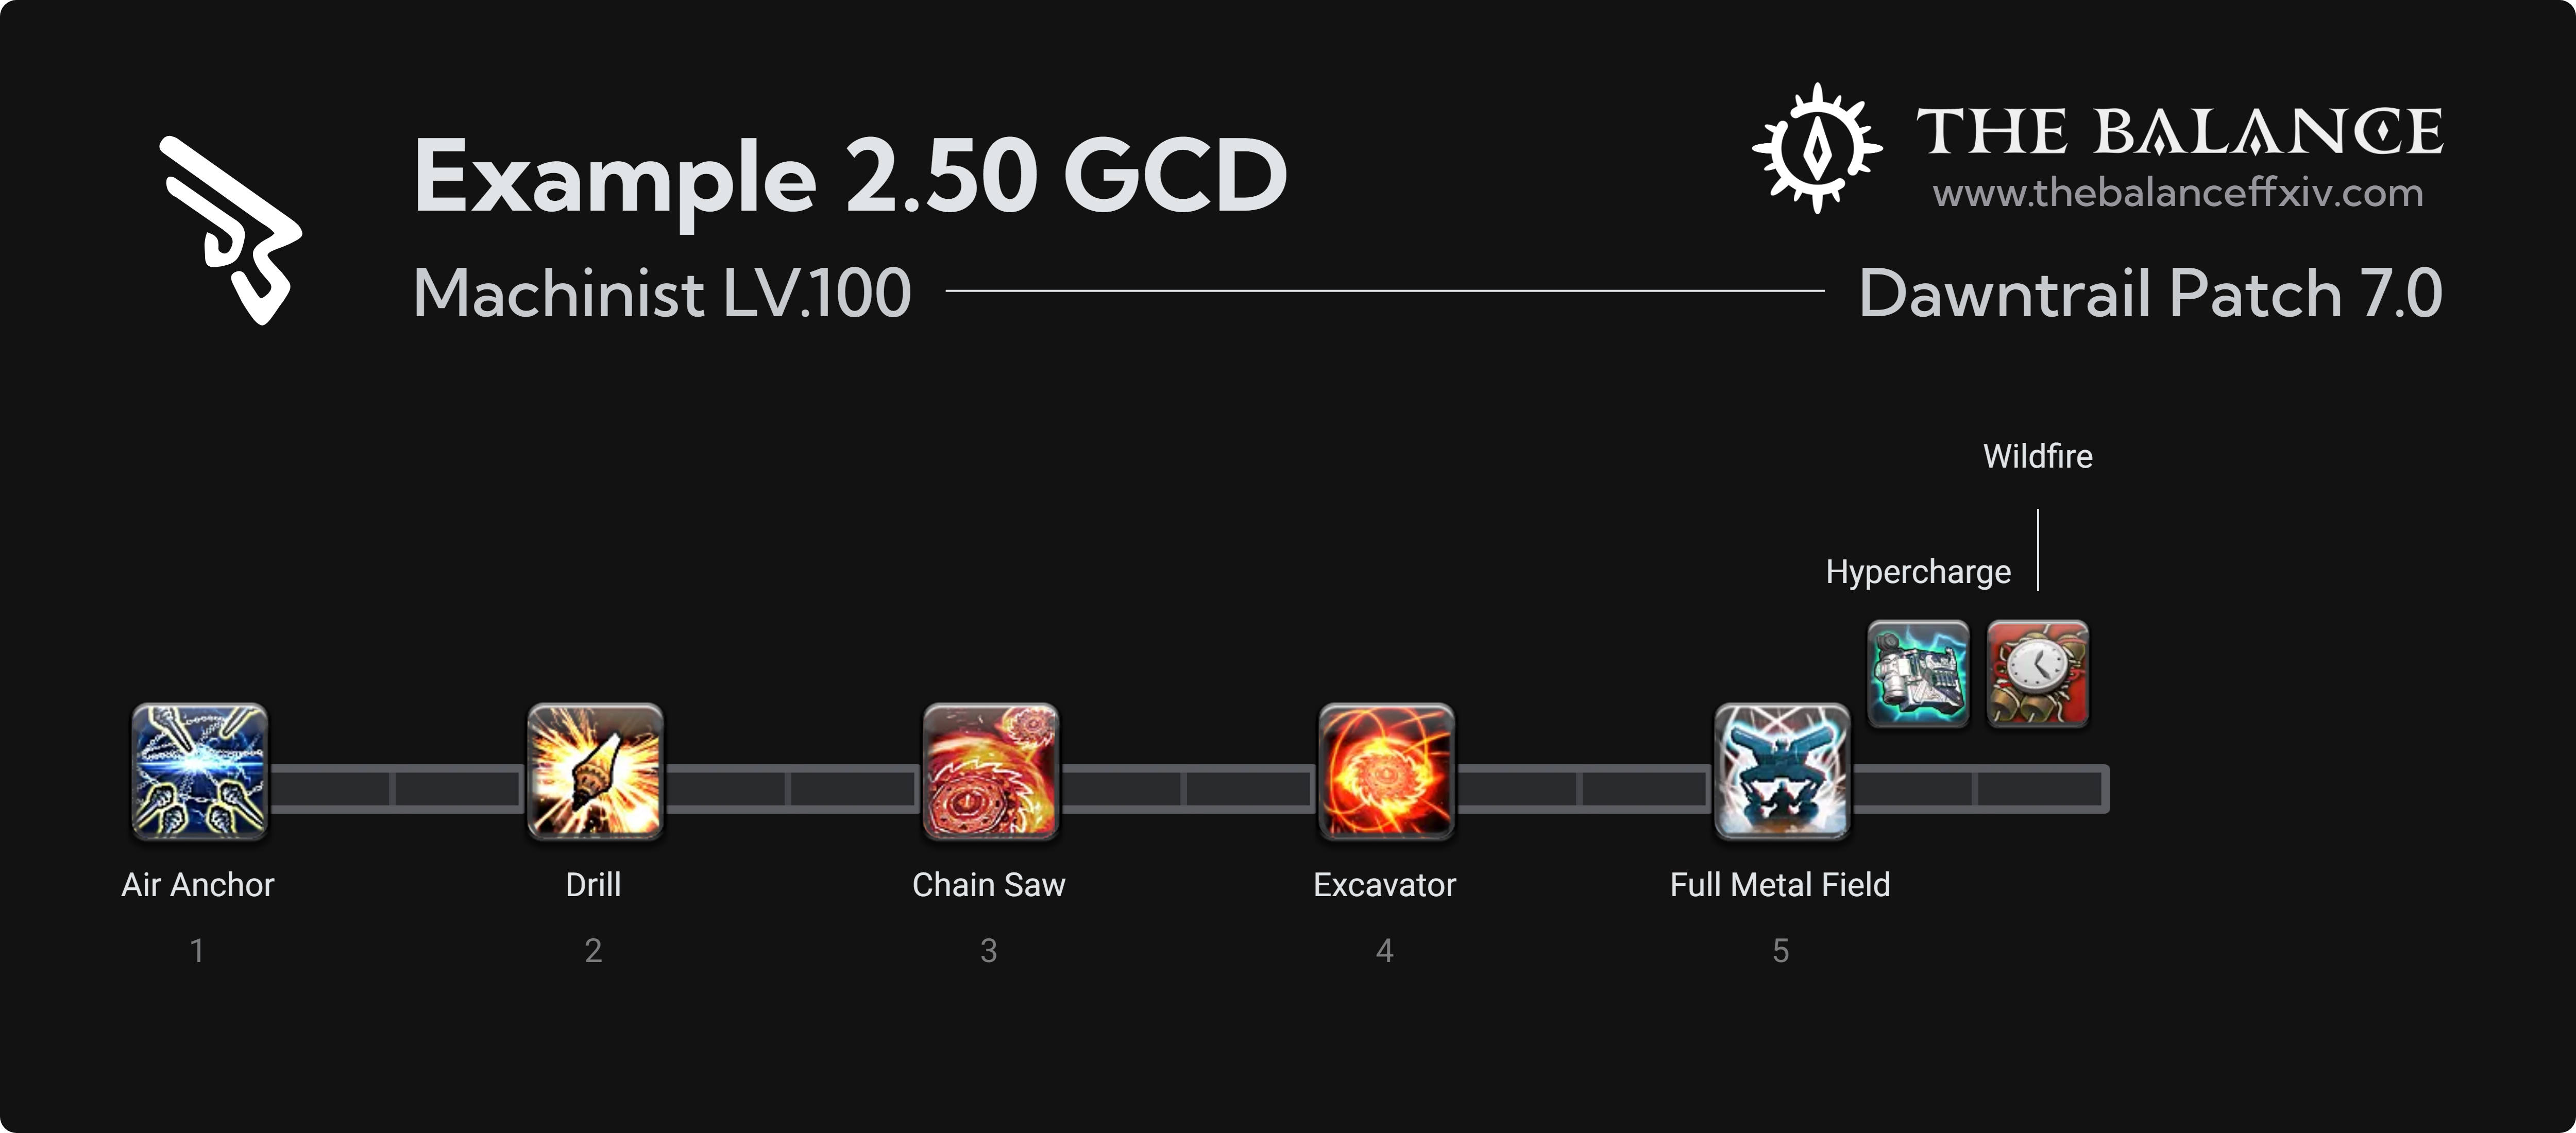
While reading this guide, the following images can be referenced to get a better grasp of what’s being talked about. It is extremely important to note that these infographics and text are aimed toward 2.50 Machinist. Anything that is faster than 2.5 will need some adjustments, see “How to deal with <2.50 GCD” section below.
Generalized Battery Usage
- The Opener Queen is used immediately upon 60 Battery (After Excavator, as seen in the opener).
- The one minute Burst Queen is used at 90, this is to help the two minute Queen to be used after Air Anchor to maximize it fully in raid buffs. Subsequent odd minute summons will have to be broken down between two Queens. Compared to Endwalker where our subsequent summons were at 90/100, we are given extra battery every minute via Excavator, so our summons are at 110/120 gauge. Thus forcing us to split it between two summons to prevent overcap. The first odd minute queen is always used at 50 and the second is a loop of 60/70/80, increments of 10 for each odd minute. So the 2nd Queen at the 3 minute is 60 battery, 2nd at the 5th minute is 70, 2nd at the 7th minute is 80, and comes back to a loop at 60 for the 9th minute. In order to gain the specific amount of battery for the 2nd odd minute queen, we add any combo GCD filler needed to obtain it after Chain Saw and before Excavator, since we can safely delay it for up to 30 seconds. If you need the Excavator to gain the battery, then we use it right after Chain Saw.
- Two minute Queen is summoned at 100 Battery at 2:01 after the Air Anchor. This is to fully maximize buffs, with summoning Queen after the Air Anchor, we synchronize our Queen to start its attack as soon as buffs are out. This is because of Queen lasting roughly 16 seconds but it takes five seconds before starting its autos.
Cheatsheet
- Ensure you have at least 50 Heat going into your even minute burst. With this rotation we run into an issue at the four minute burst window, going into it with only 45 Heat.
- Weave Checkmate and Double Check as necessary to not overcap their charges. However, try to pool them for all burst windows and especially all pot windows.
- Attempt to use a Reassemble under raid buffs if you can. Reassemble charges can be held for a pot window at two minutes if applicable.
- Double Hypercharge windows are only crucial for the first 2-Minute Burst and/or all bursts where you are potting. Despite this, it is highly recommended and advised to double hypercharge for all windows post opener for maximum buff feed and to adjust for the change for all raid buffs being 20 seconds long.
The most basic description of the level 100 rotation can be broken down by following these rules:
- Not drifting Air Anchor, Chainsaw, Barrel Stabilizer, and Wildfire.
- Not overcapping on Drill stacks.
- Not overcapping resources. This includes Heat, Battery, and Double Check / Checkmate charges.
- Using your flexible burst inside of raid buffs as much as possible.
The base rotation for Machinist revolves around two minute windows starting and ending with Wildfire application. Wildfire and Barrel Stabilizer are outliers in our kit as the cooldown does not scale with skill speed. While Heat and Battery will not loop perfectly due to differing Hypercharge windows in these segments, Wildfire can still be used as a landmark in the rotation for tracking other cooldowns in our kit, mechanics or even just used to help reset our rotation in case mistakes were made with some of the more strict timers.
In between your burst windows, you will default to pressing your combo actions (Heated Split Shot, Heated Slug Shot, and Heated Clean Shot) in order to build resource gauge and maintain uptime on the enemy while also ensuring your Multi-Tool actions (Drill, Air Anchor, and Chain Saw) are used immediately as they are available. With the new addition of Excavator, the combo attack of Chain Saw, we have up to 30 seconds to use before expiration, while in burst windows we want to use it as soon as possible from the initial Chain Saw press, we have extreme flexibility in the odd minute windows. For example, with the surplus of battery gained in Dawntrail, we have windows where we want to send out a 60 battery Queen but currently only have 50 after the Chain Saw press. Instead of following up with Excavator and getting 70, we can delay it for a full main combo or whenever we have Heated Clean Shot to get the 60 without spending Excavator to send that Queen. Giving us extreme flexibility and helping us achieve 100 Queen for the next 2-minute burst.
Two-Minute Variations
Previously, we gave an infographic for our Static 2-Minute Burst, but it is actually not needed for the very first two minute burst of the fight (120 seconds). This is because during the 4-Minute burst, we run into a very brand new issue and having the possibility to have our combo expire. With much more buttons in our burst windows, we run the risk of having our combo fall off if not maintained properly. However, for the first 2 minute window, we enter the burst on Heated Clean Shot, allowing us to burst normally without any problem. The ideal window is a 10x Blazing Shot window since without it, regardless of not needing to continue combo, we have a GCD filler after the 5th Blazing Shot. While this is can be fixed with Drill first in the opener (allowing it to a used a GCD earlier in burst), we recommend 10x Blazing Shot windows when able to do so. Although 10x is ideal, it is a little tough to properly do if on high ping to late weave the Hypercharge before Full Metal Field. If you are absolutely unable to do this setup, we still recommend the Heated Combo GCD after the 5th Blazing followed by the Drill into the next HC window.
Assuming we carry on as usual, our first 2-minute burst will look something like this. If 2-minute potting, we want to use it before the Air Anchor. An extremely important note is that this ONLY works for the very first 2-minute window (120 seconds into the fight), this will be explained later on. We end this window with Drill, and since we have two stacks, it is not drifted but rather delayed in order to give us more Heat Blasts in buffs, and since we used Drill earlier, we never risk overcapping charges of Drill. It can be difficult to late weave Hypercharge before FMF/Chain Saw and still get the full five Blazing Shots, so this is only recommended on low ping/proper ping mitigation tools.
This is exactly the same set up as the previous infographic, but to account for non 10x HB. We get rid of the late weave Hypercharge and push it to the next GCD. Since there is a gap in our Hypercharge windows, we now need a filler. This window is not ideal because we have to put our weakest potency GCD in buffs and potentially pot (Heated Split Shot). We want to avoid this at all costs, so while this window does work, we want to try our best to stick to the 10x HB window for the first 2-Minute to avoid the heated split shot in buffs, but we switch to this window for all future bursts for better alignment due to the brand new issue caused by the 4-Minute window and to prevent letting our combo expire. While it is not optimal to put a combo gcd in buffs, if your connection does not allow you to do 10x Blazing Shot, this is sadly the only choice for the first 2-Minute window.
Why can’t we hold 2/2 Drill charges to remove the combo GCD? While it is possible to be able to Drill immediately if the previous one before the 2-Minute is held, this causes a brand new issue. The 120s burst window only works the way it does because we enter this window combo neutral (ending our combo), this is done with the assumption you’re using Drill off cooldown. Holding the previous usage will simply require us to do an extra combo GCD to replace the Drill we chose to hold, which makes us go into the burst window NOT combo neutral and thus having to combo in burst anyways to not let the combo expire.
We run into our first Dawntrail specific issue after the first 2-Minute burst. With the reduction in Heat generation per minute compared to now, we enter the 4-Minute burst with only 45 Heat. To resolve this we continue the same thought process from the previous infographics and we want to continue our burst as usual, even if we go into this window combo neutral, it does not matter since we are only entering with 45 Heat. We have to find a way to obtain the extra 5 from a Heated Combo GCD regardless. The previous infographics had us delaying our Drill and shifting Drill after Excavator and thus pushing Full Metal Field a GCD after. While this does work, it is extremely inconsistent with 2.50 GCD speed, which is normally ideal for us, so for the time being we are moving away from it. It can be considered again if we are using anything faster than 2.5 gcd. To continue with this window, after our default burst, we want to Heated Combo GCD to continue the combo timer and follow up with Drill to maximize buffs. The Heated Combo is definitely a loss for buff feed and a slightly weaker pot window, but an efficient way to continue with our rotations and to set up better windows in the future.
How to deal with <2.50 GCD
First of all, never clip your GCD. Keeping your GCD rolling has a huge impact on your overall damage. Since your non-scaling cooldowns like Wildfire and Drill will no longer align with your GCD cycle, you’ll need to rearrange things to keep these actions on CD and aligned with burst as much as possible.
Wildfire
WF will come off cooldown slightly later than usual in your GCD cycle. There are a variety of ways of dealing with this, but here’s the easiest and most consistent way to do it:
- Add GCDs ( Drill and/or any Combo GCD) after Chain Saw and before Excavator/Full Metal Field until WF’s cooldown is ≤ 6s. This ensures that Drill and Chain Saw do not drift and that you can weave WF in the same place every two minutes.
- When WF’s cooldown is ≤ 6s, proceed as you usually would at 2.50, Excavator > Full Metal Field > (Hypercharge + Wildfire).
Drill
In Dawntrail, Drill’s recast no longer scales with SkS. Like WF, it will come off cooldown slightly later than usual relative to your GCD cycle, but since it has stacks it doesn’t matter if you “drift” it as long as you’re never sitting at 2/2 stacks. Drill’s placement in your rotation is no longer rigid, and we can take advantage of this:
- If Drill is not available where you’d normally use it in your burst, just use any Heated Combo GCD.
- If Drill is available and you’re about to use a Heated Combo GCD, you can use Drill instead. Make sure you’re at 0 Drill stacks going into your WF sequence.
- Try to use Drill as late as possible (i.e. the GCD before Excavator and Full Metal Field) to get it to land under buffs.
Example GCD Sequences at 2:00
2.50: Air Anchor > Drill > Chain Saw > Excavator > Full Metal Field > (Hypercharge + Wildfire)
2.47: Air Anchor > Heated Combo GCD > Chain Saw > Drill > Excavator > Hypercharge > Hypercharge + Wildfire…
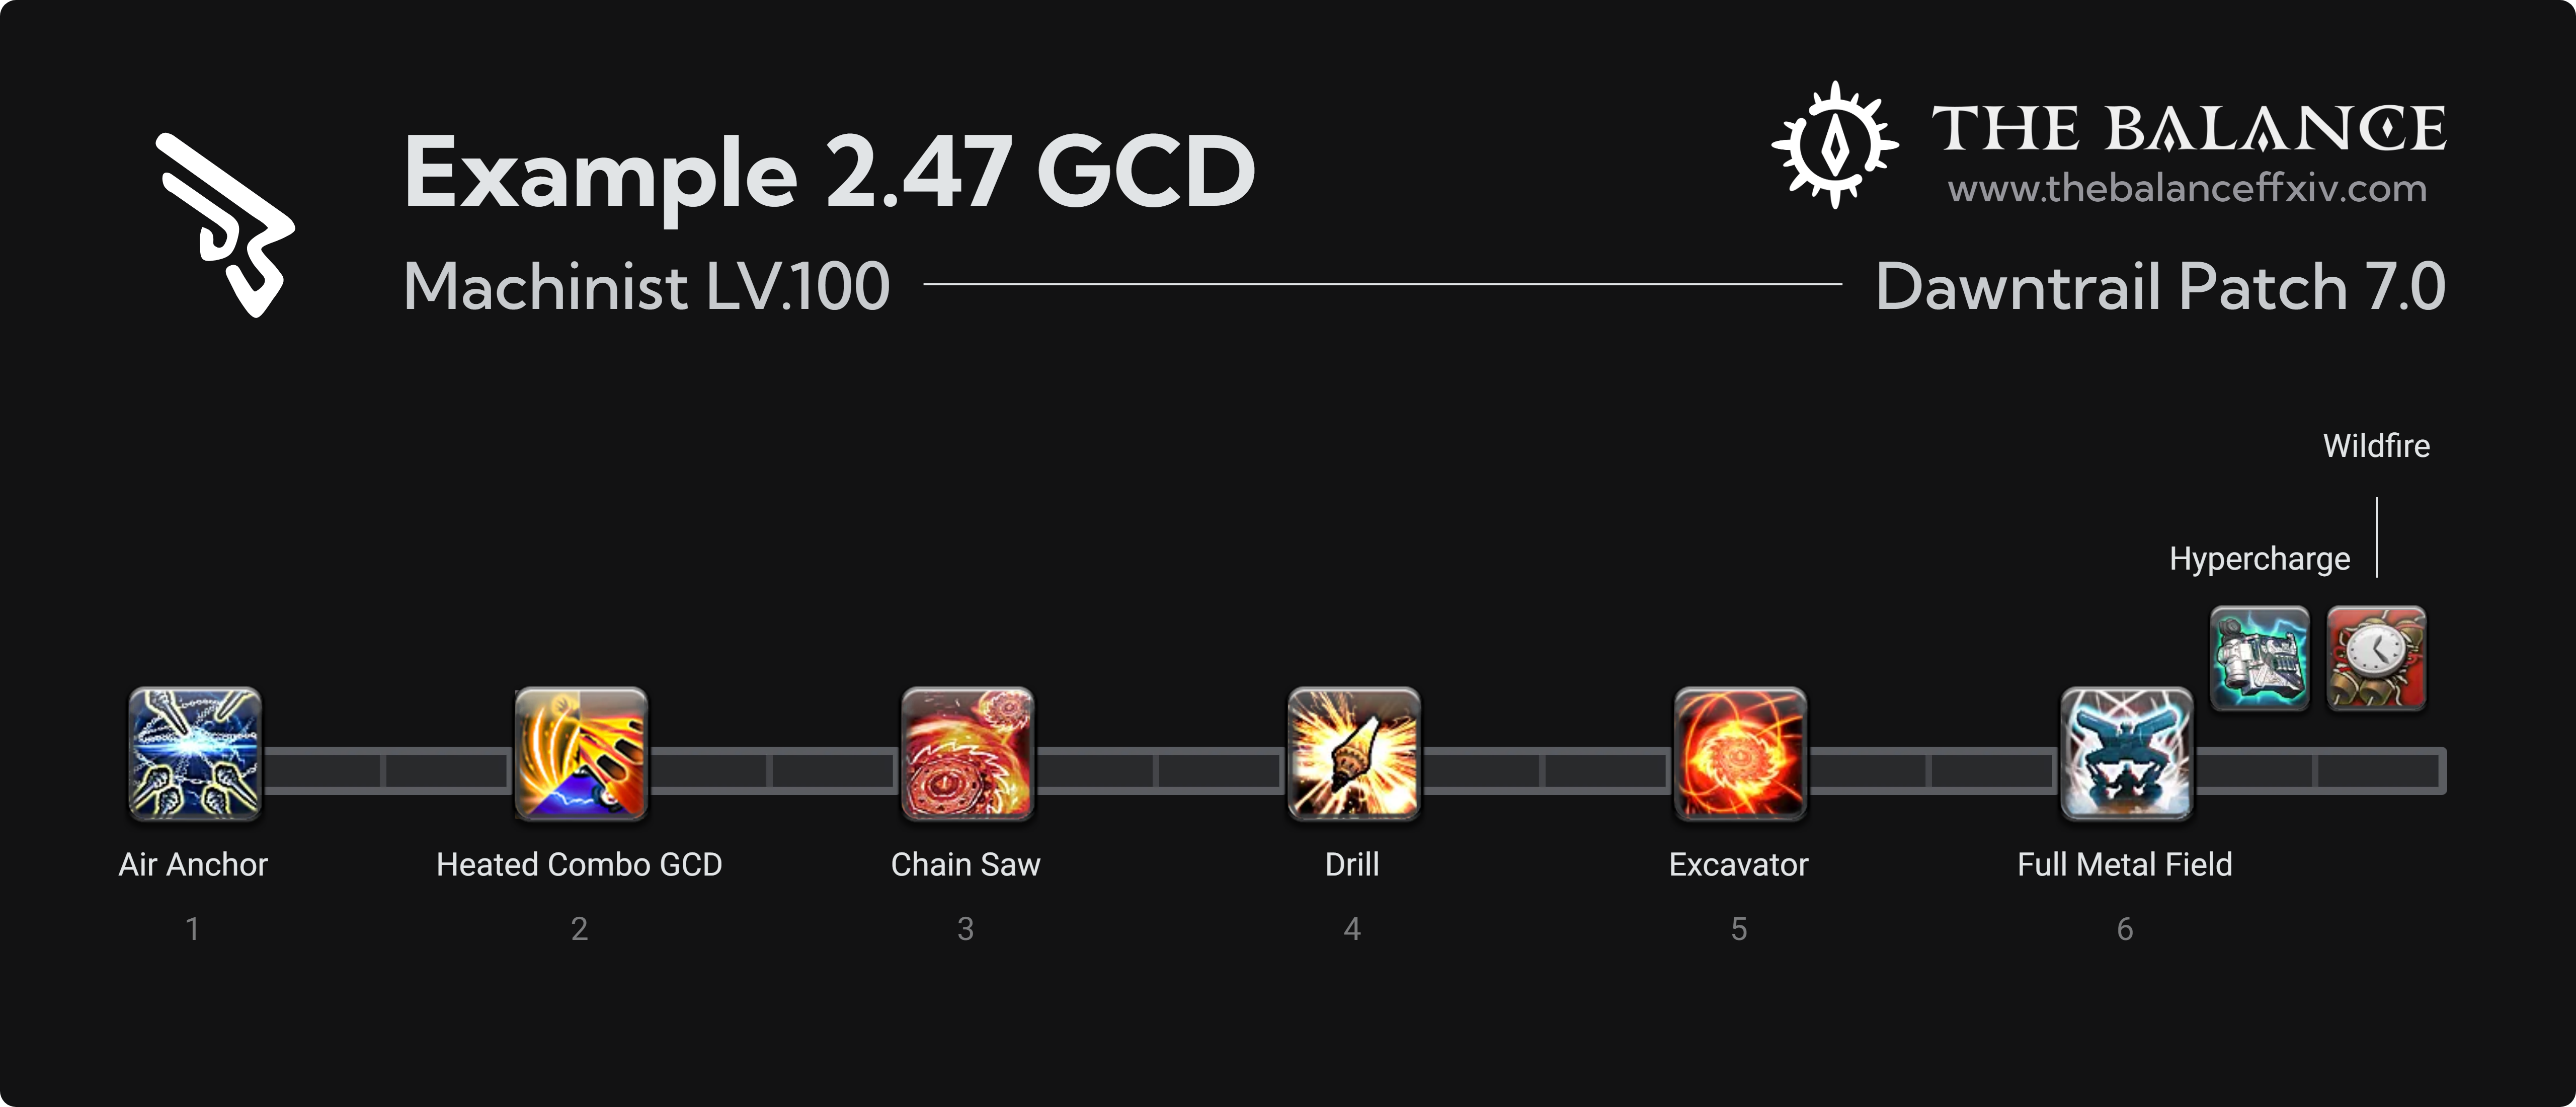
- Drill is not up after Air Anchor, so we use a Heated Combo GCD instead
- WF CD is > 6s when we would normally use Excavator, so we add 1 GCD
- Since we have a Drill charge, we use Drill rather than a Heated Combo GCD
- We continue as usual with Excavator and Full Metal Field.
Piecing Together the Multi-Tool and Heat System
As of 7.0, we are gaining two extra tools every burst window with the extra Drill usage, Excavator, and even Full Metal Field. All these new GCDs are replacing combo filler that we previously had in Endwalker. With the only way to go filler-less to do 10x HB, that is not the case now in Dawntrail. With 2x Hypercharge and our 5 Tools, and Full Metal Field, we have too many gcds to ideally carry a combo into the burst window. While its possible to carry a combo, it is extremely difficult, having to do 10x Blazing Shot to be able to have a chance to follow up the combo action right after the 10th Blazing Shot. Even more difficult and unrealistic if we stick to 5x Blazing Shot > Drill > 5x Blazing Shot, since we lose the combo unless we sacrifice the final Blazing Shot to continue this. As previously mentioned, to fix this and our 45 Heat 4-Minute window, we continue our combo instantly after the Air Anchor to keep the combo to run and not interrupt/end our burst early to continue for it.
A full segment of Hypercharge is exactly three GCDs worth of time, or 7.5 seconds. Because of this, you should never enter Hypercharge if Chainsaw, Drill or Air Anchor has less than eight seconds on their cooldown timers. Doing so will cause the Chainsaw, Drill or Air Anchor cooldowns to drift, which leads to a loss of DPS and will more than likely cause issues down the line in your rotation when you reach your rotational reset at Wildfire.
Automaton Queen and Flexible Burst Usage
The three things that make up Machinist’s flexible burst are the Heat gauge, the Battery gauge, and the charges of Double Check, Checkmate, and Reassemble. The first rule for these resources is to never allow them to overcap if possible. The second rule is to use as many of them as you can before an encounter ends, preferring to end a fight with these gauges as close to zero as possible.
Automaton Queen is Machinist’s most flexible burst and is also the most powerful of the three. Automaton Queen’s damage scaling is linear to the amount of battery she was summoned at. For every 10 Battery, the summon is worth 266 potency, with Pile Bunker being 68 potency and Crowned Collider being 78 potency per 10 gauge. Regardless of the Battery amount when summoned, Queen will always be active for a total of 12 seconds. At maximum Battery, Automaton Queen is worth 2660 potency, with 680 of that coming from Pile Bunker and another 780 coming from Crowned Collider. Below is a chart listing all Battery levels and their information.
| Battery Amount | Potency Per Battery | Pile Bunker Potency | Crowned Collider Potency | Total Normalized Pet Potency |
|---|---|---|---|---|
| 50 | 26.6 | 340 | 390 | 1184 |
| 60 | 26.6 | 408 | 468 | 1421 |
| 70 | 26.6 | 476 | 546 | 1658 |
| 80 | 26.6 | 544 | 624 | 1894 |
| 90 | 26.6 | 612 | 702 | 2131 |
| 100 | 26.6 | 680 | 780 | 2368 |
Queen’s summon should be delayed if scripted downtime is about to happen. Using Overdrive is always a loss and should be avoided unless a fight is ending and you have no other option to get the Pile Bunker and Crowned Collider off. Ultimately, you should be planning your Battery usage in such a way Queen’s finishers go off naturally, and so that you end a fight with as little excess Battery as possible.
With the addition of Excavator, we are gaining 20 extra battery every one minute, which throws our timings out of order. We are simply given too much battery to stick to a strict 1 Queen per minute cycle. With our odd minute Queen in Endwalker being used at 90/100 Battery, the extra gauge given in Dawntrail puts us at 110/120 per cycle instead. Giving us the only option to break down this one cycle Queens, into two. With a full uptime scenario used as an example, this is a 10-Minute run to show how our new timings will be treated.
| Fight Duration | Number of Queen | Amount of Battery | Notes |
|---|---|---|---|
| 00:07:50 | 1st Queen (Opener) | 60 | Used instantly, 4th GCD |
| 01:08:25 | 2nd Queen | 90 | If not early Hypercharging, delay Excavator for Heated Clean Shot to also get the 90 battery. |
| 02:01:50 | 3rd Queen (2 Minute Burst) | 100 | Used instantly after Air Anchor to fully align itself with buffs |
| 02:38:25 | 4th Queen | 50 | |
| 03:08:25 | 5th Queen | 60 | We delay Excavator a single GCD (or whenever the next Heated Clean Shot is available to get the 60 gauge) |
| 04:00:75 | 6th Queen (4 Minute Burst) | 100 | Used instantly after Air Anchor to fully align itself with buffs |
| 04:38:25 | 7th Queen | 50 | |
| 05:06:50 | 8th Queen | 70 | After Chain Saw |
| 06:00:75 | 9th Queen (6 Minute Burst) | 100 | Used instantly after Air Anchor to fully align itself with buffs |
| 06:38:25 | 10th Queen | 50 | |
| 07:10:00 | 11th Queen | 80 | We delay Excavator Heated Clean Shot, in order to get the 80 gauge |
| 08:00:75 | 12th Queen (8 Minute Burst) | 100 | Used instantly after Air Anchor to fully align itself with buffs |
| 08:38:75 | 13th Queen | 50 | |
| 09:08:25 | 14th Queen | 60 | We delay Excavator a single GCD (or whenever the next Heated Clean Shot is available to get the 60 gauge) |
| 10:00:75 | 15th Queen (10 Minute Burst) | 100 | Used instantly after Air Anchor to fully align itself with buffs |
Something to note is that we follow a somewhat static loop for queen timings. After the 1st odd minute, our odd minute timings is sending the first queen at 50 always, our 3rd minute timing is at 60, then 5th minute at 70, and 7th at 80, and then finally looping back to 60 at 9 minutes. Following this pattern, the 11th minute queen would be at 70, and 13th at 80, and so forth. However, with full uptime fights rarely going to the 10th minute mark, this rule should remain efficient for any uptime fight for savage. In order to build muscle memory for always delaying the odd minute Excavator for the proper gauge, you have the choice to also do that for the first 1-minute by holding the Hypercharge until after Queen is summoned, but if using Hypercharge as soon as we have 50 Heat post opener, you will naturally have Queen at 90 post Excavator.
While the Heat gauge may not be as flexible as the Battery gauge, there is still some finesse that can be had around its timings to make sure that you get the most out of your Hypercharge windows. Hypercharge windows can be chained together, but require a single GCD in between each window. Not only is this a good way to avoid overcapping heat during certain parts of the rotation, but it is also an excellent way of making the most out of raid buffs that may be lingering longer than a full Hypercharge window.
Reassemble comes on a charge system, stacking up to two charges. Since Drill, Air Anchor, Chainsaw, and Excavator are all the same potency and Reassemble is no longer on a strict timer, we can place Reassemble on any four of these GCDs depending on our opening alignment, the raid buffs we have in our party, down time, and kill time.
Double Queen
Double Queen is a window that was used towards the end of Endwalker that practically gained us an extra Automation Queen for our tincture/pot windows. The setup needed was to send our Queen roughly ~10 seconds before pot, since we needed a full combo (7.5 seconds) to gain 10 extra battery, with the 10 battery gained, after the next Air Anchor and Chain Saw in the burst window, we would have enough battery to send another 50 Queen. Because we sent the 1st Queen earlier than our pot, we have enough time to get most of the 1st in pot as well as the entire duration of the second Queen, ending up to be a sizable potency gain if any pot window allowed it.
With the addition of Excavator comboing off of Chain Saw, the extra 20 battery given means that we can effectively go into a Double Queen window for all of our 2-minute windows, including our pot windows if we are doing 2/8 minute pots. While it is still expected to specifically plan for Double Queen windows ahead of time, with the surplus of battery, we can do it with very minimal planning. It is important to note that while Automation Queen lasts roughly 16 seconds from start to finish, we cannot summon the 2nd Queen until ~21 seconds after the very first Automation Queen summoned. This means we can follow the same window that we currently do in 6.5. Send our Queen 10 seconds before our tincture/pot to properly get the entire duration in our window. With all raid buffs being extended to 20 seconds, we can catch some of the 2nd Queen in it, though it pretty much only being limited to 2-3 autos from our second Queen. It is key to note that this is worse feed for raid buffs for an added benefit to our personal pot.
Multi-Target Rotation and Optimization
The basic AoE priority is as follows:
Filler GCD
- Heated Combo GCD on 1-2
- Scattergun on 3+
- Note that Heated Combo GCD is a gain on 3 if you won’t be using/needing the Heat that Scattergun provides.
Hypercharge GCD
- Blazing Shot on 1-5
- Auto Crossbow on 6+
- Note that this is with the assumption that you are able to cleave all targets with the oGCDs generated from Blazing Shot, since their radius are small (5 yalms), it’s important to keep this in mind. If 1 target is out of range, Auto Crossbow is a gain on 4+ targets, if 2+ are out of range, it is a gain on 2+ targets.
Flamethrower
- If gauge is not usable, beats filler on 2+
- Beats Air Anchor (incl. battery) on 6+
- Never beats Hypercharge, Chain Saw/Excavator, Drill/Bio
- Ensure that none of your other major cooldowns (Barrel Stabilizer, Wildfire, Chainsaw, and Air Anchor ) will become available for the 11 seconds you plan to channel.
Bioblaster
- Beats Drill on 3+
- Beats Air Anchor (incl. battery) on 4+
- Never beats Chainsaw/Excavator
Auto Crossbow should only be used on four or more enemies since, unlike Blazing Shot, Auto Crossbow does not generate Double Check or Checkmate charges.
Gearing and Stat Allocation
As far as stats are concerned, the priority is as follows:
Weapon Damage > Dexterity > Critical Hit > Determination > Direct Hit > Skill Speed
The reasoning for determination being higher priority than Direct Hit is how these stats interact with Reassemble and Wildfire. Since Reassemble guarantees a critical/direct hit, it loses any gain from the direct hit stat due to the damage boost of direct hit damage always being 25%. On the opposite end of the spectrum, Wildfire cannot be a critical or direct hit. Both abilities still scale off Determination, which is why Determination is worth more to us.
Potions: Highest Grade of Dexterity available
Food: Listed inside gearing pages

High Ping and What You Can Do About It
You may have noticed parts of the Machinist rotation feeling somewhat unresponsive to your button pushing. This is a common occurrence that can happen for a multitude of reasons, almost always related to poor connection to the server. What you’re experiencing is referred to as “clipping”, due to prolonged animation lock that happens when your ping exceeds the allotted time the game gives you between GCDs to use your oGCDs. Machinist suffers more than most other jobs simply because of the Hypercharge window forcing a 1.5 second GCD and also requiring you to weave between Heat Blasts. There are a few ways to handle this:
- If possible, ensure you are using a wired connection. WiFi can be spotty and result in packet loss.
- If playing on an older computer, lower graphics settings and turn off particle effects to increase your framerate. This only matters when your frame rate is so low that it is visibly affecting your gameplay.
- Utilize a gaming VPN. Occasionally, ISPs will route your connection inefficiently, and a VPN can correct the issue by lowering packet loss and ping, creating a more stable connection to the server. Listed below are VPN options.
- Mudfish
- ExitLag
- WTFast
- Pingzapper
- NoPing
- BattlePing
A full explanation on how VPNs work and how to check your ping for FFXIV specifically can be found in this guide. The best VPN for you will differ based on location and ISP. It’s suggested that you try all possible options before deciding on one since they do cost money to use on top of your sub. Most, if not all of these should come with free trials so you can see if they help your connection.
After attempting to fix these issues with the above suggestions, the only thing you can really do without the use of illegal ToS breaking software, is adjust your rotation in a way that won’t have you doing double Hypercharge windows. This lessens the need to weave between Heat Blasts. As long as you’re capable of getting all six GCDs in Wildfire while also not overcapping on Gauss Round and Ricochet, you should have no issues playing the job.
If you’re on a PC, and you’re okay with the morality issues of injection based programs, QuickLauncher has a plug-in called NoClippy that will help your clipping issue. This program will simulate a low ping environment specifically for the animation lock of combat actions. This will not actually lower your ping or make your connection to the servers any more stable than it already is or isn’t. The instructions on how to enable NoClippy are listed on the GitHub page. While I’ve not heard of anyone being punished by Square Enix for using programs like this, the reality of the situation is they could potentially endanger your service account. Please keep this in mind if you decide to use QuickLauncher and any plug-in associated with it.
- Have any questions?

 discord.gg/thebalanceffxivAuthors
 Balance MCH Staff