Introduction
This guide contains suggestions on how to use your cooldowns effectively, and tips and tricks to play each phase as effectively as possible.
Dark Knight is a very strong tank in Dancing Mad at both main and off-tank, and its ability to move gauge usage (and therefore damage) around for whichever phase you need the most damage is invaluable during progression.
Gear
Dark Knight BiS for DMU can be found at the following link: https://xivgear.app/?page=bis|drk|ultimate|dmu, which will always be kept up to date and have a variety of options.
Potion Usage
While potion usage may depend on what your group wants to do, a recommended set of potions would at the start or 2m burst of Phase One, during the first burst of Phase Three, at the start of Phase Four, and in Phase Five.
Phase One: Kefka
Off Tank Opener
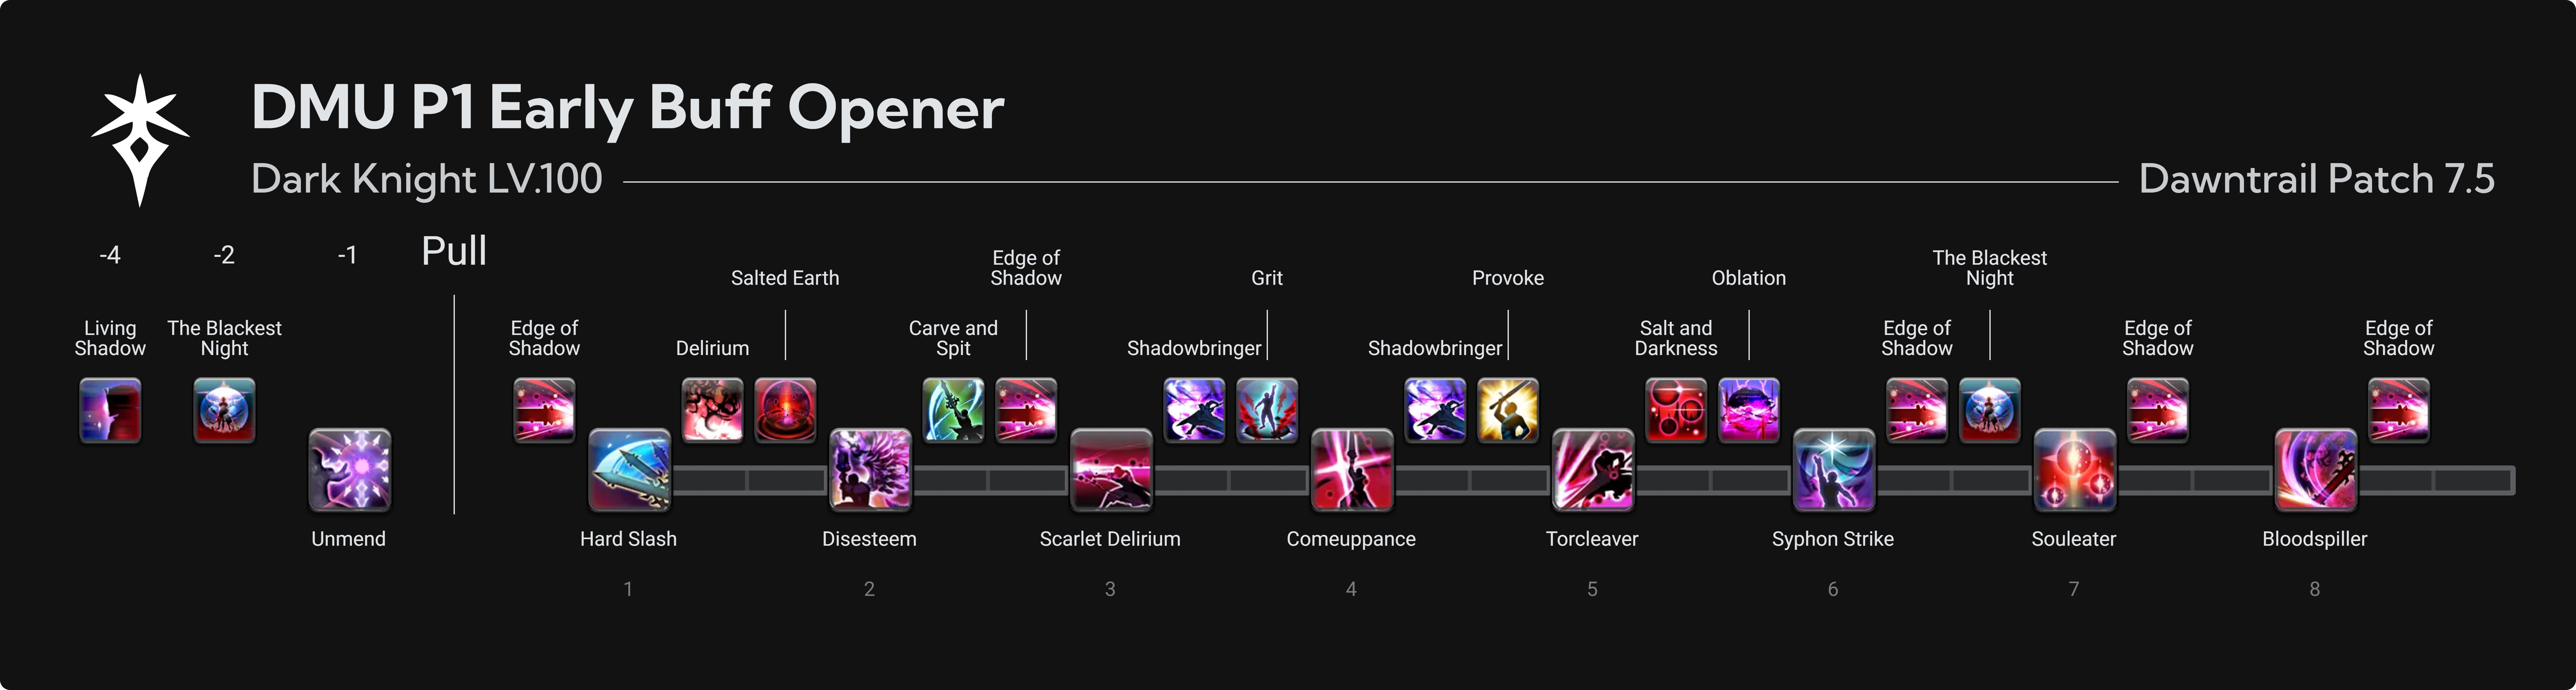
Main Tank Opener
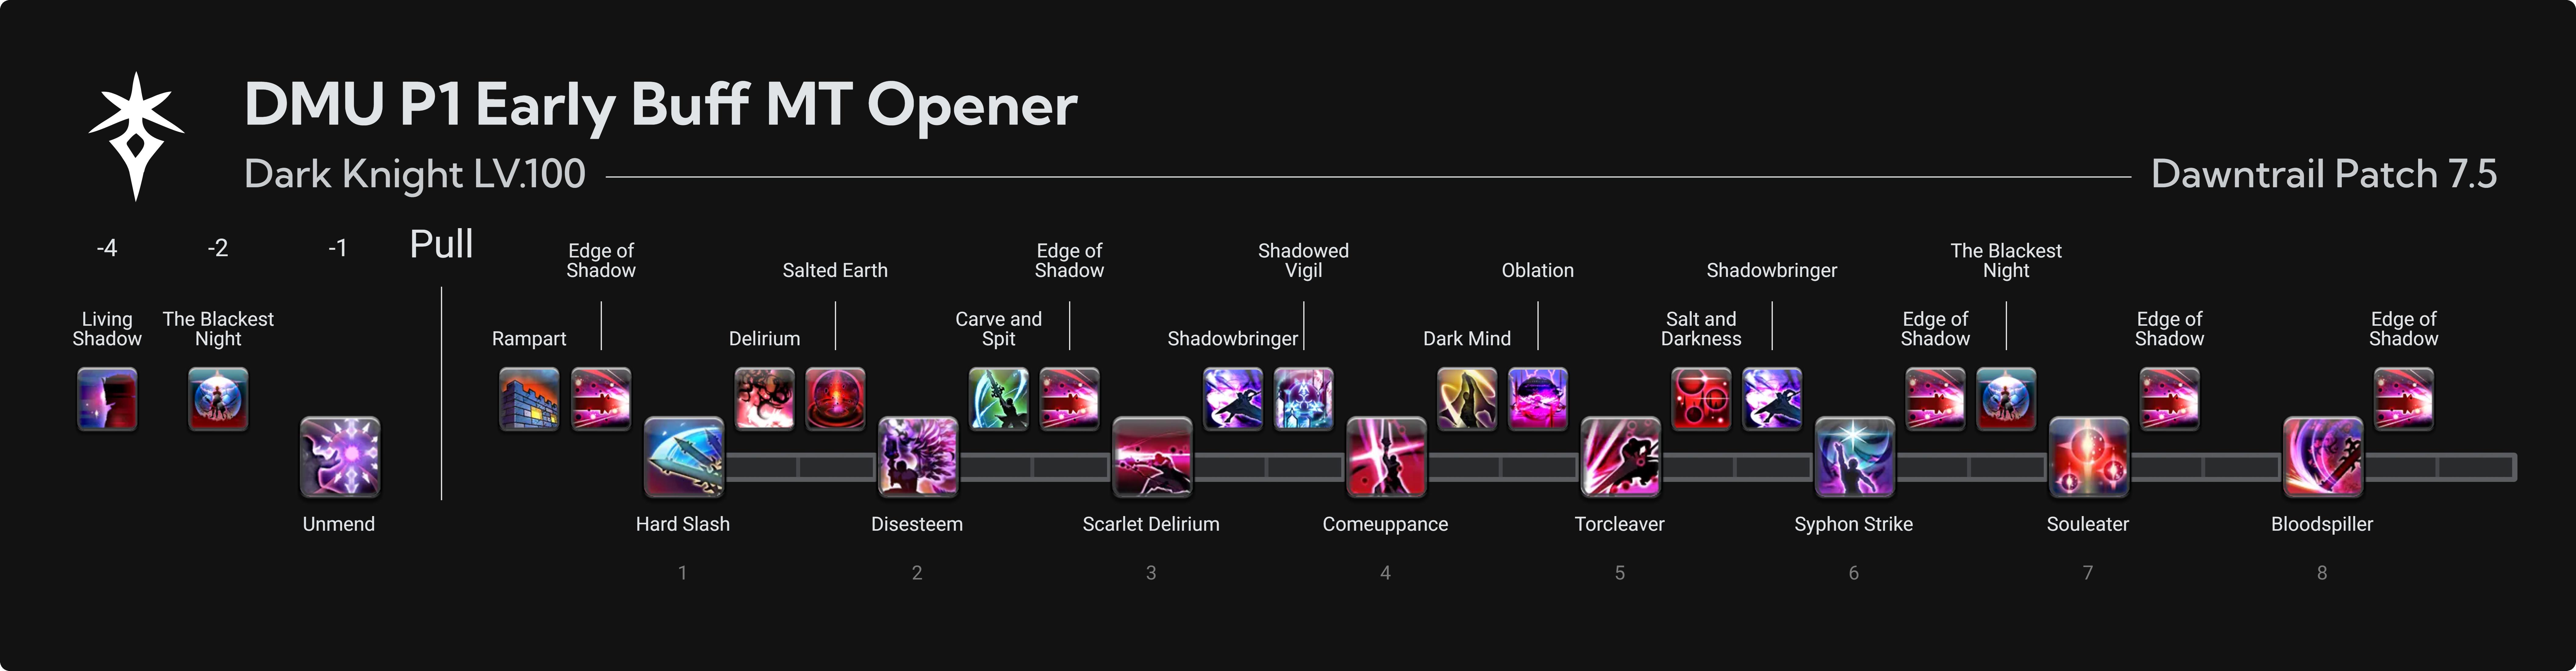
Opener Explanation
For this phase, openers and buffs are usually adjusted for first GCD buff timing. This is done so that you get a full usage of buffs at the end of Phase Two, and the listed openers below account for that.
The opener for Phase One differs depending on who is taking the first tankbuster. Both openers assume that the Main Tank is taking the first tankbuster with mitigation, and targeted mitigation (like The Blackest Night is presumed to go on the main tank.
Living Shadow can be used in the rough range of -5 to -3, but going earlier risks missing buffs. -4 aligns it nicely with your GCD on the second use.
TBN should be used very slightly later than -2 to catch an extra autoattack in the case of cotank blocks/parries. One easy way to do this is to use TBN when the 2 in the countdown reaches its minimum size and immediately hit Unmend after.
Carve and Spit is moved up before Shadowbringer so that it can be used before running out for Trines in Phase Two.
As always, the exact order of many things in the opener, such as the second Shadowbringer charge, Salt and Darkness, Oblation, and Edges can be moved around a bit.
It’s good to try to time TBN with second hit of Revolting Ruin. This is a general best practice to even out mitigation between hits with pre-shields and the extra temporary effectiveness of short mits factored in and allows Excogitation-style effects to more easily proc.
Based on when your MP regeneration ticks, you might not have MP for an Edge after the last Souleater. Weave two Edges after Bloodspiller in that case to catch the very tail end of buffs.
The Rest of the Phase
If you’re potting in Phase One, Gemdraught can be used after Unmend, but it’s generally better to use it at the 2 min burst unless you’re early in prog and want both a Phase One and Phase Two pot.
You can do one full combo after the listed opener and press Dark Missionary following the Souleater after Kefka recenters to cover Mysterious Magic + Wave Cannon and get it back for Gravitas puddle soaks.
The second Salted Earth can be held until buffs. This loses a use over the duration of the encounter, but can get a more valuable use at the start of Phase Three where DPS can matter more.
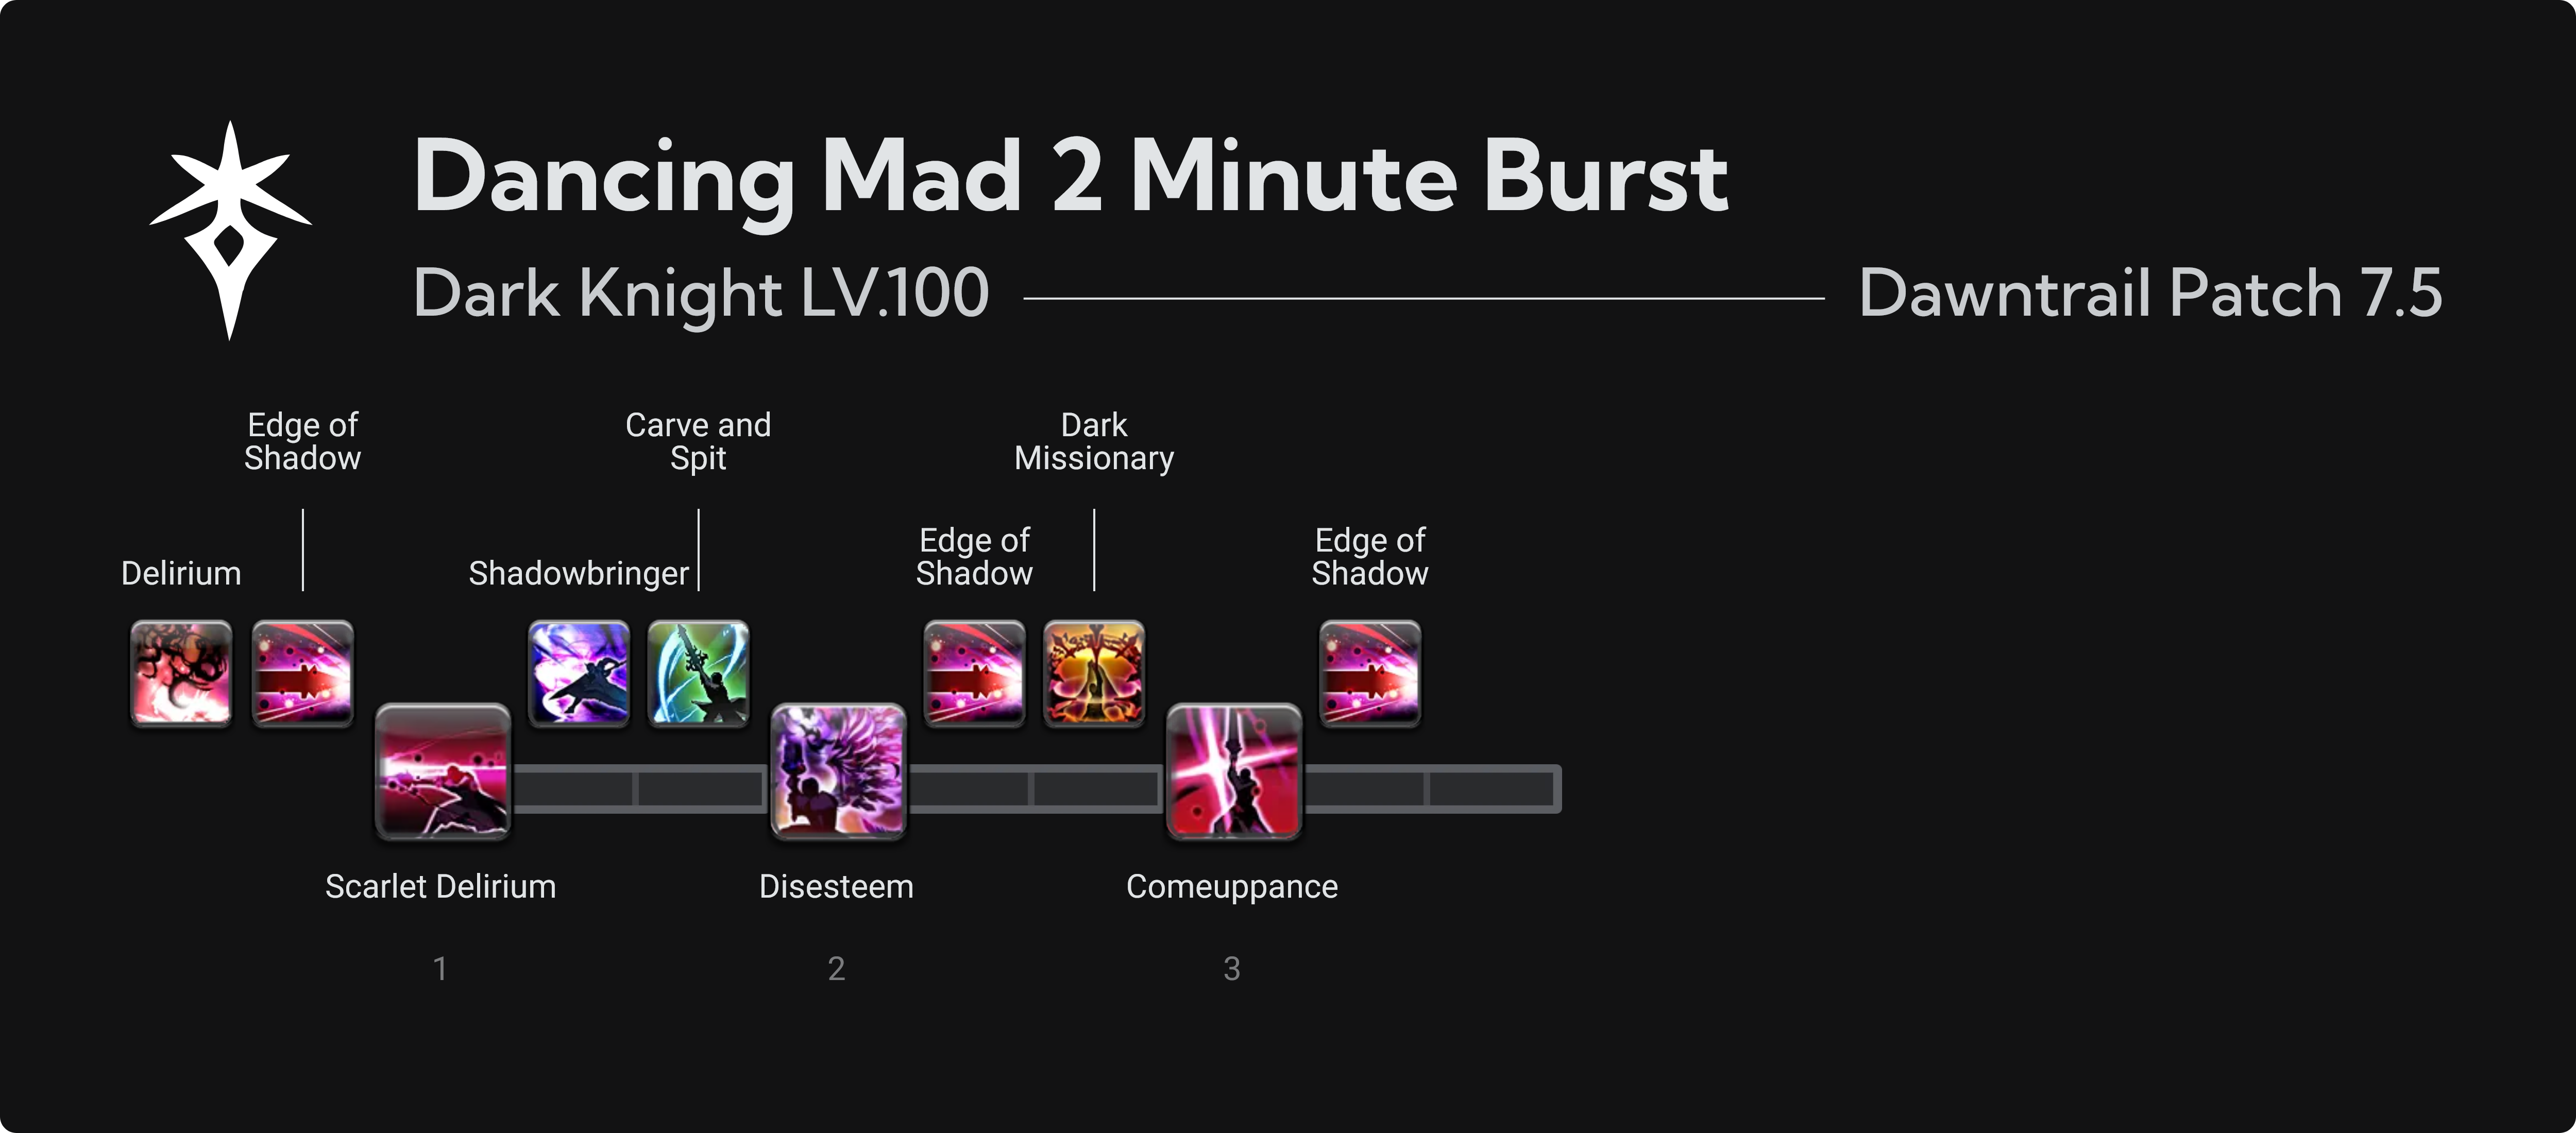
In order to avoid MP overcap at the 2min burst, you need to do a high-mana burst at the second Graven knockback using Disesteem’s long application delay to postpone MP gen until you can spend with Edge. This strategy is explained in further detail in the advanced guide, but for the purposes of this guide, all that’s necessary is the knowledge that it delays the Blood Weapon MP gain until after it would overcap you.
This can mean your burst might start off looking something like this, with Dark Missionary included presuming you’re mitigating the Light of Judgement cast:
Phase Two: God Kefka
It’s recommended to use one Edge at the end of Phase One, TBN Ultimate Embrace, then or spend the Dark Arts proc and TBN the Forsaken cast.
Ultimate Embrace hits extremely hard, somewhere in the neighbourhood of 1.3 million raw on a high roll when shared. You must have all mitigation active and use Oblation on your cotank. Even then, you require outside help to survive.
For some patterns of Forsaken, you may be disengaged from the boss, including during buffs. Move Disesteem around to minimize GCD downtime while maintaining your burst as normal.
There are some very heavy hitting tankbusters at the end of this phase, with Ultimate Embrace and Wings of Destruction. Even with perfect timing, you cannot TBN both busters, and as a result, it’s recommended to use TBN on the second hit, as with most multi-hit busters.
You can press Rampart for the second Ultimate Embrace at the end of the single wing cast. Wait until the next auto to press Shadowed Vigil. Dark Mind and Oblation should be pressed during the double Wings of Destruction castbar.
You’ll generate ~3000 MP between Phase Two ending and your first opportunity to spend in Phase Three, you can usually spend both blood and MP very aggressively at the end of this phase, since you’ll want to open Phase Three with a Delirium.
Phase Three: Chaos and Exdeath
At the start of this phase, if you have two charges of Shadowbringer (if you didn’t need to send both at the end of the last phase), you can use one immediately targeting the boss you’re not going to be holding. As a result, your opener can be something like
Delirium (before boss spawns) -> Scarlet Delirium -> Edge of Shadow -> [target the other boss] -> Shadowbringer -> [target the other boss] -> continue
Doing this is fairly ‘free’ if you can hold the Shadowbringer from Phase Two, as it means that you’ll still get two Shadowbringers in the upcoming pot window.
This phase hurts. Both tanks are going to take a punishment, but note that Chaos attacks slightly harder and more frequently than Exdeath. As a result, TBN should be used liberally throughout the phase. There is a very real chance of saving healer GCDs by keeping yourself healthy, which far outweighs the gain of more Edges in buffs. This is especially true when other damage is layered on top of autoattacks like during element pops and Slap Happy. You can and should replace an Edge in your bursts with TBN + Edge. Either way, you can usually break TBN just from autoattacks while your boss is otherwise not doing anything.
You can hold Salted Earth from the previous phase to move more damage into this phase. This will lose overall damage, but will move damage from Phase Two into Phase Three. If you held Salted Earth, place it in the center of the arena just before the bosses are targetable and weave Salt and Darkness with your first GCD.
If you didn’t hold Salted Earth, make sure that you use it and Salt and Darkness during your potion and after the Decisive Battle ‘firewall’ buffs drop. They drop as soon as the Thunder III cast begins (the large circle AoE that Exdeath casts).
Your HP after the third Thunder III doesn’t matter (as long as it’s not 0) because you get set to 1 HP by Earthquake shortly after. As long as you’re reasonably healthy going into it, you can save TBN to use immediately after Earthquake to assist your healers in keeping you alive against the following autoattacks. You can use it again off cooldown to cover the Slap Happy damage.
Be very careful about spending all your MP during the 10-minute burst (the burst during Black Hole/Earthquake). The last Thunder III happens shortly afterwards, and, presuming you’re taking it with mitigation, it is vital to have TBN for it. Of all points in the phase, this is probably the tankbuster where it’s most important to give your co-tank an Oblation charge for the second hit of the tankbuster.
If you’re not holding the boss during the next phase, make sure to use Shadowed Vigil on some auto-attacks near the end of the phase. It should come up around when the last Slap Happy comes out, which means you can mitigate that damage on top of some auto-attacks. Even better, if you’re the last tether, you can use it just before the laser goes out so that the Vigilant buff heals you before the next auto-attack. It’s completely free to do this and helps things feel a lot comfier and take a lot of pressure off your healers.
Phase Four: Kefka Says
There’s not a lot to say for this phase that’s Dark Knight specific. The boss spends a lot of his time auto-attacking, so if you’re holding the boss, make sure to mitigate the hits. If you’re not holding the boss, do make sure to help your co-tank out with TBN usage where you can.
Bank a TBN for Phase Five on the last raidwide (Ultima Upsurge). Your MP will peak in the Phase Five opener at whatever you would finish p4 with without TBN.
Phase Five: Kefka Reimagined
Mitigation is very tight this phase, both for tank mitigation and for raidwide mitigation. For some, it can be helpful to create a reference macro with mitigation so that it’s easier to remember as it’s happening.
One tank in this phase will be covering the opening Ultima Repeater, the second Ultima Repeater, and Forsaken/Forsaken Bonds hits 5-8 with their party mitigation (for us, that’s Dark Missionary). If that’s you, you should use Dark Missionary as soon as the boss swings the staff down to his side at the start, and then use it off cooldown for the next two.
Oblation can cover four of the five instances of tank damage in the phase. For most mitigation plans (presuming that tanks are invulning the end of Maddening Orchestra + following two auto-attacks), I recommend using it on:
- The first three auto-attacks
- The first Maddening Orchestra
- The post-Celestriad two auto-attacks
- The last auto-attack in the phase, presuming the first two hits are covered by a tank invuln
TBN halfway through the second Maddening Orchestra cast to get it back for the third Fell Forces auto after. Don’t worry about not having it on the flare; it really doesn’t hit that hard. Rampart needs to be very late in the Maddening Orchestra castbar to last for the third auto-attack following Maddening Orchestra. It’s better to be late than early here, as the initial hit doesn’t do very much damage.
The Forsaken and Forsaken Bonds hits at the end really, really hurt. You will want to Reprisal and Dark Missionary at least one set of four, and your co-tank should mitigate the other four. You can still keep an eye on squishies during this phase and give them a TBN if any health looks especially sketchy. It might just save a clear.
You can use your potion when Living Shadow has <10s left on its cooldown to cover its full duration if you’re worried about killtime clipping off the end of your pot.



 violet.stardust