Introduction
This guide contains suggestions on how to use your cooldowns effectively, and tips and tricks to play each phase as effectively as possible.
Dark Knight is an extremely good choice for TOP and can flexibly perform well in any of the fight’s roles (i.e. both ‘main tank’ and ‘off tank’). As always, Dark Knight have an incredibly potent set of defensive cooldowns and The Blackest Night (TBN) makes mitigating damage incredibly comfortable.
Gear
Dark Knight BiS for TOP can be found at the following link: https://xivgear.app/#/bis/drk/ultimate/top, which will always be kept up to date and have a variety of options.
2.50 is the recommended GCD speed for this fight, and while a 2.45 set is provided, there’s no specific reason to use it. The fight’s phasing favours 2.50, as well as it simming better in a vacuum.
Potion Usage
While potion usage may depend on what your group wants to do, a recommended set of potions would at the start of Phase One, Phase Three, and Phase Six, or alternatively, Phase Two, Phase Four, and Phase Six. Make sure you use one in Phase Six, but the rest will depend on where your group needs damage the most.
Use HQ Grade 1 Gemdraught of Strength or better to cap strength for TOP.
Phase One: Omega (Beetle Mode)
Opener
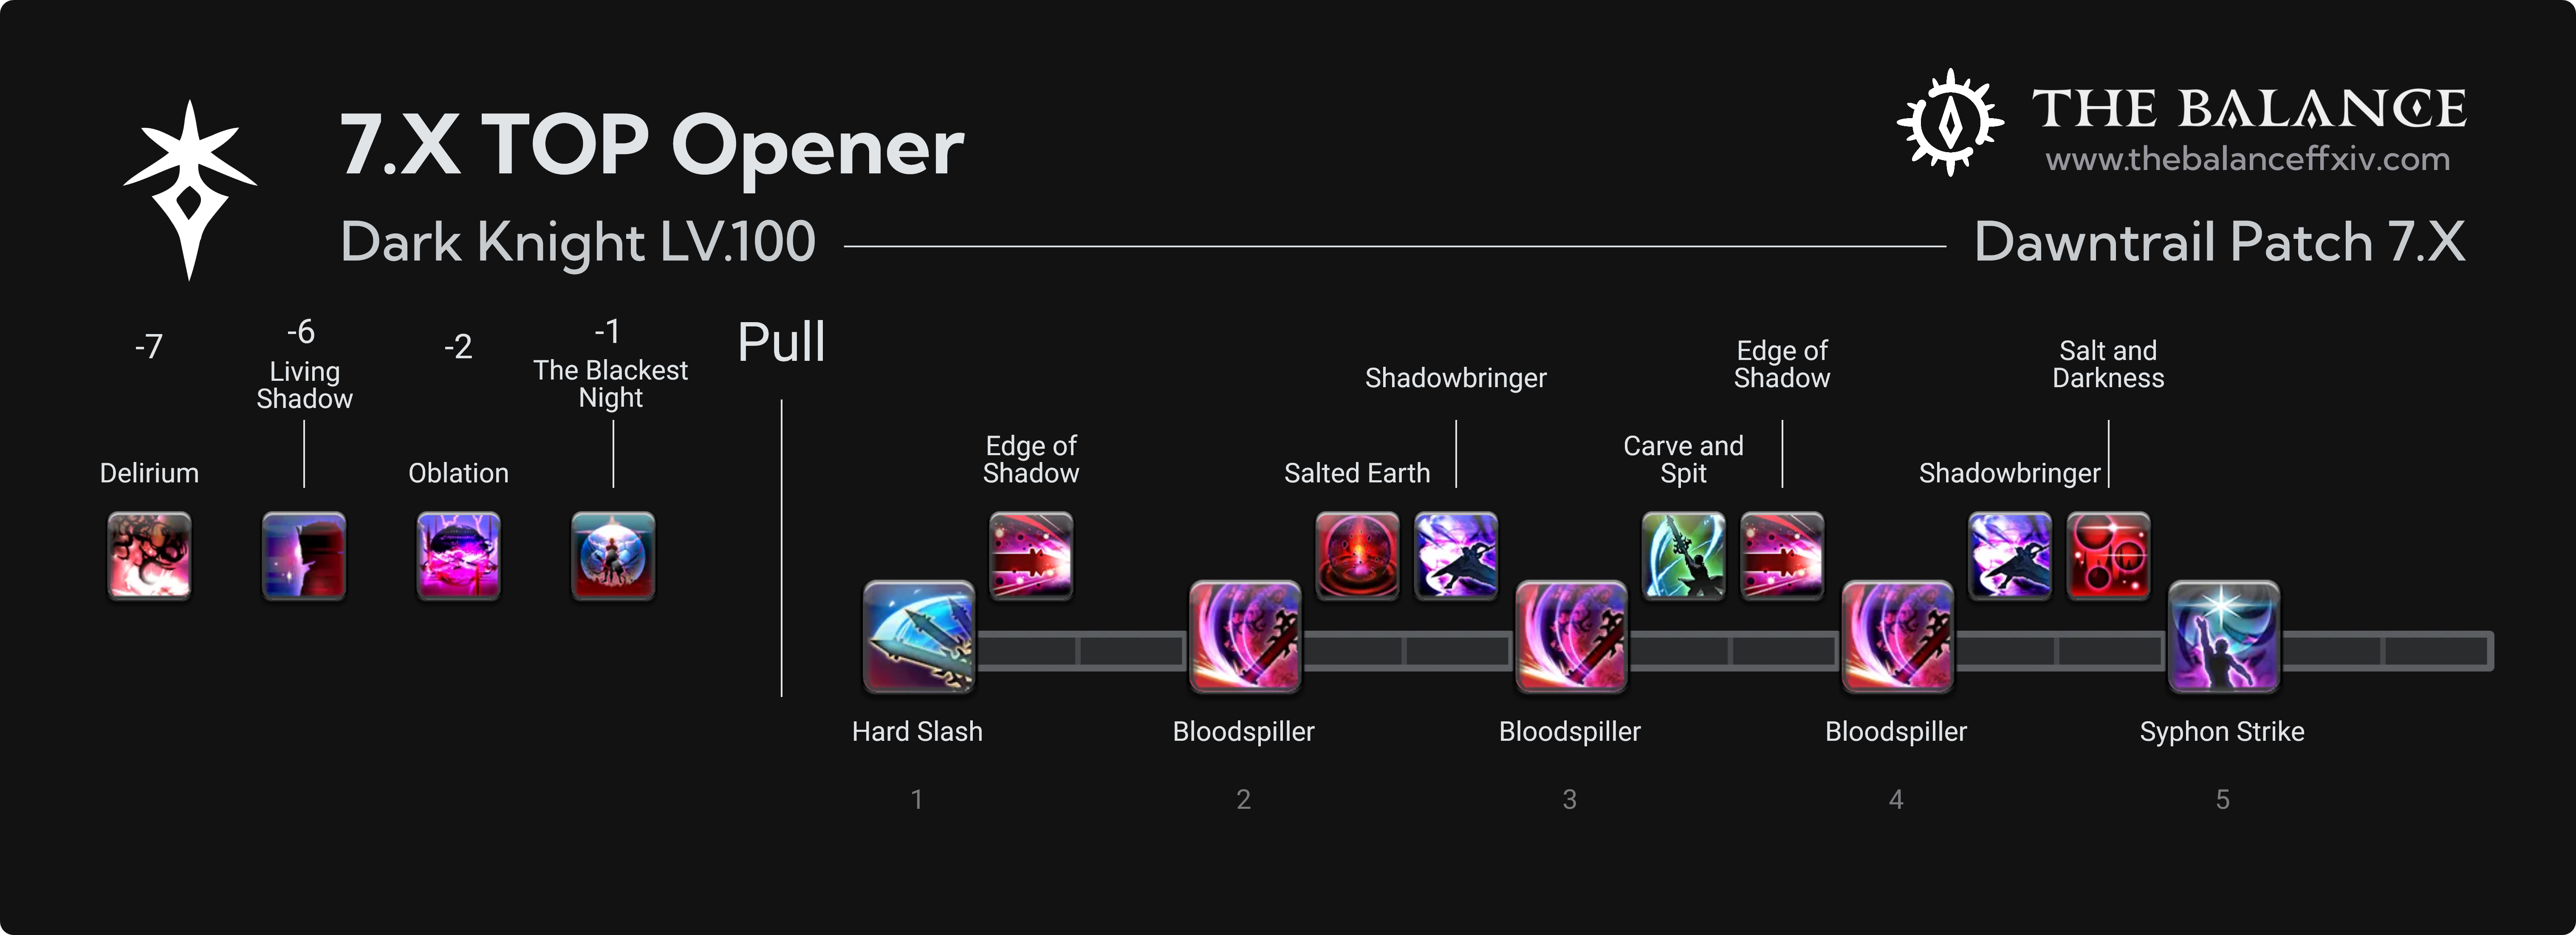
To ensure that buffs are available for cleaving both bosses at the start of the next phase, it’s recommended to use your Delirium and Living Shadow prepull. This will ensure you have enough time to have them ready for the next phase, even on a very fast killtime. This may move one or two attacks out of buffs (buffs are generally used very early in this phase), but you will not be wanting for damage and will almost certainly be holding damage if your group aims to kill near the end of the enrage cast.
If your group is choosing to hold damage to try and extend Phase One as long as possible, then we’d still recommend this opener, since moving more attacks into buffs will make it harder to hold. In other words this opener is recommended irrespective of if your group is holding.

This opener presumes you’re off-tanking, and are placing the Oblation and TBN on the main tank. If you’re the main tank, simply use your mit prepull too. There’s plenty of time to fit it and very little reason not to press it.
If choosing to pot during this phase (though with current killtimes, it will likely be unnecessary), you can use it after the Hard Slash (before the Edge) in the opener.
The Rest of the Phase
Using Dark Missionary as the conal AoEs start moving in Pantokrator will allow it to cover the first two stacks. Reprisal covers the last two if you use it just after the third in line moves in and away from the group. An easy way to time Dark Missionary is just after Second-In-Line’s debuff goes below 15 seconds, although once you’ve done the phase a few times, the timing should feel fairly automatic.
Irrespective of if you’re invulning the phase-ending tankbusters or not, you should throw a TBN on yourself to bank a Dark Arts charge for the opener of the next phase.
If you opt to use invuln for the tankbusters during this phase (which almost every group will) sure to use Rampart as the beetle dies for the upcoming Solar Ray in the next phase, as well as comfortable for the Optimized Bladedance tankbuster later in the phase.
We’ll also also want to use Living Shadow as the beetle dies too, for maximum cleave, as explained further in the next section, as well as Delirium for best timing. In short, immediately after the beetle dies and with as little delay as possible, use Rampart, Living Shadow, and Delirium.
Phase Two: Omega-M and Omega-F
For most of this phase, you’ll only be able to damage one of the clones, either Omega-M or Omega-F, due to the Firewall debuff. There are two times this isn’t the case is at the very start of the phase, and after Limitless Synergy at the end of the phase. This means we can do some optimization of our opener for AoE cleaving.
First off, as noted above, we want to make sure to use Living Shadow as soon as the Phase One boss dies, and no later, so that the leading Abyssal Drain that Esteem does hits both bosses. You should also hit Rampart and Delirium here, too. Rampart, as mentioned above, is used here so that it’s up for the second tankbuster of the phase, and Delirium because there’s no reason to hold it.
Second, we make sure to dump both of our Shadowbringer charges immediately, in the middle of our first two GCDs. Despite the one second cooldown, this will be more than fine to do without clipping your GCD. You won’t need to angle your Shadowbringer speciallky or anything like that, it should just cleave automatically.
Thirdly, if you finished Phase One with Souleater (i.e. have no active combo going into the phase), it is a gain to start the phase with Unleash and Stalwart Soul as your first two GCDs. If you didn’t finish on a Souleater, you can just start with the Bloodspillers available to you from Delirium as your AoE combo won’t be a gain. With current killtimes, this is far from a big deal, so if you want to just keep your opener consistent, you just open with Bloodspillers each time.
It is also possible to hold your second Salted Earth in Phase One to the end, to drop it in the center of the arena with a slow Phase One killtime so that you have a Salt and Darkness for the two bosses, but that may be tricky for faster killtimes, as you might not have time to place the Salted Earth after the tankbuster.
After Party Synergy, the bosses’ enmity will be reversed, so it’s common to Provoke the boss you are not currently tanking during the Party Synergy cast so that you’ll remain tied to the one you’re allowed to hit with Firewall.
After Party Synergy is over, there’s no more damage during the phase that can be mitigated with targeted mitigation, so you can freely Reprisal the auto-attacks preceding Limitless Synergy. It’s possible, but extremely tight, to continue your melee combo after Party Synergy. It’s not required, and you can lead off with Delirium instead, but you might find that some configurations makes it possible — though of course, you risk doing an uncomboed attack, if you do attempt this.
Limitless Synergy is up next, and the bosses drop Firewall as soon as the cast is done. As a result, there is a tiny window where you can hit both bosses with a Shadowbringer and Salt and Darkness. It should line up with your GCD, as long as you’ve kept it rolling correctly. Afterwards, it’s time to take a tankbuster and finish up the phase.
It’s likely that you’ll overkill this phase greatly, so we recommend bringing as much MP and Blood into the next phase as possible. Phase Three and Four have a much tighter check than Phase One and Phase Two.
Phase Three: Final Omega
During the transition, you can use TBN on either yourself or any party member during the debuff explosions to generate Dark Arts, this can gain a fair amount of MP (800-1000, depending on timing) if you were capped or almost capped before the phase began. You can use this as soon as the debuffs have 6 seconds left, or just as you make the dodge back to the outer ring of the arena.
There are no tankbusters during this phase, but the auto-attack damage is quite heavy, especially as other damage is going out throughout the phase. You should coordinate with your other tank (or follow a shared mit sheet) to make sure you’re getting full usage of your cooldowns during the phase. You can put a TBN on the tank holding the boss for every Patch cast, as well as freely using Oblation.
Reprisal works fully on damage from both Patch and the blue/red towers, and you should make sure to use it at least once during the phase, as well as putting Dark Missionary on a set.
An auto-attack plus Critical Error at the end of the phase will break TBN, even with Reprisal and additional mit, so feel free to put it on whichever tank is holding the boss at that point. If you are holding the boss, Dark Mind has a lot of value for this cast and the following auto-attacks.
Phase Four: Reboot
This phase, like the last, can be pretty tight on damage, and groups will choose to use buffs and/or pots in this Phase or the last. It’s possible that your group chooses to, for example, use buffs in Phase Three but decides to use potions and LB3 in Phase Four. Whatever the configuration, you should get a feel for which phase feels tightest to decide where to move your personal damage. Dark Knight is privileged in being able to move a lot of its damage (via Edge of Shadow, Shadowbringer, etc) between phases, and you should absolutely abuse that privilege.
TBN will pop on any squishy during Wave Cannon, and you should make sure to use Reprisal and Dark Missionary during this phase, as there’s a lot of damage going out and it can be tight on healing.
Once the boss gets to 20%, you’re locked in for Phase Five. Remember that for any sub-20% overkill, your AoE combo (Unleash and Stalwart Soul) generate gauge at a faster rate than your single target combo.
Phase Five: Dynamis
This phase has a lot of hard-hitting tankbusters, and care should be taken to make sure that mitigation is spread correctly on the tank taking the riskiest damage from the tankbusters. There are four tankbusters total, a double-hitting Solar Ray. This can be invulned, but will otherwise requires a tank swap:
- Before Run Dynamis: Delta (at the start of the phase)
- After Run Dynamis: Delta
- After Run Dynamis: Sigma
- After Run Dynamis: Omega
To make sure that you have your invulnerabilities for Phase Six, it’s recommended to use invulerabilities on the earliest possible tankbusters. As a result, the last two tankbusters can be quite tight on mitigation, as they are less than two minutes apart, meaning that, if you do not invuln them, you will not be able to use Shadow Wall on both. Compositions involving Dark Knight and either Gunbreaker or Paladin will be unable to invuln them, and will instead address them with mitigation.
Most groups handle this by splitting the 120s mitigations between each hit, and giving healer help to the tank that isn’t using the large cooldown. You should always give a tank not using a 120s cooldown your Oblation, since you will always have it for any hit you take yourself, and you can consider whether or not it makes sense to give them your TBN, too.
If you’re taking both the post-Omega and post-Sigma tankbusters with mitigation and a tank swap, you will need to take care to use Rampart early enough to be up for the post-Omega tankbuster. You can safely use Rampart after Omega-F re-appears in the middle of the arena following the dynamis debuffs in Sigma. Note that you’ll need to reapply Darkside for the upcoming damage window, too.
Be aware that during the active phase at the start of Run Dynamis: Omega, during the dodges, the tank holding the boss will take a lot of auto-attack damage. You should make sure to give them (whether or not it’s you or the other tank) TBN. It can be easy for healers to lose track of tank health during this phase due to the quickness of the dodges.
You will generate around 4000 MP from the stun at the end of this phase until the final phase is targetable. If you don’t have one already, make sure to TBN someone during the Blind Faith cast to go into the last phase with a Dark Arts! If you’re comfortably overkilling this phase, which is likely, try and bring as much blood and MP as possible into Phase Six.
Phase Six: Alpha Omega
As soon as the phase begins, make sure you use Living Shadow immediately, to make sure you get all of the hits off before enrage. You only get one pot during this phase, and it is typically done during the first or second two-minute burst. Even if using the LB, using your potion here is likely a gain due to how many resources you can bring into the phase.
The phase begins with Cosmo Memory, demanding a tank Limit Break 3. Make sure to use yours, since Dark Knight has the coolest one.
Salted Earth can be treated as a 120s cooldown and used under buffs each time in this phase without losing a use.
The auto-attacks in this phase are unique, and are two auto-attacks that go to two targets:
- The player with the highest enmity
- The furthest player from the boss
These auto-attacks apply a vulnerability, and cannot be both taken by the same player. As a result, for safety, it’s recommended that if you’re the ‘off tank’, or designated to take the far autos, to turn your stance off, and have the close tank be the only tank with stance on throughout the phase. Typically, Alpha Omega will use two auto-attacks on each tank between each mechanic of the phase.
There’s a lot of tank damage in this phase, and Wave Cannon in particular does colossal damage to tanks. Mitigation is, in general, tight for all players throughout the phase. You will want to use your invulnerability for one of the Wave Cannons (and your co-tank should Invuln the other one). Make sure you don’t spend all your MP on buffs, as you will need TBN for the tankbusters.
Cosmo Dive will target the two closest players for a high-damage tankbuster, and one random other player for a stack. In practice, this means both tanks splitting off inside the hitbox, while the non-tanks stack on the edge of the hitbox to take theirs as a group. Typically, groups will have the main tank (the tank with stance on) go left, and the off tank (the tank without it) go right.
Wave Cannon is a ‘wild charge’, meaning the damage is split amongst players hit, but the two closest players will take substantially more, essentially a tankbuster. You should comfortably be in front for these. Be aware that you shouldn’t move in too soon, though, and you should wait until the randomly-assigned wave cannon beams fire first.
Wave Cannon’s cast is 10.6 seconds, meaning you can use your 10s mit shortly after the cast begins. Make sure you don’t mit too early, as you may cause deaths.
Due to the tightness of the mitigation in this phase, we strongly recommend following a shared mitigation plan with your group, and is why there’s little in the way of mitigation suggestions in this phase despite the tightness. Irrespective of how you mitigate, you’ll be reliant on mitigation from your group for safety and comfort.
Make sure you study up as much as possible for the last phase. While conceptually simple, this phase is brutally unforgiving to any mistake, in mitigation or mechanics. A single player’s mistake (such as missed mit or dying to exasquares) will almost always cascade into a wipe. Not only will the dying player be missing the crucial free LB from the Dynamis buff, but the Dynamis buff also provides a substantial amount of mitigation, and without it you will die to every piece of damage. There are a lot of good exasquare sims available, make sure you use them and avoid heartbreak. If you need an image handy on a second monitor to reference your mit, have one!
Magic Number Dark Knight Tech
Dark Knight has a trick during the end of the phase to use the required LB3s during Magic Number to gain a sizeable amount of potency. There’s little reason not to do this, and it’s fairly ‘free’. In short, after expending your Dynamis-fuelled Limit Break 3 (and so, can safely die without losing the free LB buff), you can click off the tank LB3 (or use a macro to remove the buff) to intentionally die to Magic Number. You’ll be ressurected by the ensuing healer Limit Break 3, restoring all of your MP. If you spend all of your MP before this, you can get two full refills.
Due to this interaction, Dark Knight should usually LB3 the first Magic Number so that it can die twice, but make sure to communicate to your co-tank just in case.
Find the macro to make this easier here:
/statusoff "Gunmetal Soul"
/statusoff "Dark Force"
/statusoff "Land Waker"
/statusoff "Last Bastion"
As soon as you’ve used LB3 (use it as soon as the cast-bar appears) you can hit the macro to remove the LB buff. Make sure to dump your MP before and after!
After the first res, it’s recommended to lead off with an Edge of Shadow before your first Hard Slash, as you won’t lose a GCD this way unless LB timings are abnormally early.
Clear Point of View Videos
Dank Tank (7.3, Aether PF strats)
TOP is the first ultimate in this compilation video.


