Introductory Concepts
Section TLDR
- The gauge is what allows you to use your most important actions. Do not overcap or overspend it.
- Damage or healing calculations occur when an action is cast, not when they apply to a target. This is important for buff optimization.
- With GCD recast speeds faster than 2.50, you will occasionally (or always) use No Mercy at 9 o-clock relative to the GCD roll indicator.
Gunbreaker is a job with a focus on continuously building and spending cartridges to deal very high damage inside of strict burst windows. As a basic overview, the rotation is a builder-spender rotation focused on optimizing damage dealt every minute inside No Mercy, which is a 20% damage buff that lasts for 20 seconds after its use.
We must establish some basic concepts about the gauge usage, buff management, and buff usage before explaining the rotation.
Powder Gauge
The powder gauge (sometimes referred to as the “cartridge gauge”) is used to store resources for cooldown usage within No Mercy. It is normally capable of holding a maximum of 3 cartridges, but this can be increased to 6 temporarily by using Bloodfest.
The actions that will fill the cartridge gauge are as follows:
- Solid Barrel and Demon Slaughter both generate one cartridge upon finishing their combo.
- These combo chains cannot be broken unless switching from one to the other or using the wrong action in sequence.
- Bloodfest will grant 3 temporary cartridges in addition to your normal 3 without overwriting them, allowing you to hold a maximum of 6 cartridges for 30 seconds.
The actions that will spend cartridges from the gauge are as follows:
- Double Down spends two cartridges.
- Gnashing Fang, Burst Strike, and Fated Circle all spend one cartridge.
- Gnashing Fang is broken by the cartridge-generating combos and Reign of Beasts.
Familiarizing yourself with each combo and how they work is important. You should generally never break an active combo or finish a combo that will generate another charge while the powder gauge is full, as that would overwrite the charge and waste uses of actions that rely on the gauge, which are always stronger than the combo actions that generate resources.
Damage and Healing Snapshotting
It is important to discuss “damage/healing snapshotting” before talking about burst phase information because understanding this will significant impact your understanding of the correct approach to using cooldowns within No Mercy, and the timing of using No Mercy itself relative to the global recast timer.
Anytime an action is used, that action will calculate the damage or healing that it will deal with respect to the buffs that were active when the action was used, not when the action visibly applies to a target. This applies even for things like over-time effects such as Bow Shock, Sonic Break, Aurora, or Clarity of Corundum (the heal from Heart of Corundum).
This means that even if the damage or healing on a target appears well after the buff falls off, the damage or healing will still be buffed as long as the buff was active when the action was initially used. This means that over-time effects such as Sonic Break will be buffed for their entire duration, even if they are used at the very end of No Mercy.
It also means that using No Mercy later in the global recast timer will extend the available time to use and buff actions which, at certain global recast speeds, can buff additional weaponskills or abilities that would not have been possible if No Mercy was not used later relative to the global recast timer.
No Mercy
No Mercy is the trigger for the start of the burst phase of Gunbreaker’s rotation. It is a 20 second buff that increases any damage dealt by 20%, which allows for 8 weaponskills (occasionally 9 depending on global recast speed) to be used before No Mercy will end.
9 GCD No Mercy
Acquiring the ninth “GCD” (short for global cooldown or global recast, referring to weaponskills) within No Mercy requires a specific usage time relative to the global recast timer. Using No Mercy very early relative to the global recast timer would result in the buff activating while the global recast is still on-cooldown, wasting active buff time as you wait for the next weaponskill to be usable.
For global recast speeds faster than 2.50, No Mercy must be cast as a “late weave” to buff a 9th weaponskill, or if imagining the indicator as a clock, when the global recast indicator has reached a “nearly-9-o-clock” position. No Mercy takes slightly over half a second (600ms) to activate after pressing it, so using No Mercy as a late weave results in the buff activating at the same time that the next weaponskill can be cast, wasting little to no active buff time and permitting the use of a ninth weaponskill within the final second of No Mercy.
Usage Timing By Global Recast Speed
Not every global recast speed is a good fit for No Mercy. Some speeds within the range Gunbreaker typically plays at can and will cause inevitable drift because a 60 second cooldown cannot align to the number of possible weaponskills at that global recast speed within a 60 second period, making it necessary to wait to use No Mercy for a short duration. This will drift you away from party buffs, potentially damaging your DPS.
To minimize this as much as possible, there are basic usage guidelines for when to cast No Mercy based on global recast speed ranges. The fastest speed within each listed range is the speed that has the least drift. Deviating to a slower speed will linearly increase the innate drift that occurs with every usage of No Mercy.
2.50Use No Mercy off cooldown whenever it is usable, but preferably as an early weave (3 o’clock).
2.45 - 2.47Alternate between using No Mercy off cooldown as a late weave (9 o’clock) and early weave (3 o’clock). Try to make the 9 GCD window fit in raid buffs.
2.40 - 2.44Use No Mercy off cooldown as a late weave (9 o’clock).
Openers
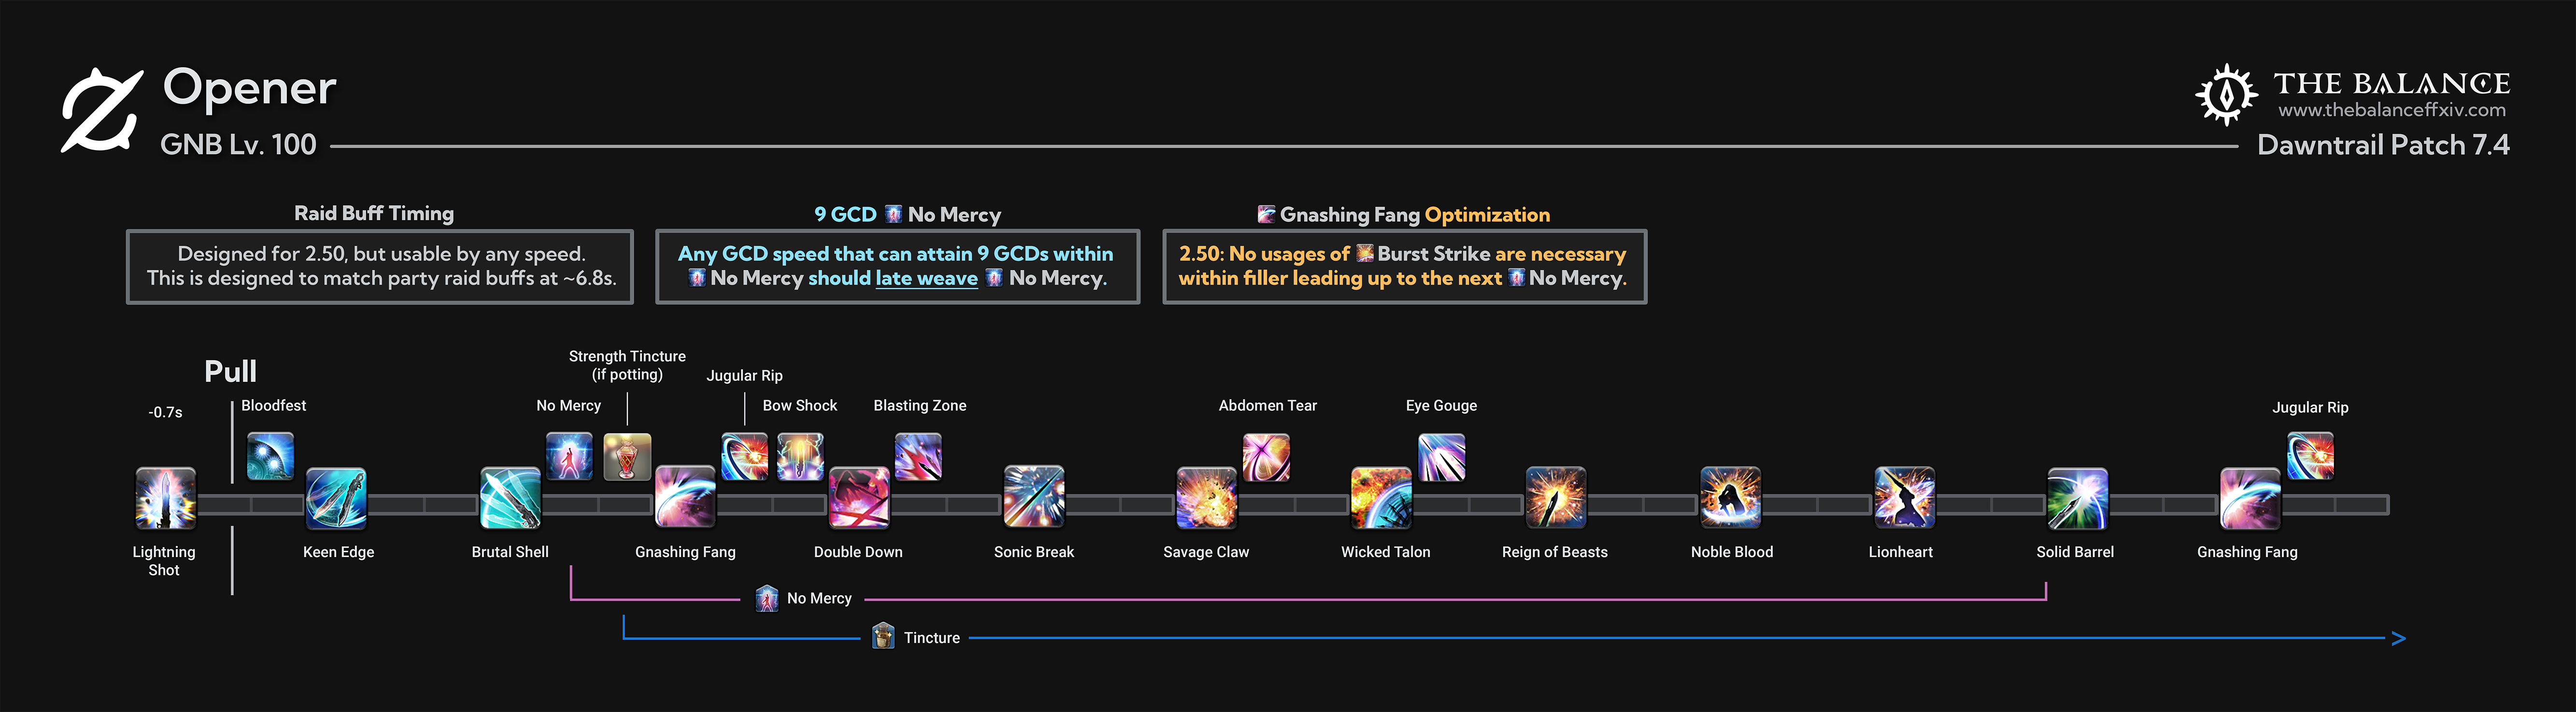
Opener Notes
The Lightning Shot cast is suggested for threat generation and raid buff alignment.
- Trajectory can be used at -0.66s to replace Lightning Shot (1/10th threat generation).
- Provoke can be used at -0.6s to replace Lightning Shot, but this is not advised without knowing the fight timeline because Provoke may be necessary within the first 30 seconds of the fight for a tank swap and can waste a pull.
- If opting out of using Lightning Shot in the case of an encounter that can begin within melee range (or by using alternative pulling options listed above), it may be necessary to start No Mercy after Solid Barrel to ensure raid buff alignment remains mostly optimized.
Rotation Fundamentals
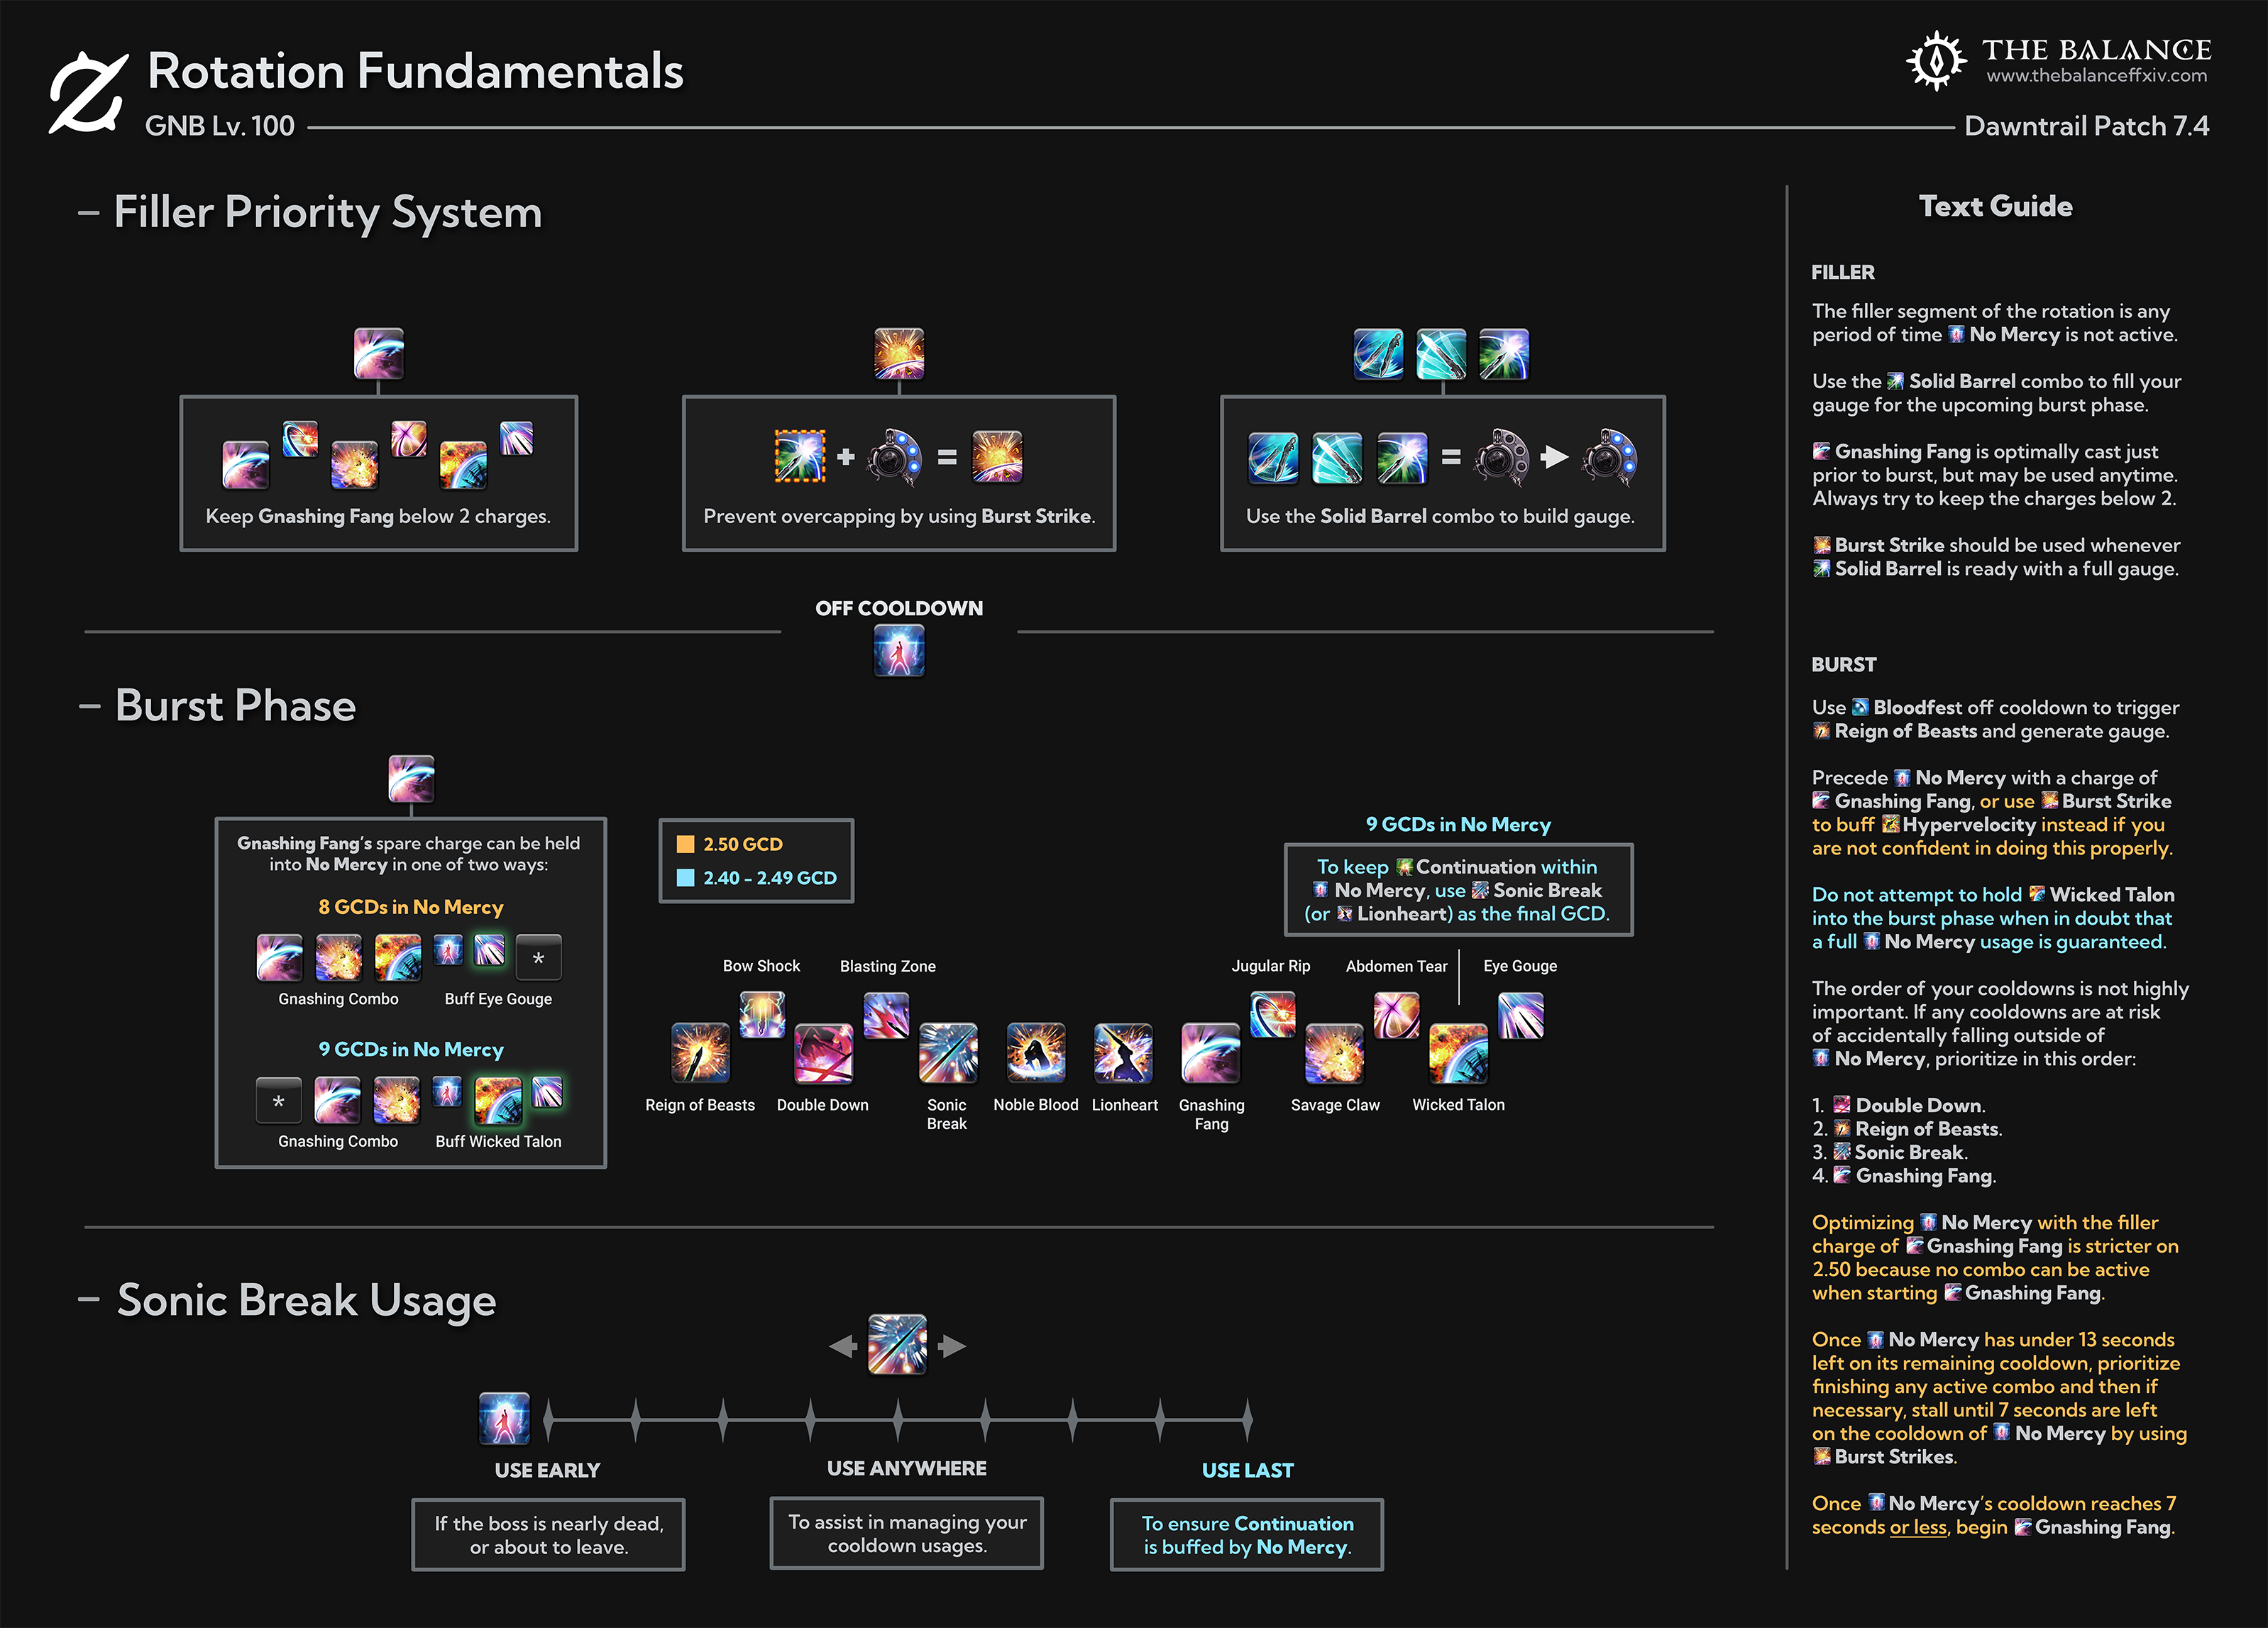
Filler Priority
The rotation is considered to be in a “filler phase” to “fill” the powder gauge while No Mercy is not active. The goal of this is primarily to set up resources and cooldowns for the next No Mercy.
Complete the Solid Barrel combo continuously to fill the gauge.
Use Gnashing Fang and Blasting Zone off cooldown ONCE. Do not overcap your charges of Gnashing Fang.
Try to only use Burst Strike when the cartridge gauge is about to overcap.
- This occurs anytime the gauge is full and Solid Barrel is the next action to use.
- You should Burst Strike into No Mercy when you will also have Bloodfest to avoid drifting the usage for any speed, and to also optimize damage on 2.50.
Once No Mercy comes back off cooldown, weave it in accordance with the usage guideline above this section.
Burst Phase
The goal of this phase is to fit the maximum amount of potency into No Mercy.
Use Bloodfest off cooldown, and try to keep it prior to No Mercy. It is not required to be used prior to No Mercy, but doing so provides additional leniency because it will remove gauge requirements for the burst phase, and provide flexibility in where Reign of Beasts and Gnashing Fang can be used.
Double Down, Sonic Break, Reign of Beasts, and Gnashing Fang should all be placed within No Mercy. The order of cooldowns within the burst phase is not strict, but ideally they should be used in an order that makes the most sense to prevent potency loss if No Mercy is interrupted.
This means that ideally each burst phase should prioritize “hard” cooldowns over “soft” cooldowns, where hard cooldowns are any cooldown that would “drift” by not being used as soon as they are available (Double Down or Gnashing Fang with 2/2 charges), and soft cooldowns are granted by other actions and can be used at any point as long as their timer for use does not expire (Reign of Beasts and Sonic Break).
If there is no need to prioritize hard cooldowns, then prioritize in order of potency. This means that the ideal cooldown setup for the burst phase will mirror the burst phase example shown in the infographic above, where Reign of Beasts is used before Gnashing Fang, and Double Down is used off-cooldown, with Sonic Break being used anywhere necessary.
If it appears that GCDs will be lost during the burst phase, attempt to prioritize cooldowns in the following order to minimize potency loss:
- Double Down
- Reign of Beasts (combo)
- Sonic Break
- Gnashing Fang
Sonic Break is very flexible, and can be used in the following priority:
- Use Sonic Break earlier next pull if any DOT uptime is lost from downtime or fight killtime.
- Use Sonic Break anywhere necessary to allow better cooldown usage.
- Use Sonic Break as the 9th GCD if Gnashing Fang’s combo or Burst Strike would end up as the 9th GCD within No Mercy (specific to speeds other than 2.50).
* Note that considering the use of Sonic Break as the 9th GCD only exists due to the fact that it does not have a cooldown, and is lower potency than Lionheart. It contains the risk of wasting a portion of the damage-over-time effect in pulls where you do not know if the boss will become untargetable. Other options exist that can remove the threat of wasting DoT time, such as:
- From 2.40 - 2.41, you can use Burst Strike or Wicked Talon as the 9th GCD, and still have time to use Continuation before No Mercy ends (only by casting No Mercy at the latest possible point in the GCD roll without interrupting the next GCD). This may not possible on ping values greater than ~50ms.
- Lionheart can also take the place of the 9th GCD instead of Sonic Break, but it is a higher potency GCD than Sonic Break, and therefore has the risk of losing additional potency if the 9th GCD is accidentally lost. Doing this also requires you to use Reign of Beasts after Gnashing Fang within the burst phase, which is stricter because it will induce greater loss if downtime occurs during No Mercy.
Ability cooldowns such as Blasting Zone and Bow Shock should be used in any order that fits the needs of a fight. The reason Bow Shock is placed prior to Blasting Zone in the infographic is because of a decision to prioritize damage-over-effect timers.
Unique Burst Phase Considerations
Optimizing No Mercy with Continuation On 2.50 GCD
Since No Mercy is used as an early weave within the global recast indicator, this allows for the buffing of an additional ability before the first weaponskill is used within No Mercy.
This means that you can use Continuation after No Mercy to buff an additional ability within No Mercy for free. This is most easily done by using Burst Strike when casting No Mercy, so that Hypervelocity can be used after enabling No Mercy.
Due to Gnashing Fang being a charge-based cooldown as of patch 7.4, it can now be held up to No Mercy without risk of loss in order to buff one of Gnashing Fang’s Continuation moves instead of Burst Strike’s Hypervelocity. This provides an additional gain up to an extra ~0.15% or ~50-60 DPS in current gear over the course of a fight.
The most ideal case with this occurs when starting Gnashing Fang ~7 seconds prior to No Mercy in a manner that looks like:
- Gnashing Fang
- Savage Claw
- Wicked Talon
- No Mercy
- Eye Gouge
- Normal burst phase.
It is worth noting that this is the ideal case, but any Continuation from the Gnashing Fang combo is a gain over Hypervelocity, so holding Gnashing Fang for any necessary reason (thereby pushing it partially into No Mercy), is perfectly acceptable and considered ideal.
The mental technique to follow is to prioritize finishing the active Solid Barrel combo when No Mercy has 13 seconds or less on the remaining cooldown, and if necessary, use Burst Strikes to stall from then on until it becomes possible to use Gnashing Fang within 7 seconds or less prior to No Mercy.
A video has been created to demonstrate that here:
An example of when the ideal case cannot be performed is if downtime occurs, and the Solid Barrel combo is active within the 7 seconds prior to No Mercy coming off cooldown. The normal Solid Barrel combo has a 30-second timer that begins the moment the last combo action was pressed, which is too short to be carried through Gnashing Fang and an entire No Mercy, so that combo must be finished prior to starting Gnashing Fang’s combo into No Mercy.
As an additional optional precision technique, during full uptime the combo can be actively managed to not be active upon reaching time to cast Gnashing Fang by utilizing Burst Strikes to manipulate the combo position to always end the Solid Barrel combo shortly before beginning Gnashing Fang. The opener that has been suggested in this guide requires zero usages of Burst Strike for the first minute after the opener has ended, but after that, attempt to follow this technique:
- Take the number of cartridges present when No Mercy ends.
- If the number is zero, the number of Burst Strikes is one.
- If the number is nonzero, double that number.
- Burst Strike that many times before reaching the next Gnashing Fang into No Mercy.
If any GCDs bleed out of No Mercy into the subsequent filler section due to downtime or interruptions within No Mercy (or Lightning Shot is used within filler), remove one necessary Burst Strike per unexpected GCD within filler.
Please note that this optional technique is NOT necessary to perform, and you can simply follow the 13-second rule listed above with the video example which will guide you to the same answer either way without thinking about it. This is just another way of approaching the optimization to ensure the most optimal outcome occurs.
If uncomfortable with attempting this optimization in general, do not attempt it and use the spare Gnashing Fang charge anywhere within the filler with a Burst Strike into No Mercy instead to buff Hypervelocity instead. This is not a significant loss, reducing your DPS by only 0.15% - 0.2%.
Gnashing Fang Optimizations for Speeds Below 2.50
Since 9 GCDs within No Mercy becomes possible for speeds faster than 2.50, the goal shifts from moving Eye Gouge into No Mercy over to moving Wicked Talon into No Mercy.
This is done by starting Gnashing Fang approximately 3-4 seconds before No Mercy comes off cooldown. The combo timer can be carried through Gnashing Fang and No Mercy without breaking, unlike 2.50 due to the reduced time between GCDs.
- Be warned, any major GCD clipping within No Mercy can risk loss of combo state. For this reason, it is suggested to still try to end any active combo before trying to optimize Gnashing Fang.
- If not attempting to optimize Gnashing Fang, then simply Burst Strike within No Mercy as the 9th GCD.
Combo Considerations
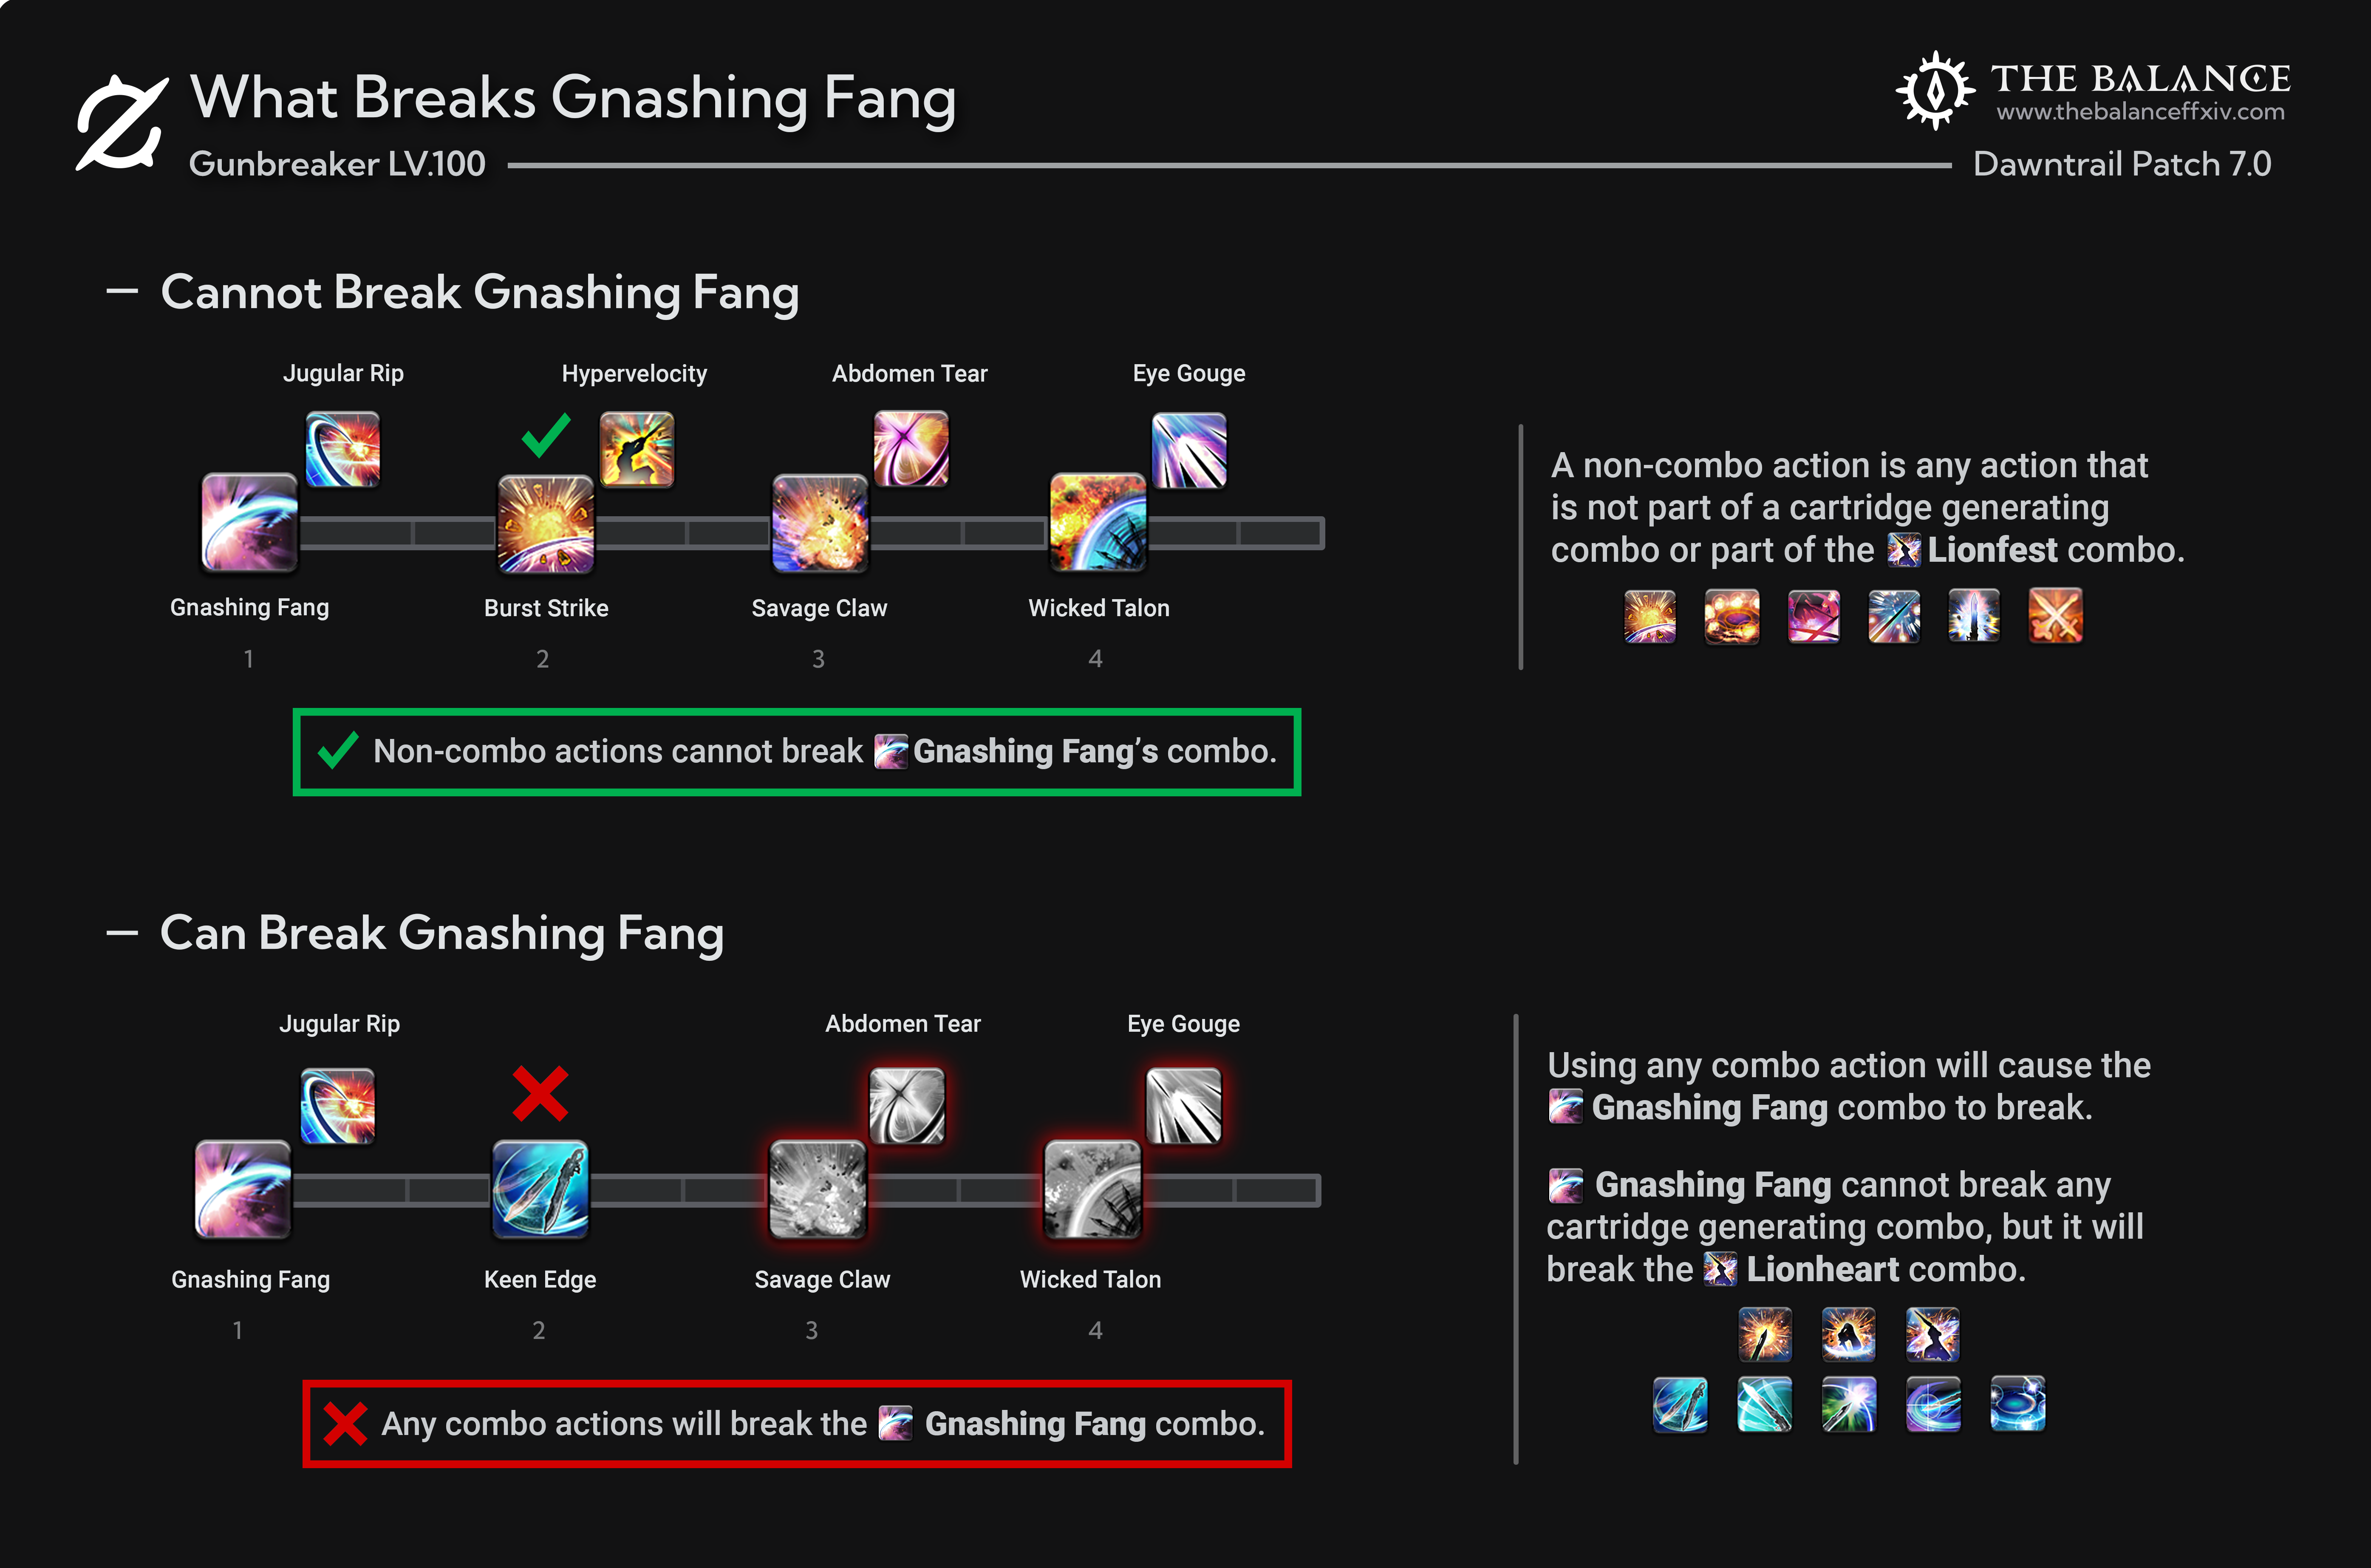
Certain actions cannot be cast while certain combo chains are active without breaking the presently active combo chain. It is important to understand what can or cannot be pressed during a combo chain to avoid losing out on significant potency by mistake.
- The standard Solid Barrel combo cannot be broken by anything but itself or its AOE counterpart.
- Gnashing Fang and Lionheart are both broken by the Solid Barrel combo, as well as its AOE counterpart.
- Gnashing Fang and Lionheart are also their own independent combo chains that cannot be used or mixed together, or they will break the other.
Skill Speed Considerations
Section TLDR:
- GCD cooldowns come off cooldown before No Mercy with faster GCDs. Hold them back into No Mercy.
- 2.40, 2.45, and 2.50 are driftless for party raid buffs and No Mercy.
- 2.45 requires less than or equal to ~50ms ping (or plugins) to not clip/drift No Mercy.
- Other GCDs cause some amount of buff drift, potentially drifting No Mercy from raid buffs.
- This does not mean that other speeds are unplayable or bad, but it does add the risk of losing bonus raid buff damage.
Cooldown Misalignment Due To Cooldown Reduction
Skill Speed (SKS) modifies weaponskill cooldowns by reducing their cooldowns by 0.1% per SKS tier. This is done to help weaponskill cooldowns remain aligned to the global recast timer and not clip them against the global recast aggressively or cause them to drift by having to hold them.
This benefit is not extended to ability cooldowns. This is done intentionally to keep No Mercy aligned to party raid buffs, but it creates misalignment between weaponskill cooldowns like Double Down and ability cooldowns like No Mercy, because weaponskill cooldowns like Double Down begin coming off cooldown sooner than No Mercy does.
The solution to this is simple - pretend the cooldown reduction does not exist and hold the weaponskill cooldowns back into No Mercy.
Cooldown Drift
Similarly to how weaponskill cooldowns do not align to No Mercy with SKS, certain global recast speeds do not align themselves to ability cooldowns either. This causes ability cooldowns to occasionally drift into the next weaponskill cast, because they would interrupt the next weaponskill cast if they were cast upon becoming ready for use due to animation lock.
Animation lock plays a significant limiting role in whether or not you can press an action when it becomes ready for use, because animation lock from the previous action used (either from a weaponskill or ability) must end before any other action may be cast. This is why casting abilities right before the next weaponskill is about to be pressed can interrupt the next weaponskill and cause a global recast timer clip. This limits the timing within the global recast that abilities can be used without clipping into the global recast, and that room is both ping dependent and FPS dependent.
- Higher ping results in longer animation lock, reducing the available room before global recast clipping occurs.
- In regards to FPS, a new action can only be used on the first frame that it is rendered usable, so a microscopic clip that you cannot visually see occurs while you wait for your PC or console to generate a new frame rendering the action as usable to the game client. Technically speaking, this increases the time you can use abilities inbetween weaponskill casts, because you would have clipped by that amount regardless with you knowing it.
Determining how much a cooldown will “shift” from the last position it came off cooldown per use on any given speed is found by dividing the cooldown length by the global recast speed.
- As an example, 60s / 2.50s weaponskill recast = 24 weaponskills per No Mercy or Bow Shock, meaning a 60 second cooldown will come off cooldown exactly every 24 weaponskill casts from wherever the last usage of No Mercy occurred relative to the global recast indicator. Practically, this means that 60s ability cooldowns will never be ready for use at a different place in relation to the global recast as long as the global recast was never interrupted or stopped. This can be observed by playing on a global recast of 2.50 and using a 60 second cooldown, then repeatedly spamming one weaponskill until the 60 second cooldown becomes ready for use again.
- On 2.46, this becomes 60s / 2.46s weaponskill recast = 24.39 weaponskills, meaning that No Mercy will become ready for use again +0.39 global recasts after the last time it was cast relative to the global recast indicator, because 24 weaponskills have been cast and another 0.39 global recasts worth of time must pass before it will become ready for use again. Using a clock example, if the last cast was at 3 o’clock, the next time No Mercy will be available for use is approximately at 7 o’clock relative to the global recast indicator.
This observed shift in where a cooldown becomes ready for use again will accumulate with every usage to the point that the cooldown will eventually become ready for use at a point that it cannot be used without interrupting the next weaponskill cast, forcing the cooldown to be held to the next global recast and then be used at the earliest usable point within the next global recast timer.
What this means for the rotation is that some global recast speeds are just uniquely worse at aligning to abilities and will cause more drift than other speeds will over the course of a fight. This can be very important for both raid buffs and preventing loss of cooldown usages, and due to how loaded the burst window is at level 100, it becomes very unfavorable to drift out of party buffs due to uncontrollable global recast speed-based drift because high-potency actions such as Wicked Talon will leave party buffs first.
The speeds that do NOT drift No Mercy by any significant amount are as follows:
- 2.50 (0.00s drift per use)
- 2.45 (0.05s drift per every other use) (PING DEPENDENT - ≤50MS TO NOT CLIP OR DRIFT)
- 2.40 (0.00s drift per use)
Those three speeds in particular are the most favorable for staying aligned with party buffs. Going from 2.40 to 2.42 would increase the drift rate because it would take longer for No Mercy to return to the same ideal usage point, and the cooldown can only be used one time per drift. In specific, it would cause 2.42 * (1 - (60 / 2.42 - 24) = 0.5s of drift per No Mercy (excluding factors like framerate). This drift linearly increases or decreases within the respective speed range of 2.40 - 2.44 as the global recast speed is slowed or sped up respectively, and the same holds true of 2.45 - 2.47 which can use No Mercy twice off cooldown between drifts of No Mercy.
Keep in mind that this doesn’t necessarily mean 2.40 is always better than 2.42 or something slower, it just means that the risk of losing raid buff damage over extended periods of time where raid buffs never realign to No Mercy is increased when running other speeds, which can potentially be a damage loss depending on the encounter.
Recovery Considerations
SECTION TLDR:
- Being rebuilt for 7.4.
This section is still under reconstruction for the mini-rework of 7.4. It will cover mostly downtime where a target cannot be targeted or struck.
AOE Priority
Level 100
- Use the Demon Slaughter combo on 3 or more targets.
- Use Fated Circle on 2 targets or more.
- Use Double Down on any number of targets, preferably positioning yourself to strike as many targets as possible.
- Use Reign of Beasts’ combo on any number of targets, but always try to target the enemy that is closest to as many other enemies as possible, as the damage effect is centered on your current target.
- Stop using Gnashing Fang on 3 or more targets.
- Use Sonic Break on up to 5 targets.
- At 4 targets, do not use Sonic Break if you suspect that it will not use it’s entire damage-over-time duration.
- At 3 targets, do not use Sonic Break if you suspect that it will not use at least half of it’s damage-over-time duration.
- At 3+ targets, it is a gain to hold Sonic Break out of No Mercy if it will let you use another Fated Circle in it’s place (make sure to still use Sonic Break after No Mercy ends).
Mitigation
Great Nebula
- Reduces damage taken by 40% for 15 seconds.
- Increases maximum health by 20% and heals you for that amount.
Rampart
- Reduces damage taken by 20% for 20 seconds.
- Increases healing received by self-healing actions by 15%.
Camouflage
- Reduces damage taken by 10% for 20 seconds.
- Provides an additive +50% parry rate (for a total of 60% parry rate) for 20 seconds. Parrying applies a 15% damage reduction to physical attacks only.
Heart of Corundum
- Reduces their damage taken by 27.75% for the first 4 seconds it was applied, and 15% for the next 4 seconds after that.
- Applies a 900 potency heal that will proc upon a player’s maximum HP reaching less than 50%, or when the buff expires 20 seconds later.
Aurora
- Targeted 18 second heal over time effect that heals yourself or your target for 300 potency every 3 seconds (1800 total).
- It has two stacks, which makes it an effective regen effect to apply to any player that requires extra healing over a certain duration.
Superbolide
- Reduces HP to 50% of your maximum HP and renders you impervious to most attacks for 10 seconds.
Arm’s Length
- Provides knockback or draw-in effect immunity for six seconds.
- Applies a 20% Slow effect to enemies that attack you while Arm’s Length is active (enemies will attack you 20% slower, very useful for dungeons).
Party Utility
Heart of Light
- Reduces magic damage taken by 10% and physical damage taken by 5% for self and party members in a 30y radius around you for 15 seconds.
Reprisal
- Reduces damage dealt by all enemies in a 5y radius around you by 10% for 15 seconds.
Low Blow
- Stuns a target for five seconds. Interrupts any cast.
- Enemies that get stunned repeatedly will slowly develop stun immunity.
Interject
- Interrupts any cast (if it is an interruptible cast).
Provoke
- Places you at the top of the enmity list and grants 5000 potency worth of additional enmity (50,000 if tank stance is active).
Shirk
- Transfers 25% of your current enmity to any targeted party member.
Mitigation Planning
All mitigation is multiplicative. As an example with both Rampart and Great Nebula together, the total reduced damage amount is 1 - (1 - 0.2) * (1 - 0.4) = 52% when put together.
Despite the apparent theoretical 8% loss in efficiency from stacking them, it is not only optimal but necessary in many types of content to stack mitigation together to minimize damage taken during instances of heavy damage or periods with a high rate of damage, which typically apply to either tankbuster attacks or dungeon pulls respectively, but can also apply to things like boss auto attack chains. Efficiency loss is irrelevant in relation to fight-specific mitigation needs, especially when most cooldowns are sitting waiting to be used throughout a fight anyways.
Understanding the fight timeline is critical to effective mitigation. Every pull you make should be a live re-assessment of your usage timing on mitigation such as Reprisal and Heart of Light (or any personal mitigation) to evaluate if you can either cover additional instances of damage with the same usage, or gain additional usages of that cooldown later while still covering the same instance of damage with the current usage.
Give yourself appropriate time to weave mitigation during your normal rotation. Utilize the long active timer of your heavy mitigation to your advantage and use it before the cast if necessary to permit weaving needs. It only needs to be active for the hit preparation.
The majority of tankbusters can be resolved through a basic strategy of employing either Rampart and Camoflauge tied with Heart of Corundum, or Nebula tied with Heart of Corundum. Some strategies may prefer that you use Superbolide as well.
Heart of Corundum is also an extremely flexible action in the sense that you can use it and abuse the proc timer of Catharsis of Corundum, which is the 900 potency heal effect that it carries. The proc heal does not go off until 20 seconds expire, or a player drops below 50% HP. This allows niche strategies to be employed that allow you to very precisely time a heal to go off at the ideal time, where healing is necessary but mitigation is not.
Dungeon Tips
Attempt to pull wall-to-wall if the healer is capable of handling it.
Use your cooldowns as follows:
General Tips
- Prepull Heart of Corundum early to proc free healing as you are running.
- Apply Aurora to help buffer into any required healing.
- Apply Superbolide as needed if healer help is required.
- Lightly space mitigations out over a couple of GCDs, but ensure most of it is active while the majority of the dungeon targets are alive.
- If you’re playing with a WHM, let them cast Holy on the mobs before mitting.
First Wall to Wall:
- Rampart and Camoflauge
- Heart of Corundum (off cooldown)
- Reprisal
- Low Blow (off cooldown)
- Consider Heart of Light (5% physical)
Second Wall to Wall:
- Great Nebula and Arm’s Length
- Heart of Corundum (off cooldown)
- Reprisal
- Low Blow (off cooldown)
After Great Nebula expires, Rampart/Camoflauge/Heart of Light should be coming off cooldown again.
This plan works for the majority of dungeon encounters. However, this may not work out due to poor party DPS and you may have to alter cooldown usage. There’s nothing wrong with taking the next few pulls slow if more cooldowns had to be used than normal.
- Have any questions?

 discord.gg/thebalanceffxivAuthors
 Krom
Krom krom.ulus
 Azazael
Azazel#1000
Azazael
Azazel#1000