Welcome to the Basics Guide for Paladin! Whether you are a fresh level 100, a returning player, or just need a refresher, this guide will get you started and allow you to hit the ground running.
Since this is a basic introduction to level 100 Paladin, this guide will not go into many nuances and topics that are tied to high-end optimization. If you are looking for such information, you may find it in one of the dedicated guides below, or in discussion channels on the Balance discord:
- Leveling Guide
- Openers
- Advanced Guide
- Stats and Materia (see main page)
- Gearing
- Skill Overview
- Frequently Asked Questions
Paladin Playstyle
The Paladin rotation revolves around its main buffs: Fight or Flight, which heavily buffs all damage dealt, and Requiescat, which enables the use of powerful spells. Defensively, Paladin has strong party mitigation as well as targeted mitigation for your co-tank or party members.
Core Concepts
There are a few key concepts that are fundamental to the game and carry over between jobs.
- Keeping your Global Cooldown (GCD) on cooldown is one of the most important parts of playing any job. Pressing something wrong is almost always better than pressing nothing at all.
- As a primarily melee job, it is important to know how to keep melee uptime on the boss. This includes knowing when mechanics snapshot and where you can greed for extra GCDs before and after disengaging for mechanics.
- Keep off-Global Cooldowns (oGCDs) on cooldown. Damaging oGCDs should be used roughly as they come off cooldown, as long as using them does not delay your next GCD due to animation lock.
The Rotation
Paladin Opener
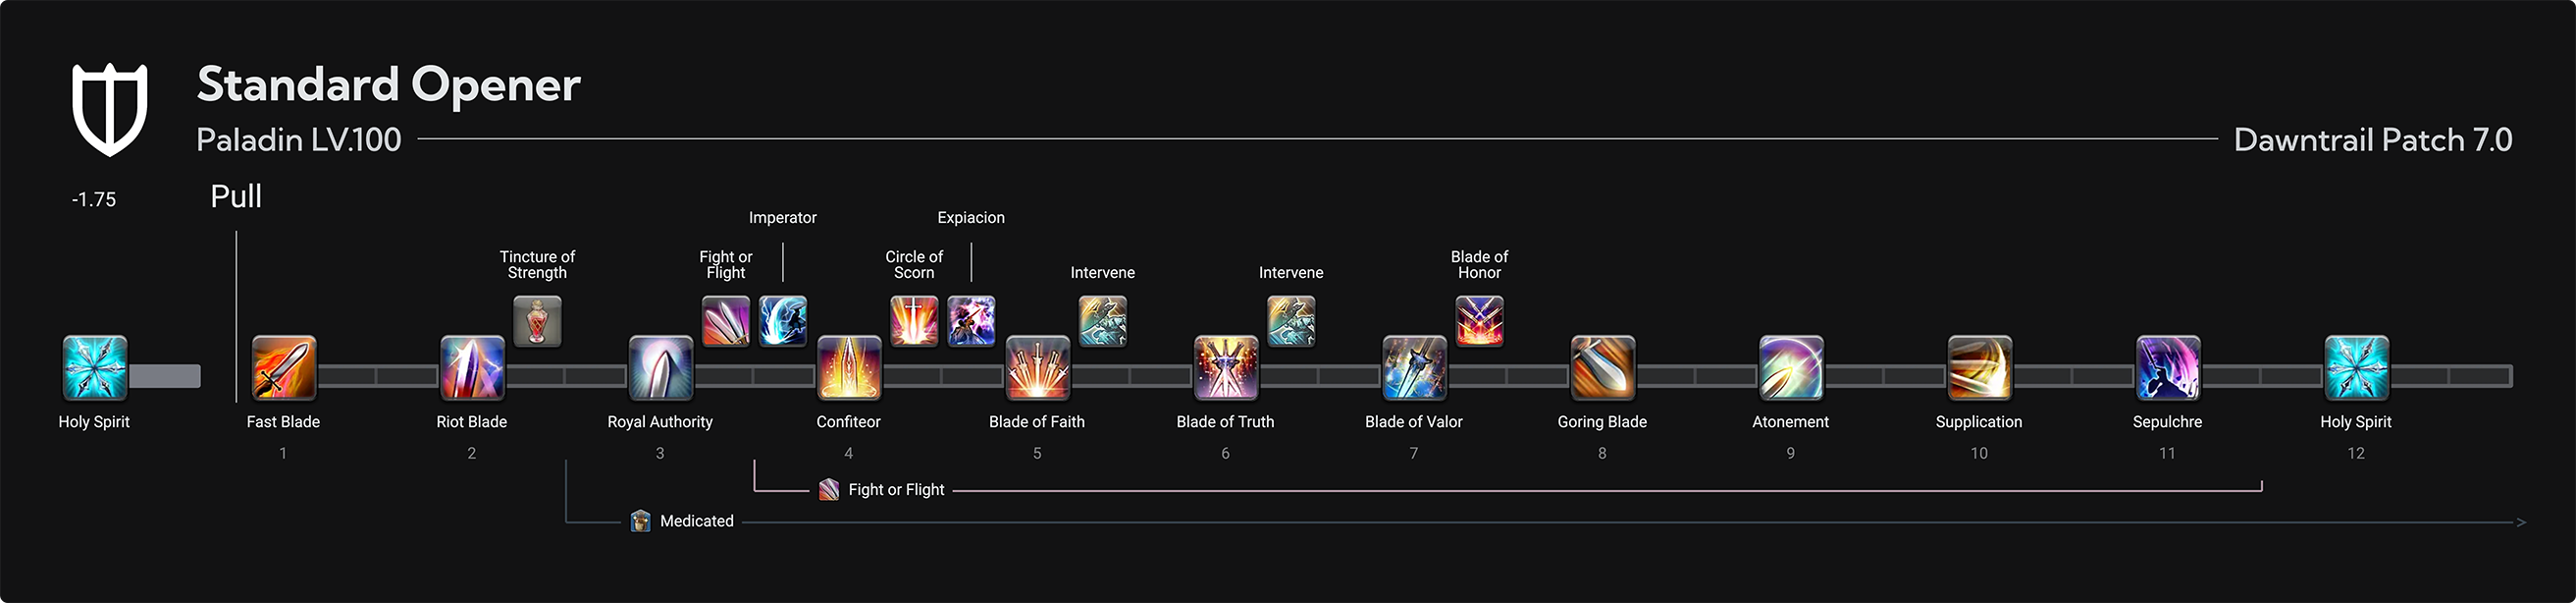
The potion used is whatever the current tier’s Strength potion is (as of patch 7.0, it is the Grade 1 Gemdraught of Strength).
After the opener, we cycle between a filler phase and a burst phase (explained below).
Paladin Rotation
Burst Phase
Always use Fight or Flight on cooldown, this begins your burst phase and is a large portion your damage. Your Fight or Flight buff window should contain the following GCDs:
- Confiteor
- Blade of Faith
- Blade of Truth
- Blade of Valor
- Goring Blade
- 3 “extra” GCDs
The exact GCD order is flexible. Since the Confiteor combo actions and Goring Blade do not break combo, it is recommended to use them first in the Fight or Flight window to avoid losing uses.
The three extra GCDs consist of whatever are the strongest “filler” GCDs available, i.e. some combination of Royal Authority, Atonement, Supplication, Sepulchre, or Divine Might-buffed Holy Spirit.
Since Sepulchre is stronger than Holy Spirit and Supplication (which are in turn stronger than Royal Authority and Atonement), prioritize putting Sepulchre in Fight or Flight when possible (this will not be possible when Royal Authority is used inside Fight or Flight). This will sometimes push Holy Spirit outside of the Fight or Flight buff window but is still an overall gain.
Each Fight or Flight should also include the following actions:
- Imperator (this can be weaved immediately after Fight or Flight, and must precede Confiteor)
- Blade of Honor (use this immediately after Blade of Valor)
- Circle of Scorn
- Expiacion
- 2 Intervenes (these should be held for Fight or Flight when possible — use them outside of Fight or Flight if needed to keep melee uptime)
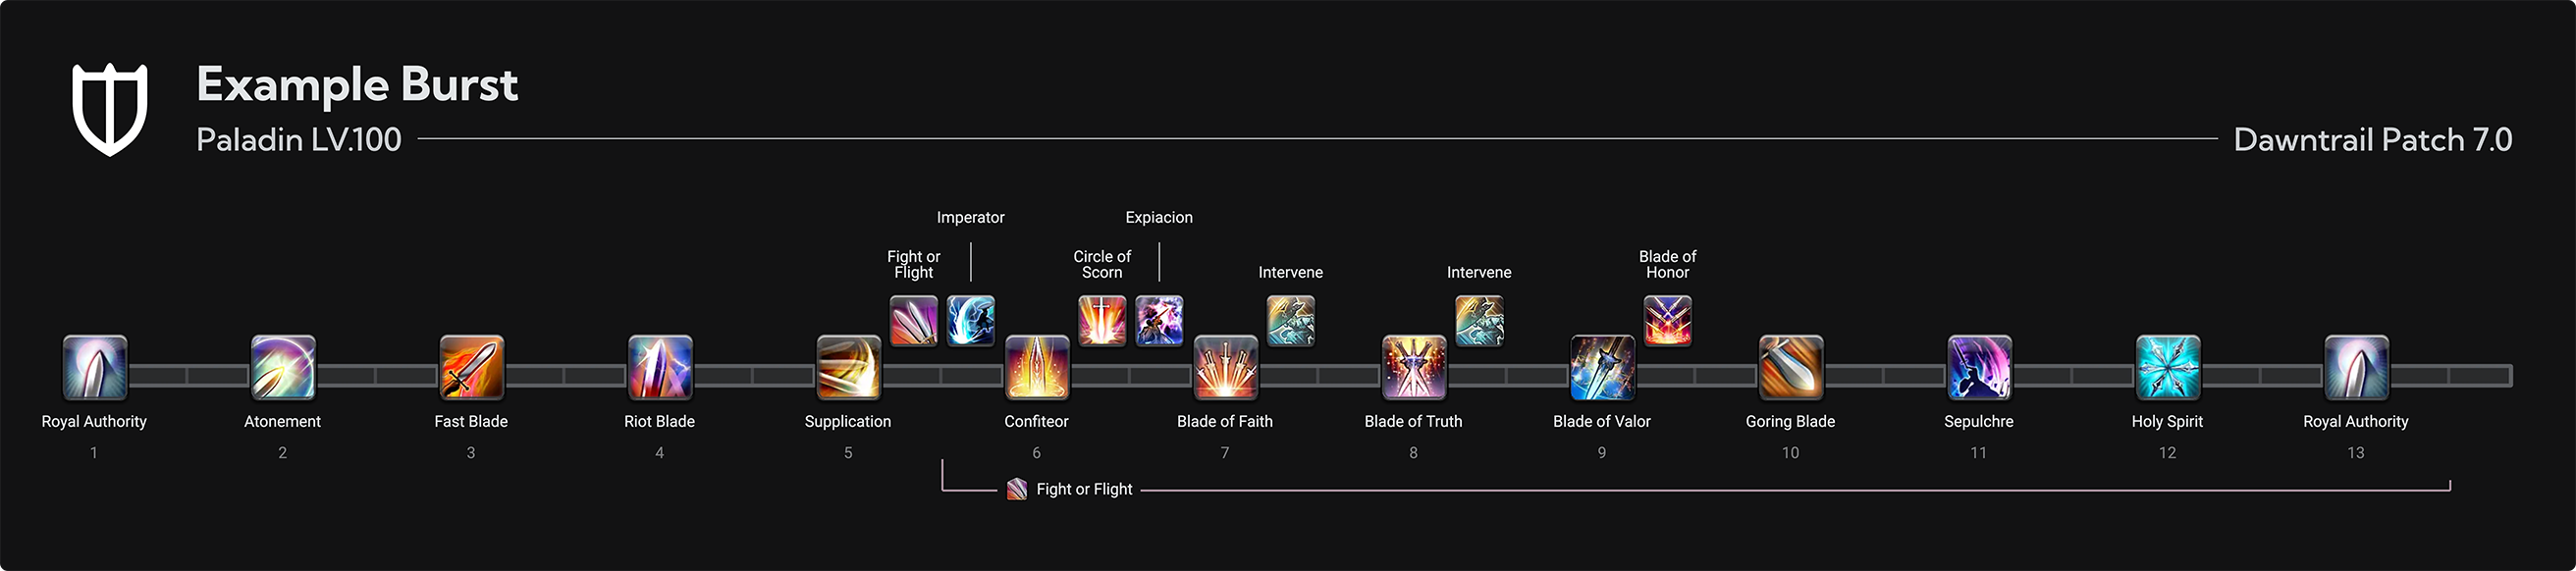
Filler Phase
Outside of Fight or Flight, repeat the Royal Authority combo (Fast Blade, Riot Blade, Royal Authority) and spend the procs it gives you (Atonement, Supplication, Sepulchre, and Divine Might). Make sure to spend all remaining procs before finishing the next Royal Authority combo.
For stronger Fight or Flight windows, you can bank the resources generated by your Royal Authority combo by not spending them until your next Royal Authority is ready. For example, by following Royal Authority with Atonement, Fast Blade, Riot Blade, Supplication, Holy Spirit, Sepulchre, then Royal Authority outside of Fight or Flight, you will always have the strongest three filler GCDs available for use during burst, no matter where Fight or Flight comes off cooldown.
Additionally, use Circle of Scorn and Expiacion on cooldown, so they are available for your next burst.
Fight or Flight may come up at any point during your filler — that is okay, and you should use it immediately regardless of what point during your combo you are. Since Goring Blade and the Blade of Valor combo do not break combo, you can easily pick up your filler combo afterwards.
Multiple Targets
- At three or more targets, replace single target melee combos with Total Eclipse and Prominence and Holy Spirit with Holy Circle
Notable Utility

Divine Veil provides a party-wide shield and heal. Use during dungeon trash pulls as self-mitigation or during trials and raids as party mitigation.

Passage of Arms applies a buff to all party members behind you, granting them a 15% reduction in damage taken. The buff lingers for five seconds after you cancel it, so the most common use case is flashing it onto the party before high raid-wide damage.
In a pinch this can also be used for a hard-hitting tankbuster, but needs to be channeled since the guaranteed block buff ends as soon as the skill is canceled. This is not recommended because the cooldown is very long and is often more valuable as raid mitigation.

Intervention gives your target a buff that reduces damage taken, as well as provides a small regen effect. The damage reduction buff can be buffed by having either Rampart or Sentinel active when casting Intervention. Having both Rampart and Sentinel active does not provide an additional buff.

Reprisal reduces the damage dealt by all enemies around you. Most of the time, use this on raid-wide damage.


Use your other defensive cooldowns to reduce incoming damage and make life easier for your healers.


These skills are very niche and infrequently used but have their time and place to shine. Clemency is a significant DPS loss but enables soloing dungeon bosses when the healer is dead, or saving runs when progging raids and trials. Cover can be used in niche optimization strategies or for saving a party member from otherwise lethal damage. Covered damage ignores Hallowed Ground.
Helpful Macros
Co-tank macros assume your co-tank is in party slot two (default party sorting).
Intervention on Co-Tank
/merror off
/ac Intervention <2>
/ac Intervention <2>
/ac Intervention <2>
/ac Intervention <2>
/ac Intervention <2>
/ac Intervention <2>
/ac Intervention <2>
/ac Intervention <2>
/ac Intervention <2>
/ac Intervention <2>
/ac Intervention <2>
/ac Intervention <2>
/ac Intervention <2>
/micon Intervention
Mouseover Cover:
/merror off
/ac Cover <mo>
/ac Cover <mo>
/ac Cover <mo>
/ac Cover <mo>
/ac Cover <mo>
/ac Cover <mo>
/ac Cover <mo>
/ac Cover <mo>
/ac Cover <mo>
/ac Cover <mo>
/ac Cover <mo>
/ac Cover <mo>
/ac Cover <mo>
/micon Cover
Shirk on Co-Tank
/merror off
/ac Shirk <2>
/ac Shirk <2>
/ac Shirk <2>
/ac Shirk <2>
/ac Shirk <2>
/ac Shirk <2>
/ac Shirk <2>
/ac Shirk <2>
/ac Shirk <2>
/ac Shirk <2>
/ac Shirk <2>
/ac Shirk <2>
/ac Shirk <2>
/micon Shirk
Why are there so many repeated lines? FFXIV macros do not queue, so hitting a macro while in animation lock from another action will cause the macro to not go off. Since macros execute lines sequentially at around one line per frame, repeating the /action lines simulates mashing the ability every frame for ~15 frames and gives the macro a semblance of queuing.
Mouseover? <2>?<mo> will attempt to target whatever your mouse cursor is currently hovering over when that macro line is reached, whether it be their physical model or a name on your party list.
<2> targets the second player on your party list, which is the other tank by default in eight-person content.
Stats and Itemization
Before obtaining best-in-slot gear, pick gear and meld according to stat priority on each piece of gear. Best-in-slot sets can be found in the Balance Discord or the Best in Slot page on this website.
Because of stat tiering, XIVGear gets the last word on any specific gearing question.
Highest Priority
Weapon Damage (main-hand weapon only)
- Significantly affects all damage dealt.
- Proportional to item level.
- Always the top priority for main-hand weapons
Strength
- Affects all damage dealt.
- Proportional to item level.
- Almost always more important to have higher Strength rather than swapping low-priority substats for high-priority ones
Critical Hit
- Affects critical chance and critical damage.
- Often naturally capped on BiS gear pieces.
- Priority meld on all gear (unless that gear piece would overcap, i.e. the number turns red when melding).
Direct Hit
- Affects only direct hit chance.
- Meld remaining slots (filler stat).
Determination
- Increases damage dealt and healing done.
- Sometimes used in one slot due to stat tiering.
Tenacity
- Increases damage dealt, healing done, and reduces damage taken.
- Rarely melded due to weak scaling and minimal impact of mitigation.
Skill Speed
- Reduces weaponskill recast time.
- Skill speed is inefficient on Paladin and should be avoided where possible, though usually not at the expense of item level
- See precise skill speed tiers, courtesy of the folks over at Allagan Studies.
Lowest Priority