Intro
By Mox Xinmagar & The Happy Team of Warriors
@Balance Discord
Hello team!
There should be an intro here, but I am bad at writing those.
Therefore I shall skip the funny talks about the Angriest Healer of FFXIV and let the rest of the guide do the talking.
This intro is focused on Lvl100 Endwalker Warrior. Please get to level 100 soon.
Skills
The order of skills is pretty straight forward. Here is an image to visualize it all:
Traits on the left, damaging skills in the middle-ish, and cooldowns/buffs on the right.
Some of the skills are used often enough that we might abbreviate them later on in the guide.
For ease of reading, the following list entries have their abbreviations first, then the skill name, with special mentions in parentheses.
Abbreviation, skill name (special mentions)
GCDs (Global-Cooldowns)
Single-target Combo pieces:
- HS, Heavy Swing (combo 1)
- Maim (combo 2)
- Eye/Path, Storm’s Eye/Storm’s Path (combo 3)
Multi-target Combo pieces:
- OP, Overpower
- MT, Mythril Tempest
Single-target Gauge Spenders:
- IB, Inner Beast (Lvl 35)
- FC, Fell Cleave (Lvl 54, trait upgrades Inner Beast)
- IC, Inner Chaos (Lvl 80, Infuriate unlocks Inner Chaos)
- These are all on a single button
Multi-target Gauge Spenders:
- Steel Cyclone (Lvl 50)
- Decimate (Lvl 60, trait upgrades Steel Cyclone)
- Chaotic Cyclone (Lvl 72, Infuriate unlocks Chaotic Cyclone)
- These are all on a single button
Special mention:
- Rend, Primal Rend (Lvl 90)
- Has an animation lock, cannot be double-weaved with
- Ruin, Primal Ruination (Lvl 100)
- Follow-up on Rend, can be used within 20s of using Rend.
- These are all on a single button
oGCDs (Off-Global Cooldowns)
Single-target oGCDs:
- Uph, Upheaval (Lvl 64)
- Ons, Onslaught (Lvl 62)
Multi-target oGCDs:
- Orogeny (Lvl 86)
Special mention oGCDs:
- Wrath, Primal Wrath (lv 96)
- Shares a button with Inner Release
Damage Buffs
- Zerk, Berserk (Lvl 6)
- IR, Inner Release (Lvl 70, trait upgrades Berserk)
Defensive Cooldowns
Warrior-specific
- Thrill, Thrill of Battle (Lvl 30)
- Veng, Vengeance (Lvl 38)
- Damn, Damnation (lv 92, upgrades Vengeance)
- Holm, Holmgang (Lvl 42)
- RI, Raw Intuition (Lvl 56)
- SIO, Shake It Off (Lvl 68)
- NF, Nascent Flash (Lvl 76)
- BW, Bloodwhetting (Lvl 82, trait upgrades Raw Intuition)
Role-specific Actions
Mitigation:
- Ramp, Rampart (Lvl 8)
- Reprisal (Lvl 22)
- Arm’s Length (Lvl 32)
Interruptions:
- Low Blow (Lvl 12)
- Interject (Lvl 18)
Aggro Management:
- Provoke (Lvl 15)
- Shirk (Lvl 48)

Warrior Gameplay
Warrior gameplay focuses on gathering resources and maximizing the effectiveness of those resources.
These resources are Beast Gauge, and with some imagination, our buffs and oGCD stacks.
First off, the important parts to get your gameplay flowing.
Openers
Warrior openers are all about catching the party buffs and maximizing potential amount of uses per skill. There is some flexibility, mainly in Potion timings and the use of Primal Rend, but also when IR is used. This means that we are delaying some skills until after all the party buffs are up, while also making sure to get them all on cooldown as soon as possible.
While exact timings are not often important to 99% of the player base, we will still follow them as Best Practices™.
Assumptions:
- Tomahawk starts the pull at 0.00s. This means that the actual use of Tomahawk is at around -0.7s, right before the pull timer hits 0.
- Skill Speed is at around 532, which translates to 2.47 GCD. Faster skill speed is fine, but the openers listed will be slightly different in practice due to some skills having flat timers (Upheaval at 30s) and our GCD speed being flexible (2.50 to 2.30).
- Potion covers 12 GCDs. It is definitely possible for Potion to cover 13 GCDs, but due to Dawntrail Warrior being such a slow-paced job in general, and players having wildly different internet connections, we will show openers with 12 GCD Potions.
- All of the important Party buffs are up after 7.8s into the pull.
Syntax
- GCDs are on the lower part of the image.
- oGCDs and potions are on the upper part of the image.
- Going forward, all the skills will be listed as GCD +oGCD1 +oGCD2.
All-Around Opener
Catches party buffs, burns all our resources as soon as possible.
There is nothing special about this. This is your usual opener. The IR stacks last right until the 3rd Fell Cleave at 2.50 GCD.

The order of actions is:
- Tomahawk +Infuriate
- Heavy Swing
- Maim
- Storm’s Eye +Inner Release +Potion
- Inner Chaos +Upheaval +Onslaught
- Primal Rend +Onslaught
- Primal Ruination +Onslaught
- Fell Cleave
- Fell Cleave
- Fell Cleave +Primal Wrath +Infuriate
- Inner Chaos
- Heavy Swing
- Maim
- Storm’s Path
- Fell Cleave +Infuriate
- Inner Chaos
- Heavy Swing
- Maim +Upheaval
- Storm’s Eye
Other Opener options
We have opted to do a bigger write-up in a separate document as to not overwhelm people that are looking for the simple opener. Please see this google doc for various advanced openers.
We expect you to do your own adjustments for any fight-specific needs. There is no support for these openers.
Rotation
The Dawntrail Warrior rotation is mostly a priority system with some flexibility baked in. The short version can be summarized as follows:
- Keep hitting things
- Keep the buff up
- Don’t overcap on buff
- Storm’s Path to gain more gauge
- Don’t overcap gauge
- Keep Upheaval on cooldown
- Keep Inner Release on cooldown
- Keep Onslaughts ticking (below three stacks)
- Keep Infuriate ticking (below two stacks)
- Burn gauge/stacks inside party buffs
- Don’t drop Primal Wrath (3x IR FC)
- Don’t drop Primal Rend or Primal Ruination
That is a lot of things that you might not know about, so we will break them down into their own sections.
Combos and breaking them
- Thanks to Endwalker, dropping a combo is really difficult now.
- Combo actions last 30 seconds before dropping.
- You can use Tomahawk and Gauge spenders between combo pieces.
- The only way to break the combo is to use a GCD from another combo, or to use the same combo GCD twice, or to use an earlier combo piece.
Surging Tempest - The Buff
- +10% damage buff that we keep up.
- Granted by Storm’s Eye combo or Mythril Tempest combo.
- Aim to refresh between 7-15 seconds.
- Stacks up to 60s. Use this to your advantage in fights with forced downtime.
- Inner Release gives +10s to the buff. Keep this in mind when refreshing your buff.
Storm’s Path and Storm’s Eye
- Use Storm’s Eye combo to get the buff up.
- Use Storm’s Path combo to get more gauge.
Beast Gauge
- Used for Fell Cleaves and Inner Chaoses.
- Don’t throw the gauge away, try to spend it inside party buffs.
- Don’t overcap. Using Storm’s Path at 90 gauge gets you to 100 gauge. You can’t have 110 gauge.
- Spend all of your gauge inside party buffs. Gather gauge between party buffs.
Onslaught
- Very useful as a gap closer, meaning that we can stick to the boss even when knocked back.
- We can stack up to three of them. They are on a 30s timer.
- We can do some fancy optimization around party buffs!
- With the current party buffs being mostly 120s, we aim to do 3-1 cycles of Onslaughts.
- Three Onslaughts into the opener, One Onslaught while waiting for the buffs to come up again.
- Repeat 3-1, 3-1. Three inside even minute buffs, one inside odd minute buffs if available.
- Do not let them sit on full stacks for long. That is a DPS loss.
Infuriate
- We get two stacks, on a 60s timer.
- Unlocks Inner Chaos for 30 seconds.
- Spend them in party buffs. That’s what they’re for.
- It is possible to carry the Inner Chaos for 30 seconds. Do not drop it.
Upheaval
- Should be used on cooldown. It is on a 30s timer, meaning that it should hit every party buff.
- As long as those buffs are up every 60/120 seconds, that is.
- Does not matter if it is inside Inner Release or not, as IR only affects Fell Cleave and Decimate now.
Inner Release
- Our “Free Fell Cleaves” button.
- Each Fell Cleave / Decimate grants a “Burgeoning Fury” buff. Collect three of these to unlock Primal Wrath.
- Stacks last for 15 seconds. This is is 5-6 GCDs depending on your skill speed.
- Grants Inner Strength, negating some effects such as knockback for 15 seconds.
- Inner Release stacks are used only by Fell Cleave or Decimate.
- Be mindful of using combo GCDs, Rend and ICs during the stacks, as it is easy to drop the third stack.
- Be mindful about the amount of gauge you enter IR with. If you have 60g, you cannot get rid of any gauge until the IR stacks end.
- Using Infuriate during IR lets us use Inner Chaos instead of an IR Fell Cleave. Remember to avoid overcapping gauge.
- Use IR on cooldown. Unless the fight downtime would waste it.
Primal Wrath
- Unlocked after using three Inner Release Fell Cleave/Decimates.
- Follow-up on Inner Release.
Area of Effect
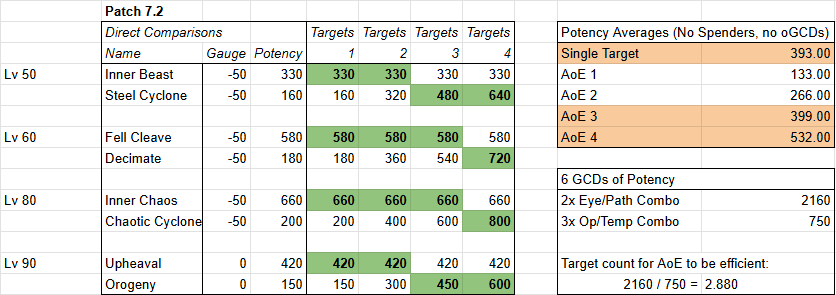
Area of Effect refers to using skills that hit multiple targets in one go. The AoE skills themselves have a lower potency than single target skills. So what is the big deal?
For Dawntrail Warriors, the options are pretty clear cut. At level 100, the AoE rotation for Warriors is more effective than single target rotation if there are three or more targets to hit.
Here is a nice table comparing various skills and combos and their effective potency at different situations. Do note that Fell Cleave wins in potency when fighting 3 targets or less.

That is a bunch of numbers, and Warriors are known to be bad at reading, so let us summarize:
Target count: 4
- Overpower + Mythril Tempest
- Decimate or Chaotic Cyclone
- Orogeny
Target count: 3
- Overpower + Mythril Tempest
- Fell Cleave
- Orogeny
Target count: 2 or less
- Storm’s Eye / Storm’s Path
- Inner Beast
- Upheaval

Getting Advanced
That is it for the very basics. Now, you might feel like Warriors do not have a lot of optimization going on, and you would be right. However, there are some tricks in our sleeves that can be used.
Beast Gauge
Warrior’s gauge should not be spent willy-nilly. There must be a reason for using the gauge.
A couple of rules to mention first:
- We cannot reach >=110 gauge. This will be referred to as “overcapping.”
- Maim gives +10 gauge.
- Storm’s Path gives +20 gauge.
- Storm’s Eye gives +10 gauge.
- Surging Tempest cannot reach >60 seconds. This, too, will be “overcapping.”
- Infuriate gives +50 gauge.
With those rules in mind, we want to maximize our Beast Gauge generation, as our main sources of damage are locked behind Beast Gauge.
Avoiding Overcapping:
- Do not use Storm’s Path at 90-100 gauge. Fell Cleave first.
- Do not use Infuriate at 60-100 gauge. Fell Cleave first.
- Do not use Storm’s Eye at >31 buff timer. Use other GCDs first.
Some exceptions exist, but if you are reading these notes, you might not know any yet. These are often fight-specific.
You may want to consider emptying your gauge as much as possible, before using Infuriate.
This will let you use Infuriate and carry the Inner Chaos into a later moment. More about this slightly later in this same section under “Carrying Buffs.”
Using Beast Gauge
Beast Gauge does not expire. This means that we can stock up for party buffs and empty it all once there are buffs to take advantage of. You may feel compelled to use that 50 gauge on a Fell Cleave as soon as possible. As mentioned above, there is no reason to do so. You often lose out on free damage that could have been gained by saving that Fell Cleave for buff windows.
You should avoid overcapping as much as possible. This is achieved by using single Fell Cleaves every time your next GCD would make you overcap on your gauge.
Sitting at 100 gauge and the next combo GCD is Maim/Path/Eye? Better Fell Cleave first.
Inner Release and Infuriate timer
It is beneficial to avoid hitting two full stacks of Infuriate, as to gain the full advantage of the timer ticking. Therefore, we may run into moments where our Infuriate would hit two stacks during Inner Release.
To avoid hitting two stacks of Infuriate, we aim to do the following:
- Enter Inner Release with <=50 gauge, or
- Enter Inner Release and the next Infuriate is >30 seconds away, or
- Burn gauge before Inner Release, as this gives us free reign over our Infuriates, making it possible to hit 2IC 1Rend 3IRFC inside party buffs.
Setting up the last option takes a bit of planning and depends on the fight and skill speed.

Staying Alive
Warriors excel at staying alive. We are the outlier in survivability.
Stacking Cooldowns
Most of the game can be solved by stacking cooldowns in such a way that our “survivability” increases by ~35%.
Consider the following situation:
- Tank buster will hit for 100% of our HP.
- Warrior has all their cooldowns available.
- Thrill of Battle is used. Warrior’s Max HP is now 120%.
- Rampart is used. Tank buster now hits for 80% of the original.
The gap between the new max HP and the new tank buster is now “40%.”
While math does not work this way exactly, it is good enough to paint a mental image of the survivability increase.

As another example, consider Bloodwhetting + Rampart.
- Tank buster for 100% of Max HP.
- Rampart reduces it down to 80%.
- Bloodwhetting reduces that down to 64.8%
- 100 x (1 - 0.2) x (1 - 0.19)
- = 100 x 0.8 x 0.81
- = 80 x 0.81
- = 64.8
The original tank buster of 100% now hits for 64.8% – a reduction of 35.2%.
Usual Sets of Cooldowns
As for practical uses, we assume a good use of the Bloodwhetting, granting us a total of 19% mitigation for four seconds.
The 20s
Reprisal (15%)
Thrill of Battle (20%)
Rampart (20%)
Bloodwhetting (19%)
The 40s
Damnation (40%)
Rampart + Bloodwhetting (20% + 19%)
Thrill + Bloodwhetting (20% + 19%)
The 60s
Damnation + Bloodwhetting (40% + 19%)
Damnation + Rampart (40% + 20%)
Damnation + Thrill (40% + 20%)
Damnation + Reprisal (40% + 15%)
Rampart + Thrill + Bloodwhetting (20% + 20% + 19%)
The 80s
Damnation + Bloodwhetting + Reprisal (40% + 19% + 15%)
Damnation + Rampart + Thrill (40% + 20% + 20%)
Rampart + Thrill + Bloodwhetting + Reprisal (20% + 20% + 20% + 15%)
The Kitchen Sink
Damnation + Rampart + Thrill + Bloodwhetting + Reprisal
(40% + 20% + 20% + 19% + 15%)
It Still Kills Me
Holmgang (invulnerability)
Tank Swap (mechanical requirement)
Anything with a Reprisal in them is considered very situational and should be used with care.
If you are using Reprisal to survive a tank buster, remember that it might be down for the next raid-wide damage.
Other sources of 10% mitigation exist, such as Exaltation on Astrologians.
Kitchen Sink comes from the idiom “Everything but the kitchen sink”.
What does “Everything but the Kitchen Sink” mean?
We are throwing everything at the problem.
Healing
Warrior is the third healer of the party. With Bloodwhetting, Equilibrium, Nascent Flash and Shake It Off, we are blessed with the responsibilities of saving people who stand in stupid.
In this section, we will go over the very basics of Warrior Heals.
Thrill of Battle
- Affects incoming heals
- Affects Storm’s Path’s healing.
- Affects Shake it Off’s healing.
- Affects Equilibrium’s main heal and the HoT.
- Does affect the Bloodwhetting’s shield.
- Does affect Bloodwhetting heals (since 7.1).
- Weird like that.
Shake It Off
- Grants 15% of Party Member’s MaxHP as a Shield.
- Also +2% for each buff eaten (Thrill, Vengeance, Bloodwhetting), resulting in a maximum of 21% MaxHP Shield.
- Also heals Party Members for 300 Potency.
- Gives a regen!
- Snapshots Thrill’d WAR’s HP, before eating the buff. Big Value™️ for Warriors.
Bloodwhetting
- Get four GCDs in by popping this in the second oGCD slot.
- Heals per hit, very powerful in dungeons.
- May Crit a heal randomly. Luck!
- Primal Rend, Chaotic Cyclone, Inner Chaos and Primal Ruination always force a Crit heal.
- Inner Release’d Fell Cleaves do NOT force a Crit heal.
- Thrill of Battle does increase the healing from these (patch 7.1+).
- Initial mitigation is 19% due to diminishing returns (100 x 0.9 x 0.9 = 81).
Nascent Flash
- Goes on a friend.
- Initial mitigation is 19% due to diminishing returns (100 x 0.9 x 0.9 = 81).
- Gives them the mitigation, much like Bloodwhetting would give to us.
- Save a friend with this!
Damnation
- Trait upgrades Vengeance into Damnation
- Taking damage, or having the buff “Primeval impulse” expire, procs a Regen effect that lasts for 15 seconds.
- In patch 7.0, the regen on a BIS Warrior is about 10k to 11k per tick.
Rampart
- Affects incoming heals (lv94 trait), much like Thrill of Battle
- Increases HP recovery via healing actions on self by 15%
Equilibrium
- A decent heal button, with a Regen effect tied to it.
- Great when used with Thrill of Battle, Rampart or both.
Forcing Crits
- Inner Chaos, Chaotic Cyclone, Primal Rend and Primal Ruination force a Crit heal.
- This may save a life.
- Be the healer of the party.
- Inner Release’d skills do not force a Crit heal.

Stats and Gear
Welcome to Dawntrail Warrior stats and gearing! Soon you will have all sorts of confusion and question various things you have heard in various parts of the Internet!
First things first:
- Warriors are strength-based. Vitality is nice, but it always walks hand in hand with strength upgrades.
- Since Patch 6.2, having Direct Hit melds increases the damage of our 100% DCrit skills.
- Since Patch 6.2, party buffs affecting Crit and DHit rates also boost the damage of our 100% DCrit skills.
Universal Stat Priorities
Weapon Damage »> Main Stat »» Substats.
Very few exceptions have existed before Dawntrail.
Warrior Substat Priority
Crit > comfy SkS > DH >= Det > Tnc
Also applies to Materia Melds.
What happened with Direct Hit not being desirable?
Patch 6.2 made DHit provide bonus damage to skills that have 100% Direct Hit and 100% Critical Hit rates.
After two full expansions, DHit is good for us again.
Skill Speed
We do not deliberately avoid Skill Speed, but we do not prioritize it at all.
Maybe only for comfy reasons such as fight phasing or oGCD lineups etc.
oGCD lineups referring to situations where our GCD and oGCDs come up at the same time, forcing us to delay one or the other.
A rule of thumb is to delay the oGCD in most situations.
Why Tenacity?
Tenacity increases all damage dealt, much like Determination.
We’re usually melding very little of this due to the game being designed around damage.

Macros
Macros are weird. They are fired off one line per one in-game frame. 15 lines of Macro, 15 FPS in-game? That macro is gone in a single second. Macros also don’t queue like normal skills do.
Filling up all the slots with repeating lines sort of simulates queuing. The real reasoning is that macros read one line per each in-game frame. If the macro tries to execute an action while in animation lock (from another action, for example), it has no effect.
	Frame 1: /merror off
	Frame 2: /ac "Nascent Flash" <2>
	Frame 3: /ac "Nascent Flash" <2>
	Frame N: ...
When you repeat the action inside the macro, you stretch the action activation window.
Instead of a macro that has a single frame where it attempts to use an action, you have a macro with 13 frames of attempts. This gets around the issue of “animation lock vs macros” where you might not be able to use a skill because of the animation lock.
Holmgang
Holmgang is weird. If your Holmgang target dies, you lose the effect. Self-cast gets around this. If your target is too far away, you will not be able to cast Holmgang. Self-cast gets around this, too. To achieve both goals, we self-cast using
	/merror off
	/ac "Holmgang" <me>
	/ac "Holmgang" <me>
	/ac "Holmgang" <me>
	/ac "Holmgang" <me>
	/ac "Holmgang" <me>
	/ac "Holmgang" <me>
	/ac "Holmgang" <me>
	/ac "Holmgang" <me>
	/ac "Holmgang" <me>
	/ac "Holmgang" <me>
	/ac "Holmgang" <me>
	/ac "Holmgang" <me>
	/ac "Holmgang" <me>
	/micon "Holmgang"
_
Nascent Flash
Nascent Flash goes on a friend. Most often on the co-tank of your eight-person party.
They are, by default, the second member in your party list, which is what the <2> refers to.
You may make a mouseover macro by using
	/merror off
	/ac "Nascent Flash" <2>
	/ac "Nascent Flash" <2>
	/ac "Nascent Flash" <2>
	/ac "Nascent Flash" <2>
	/ac "Nascent Flash" <2>
	/ac "Nascent Flash" <2>
	/ac "Nascent Flash" <2>
	/ac "Nascent Flash" <2>
	/ac "Nascent Flash" <2>
	/ac "Nascent Flash" <2>
	/ac "Nascent Flash" <2>
	/ac "Nascent Flash" <2>
	/ac "Nascent Flash" <2>
	/micon "Nascent Flash"
_
Shirk
Shirk the second Party member. Often your co-tank.
	/merror off
	/ac "Shirk" <2>
	/ac "Shirk" <2>
	/ac "Shirk" <2>
	/ac "Shirk" <2>
	/ac "Shirk" <2>
	/ac "Shirk" <2>
	/ac "Shirk" <2>
	/ac "Shirk" <2>
	/ac "Shirk" <2>
	/ac "Shirk" <2>
	/ac "Shirk" <2>
	/ac "Shirk" <2>
	/ac "Shirk" <2>
	/micon "Shirk"
_
Gear Sets and Consumables (Food, Potion)
Please see the Warrior’s main page for different gear sets. Some of the gear sets have very specific melds, some of which might go against the usual meld priority.
What’s the different GCD speeds? Why not just use the one with the highest simulated DPS?
The simulations are made with a simulated infinite rotational loop, which also heavily skews the value of skill speed.
Fights are not infinite, and often come with downtime.
Slower GCDs offer some rotational tricks to maximize party buff windows.
Simulations are also pure math based on our best understanding and knowledge of the game’s mechanics. Practice always differs from theory.
Credits
Hello team!
This guide was written by the Happy Warriors of the Balance discord!
Discord.gg @TheBalanceFFXIV
You can catch all of us in the Warrior channels, either posting Cats or Lizards, or discussing Pokemon cards.


